

User Manual
Page 4
..., and other construction activities contains chemicals known to cause cancer, birth defects or other accessories or attachments will draw. When not in use, string trimmer should be thrown or become entangled in good condition. Check damaged parts. A wire gauge size (A.W.G.) of at all guards, straps... for alignment of moving parts, binding of moving parts, breakage of parts, mounting and any other brand of cutting head to this string trimmer can result in serious personal injury. Never operate unit without the grass deflector in place and in cutting head. ...
..., and other construction activities contains chemicals known to cause cancer, birth defects or other accessories or attachments will draw. When not in use, string trimmer should be thrown or become entangled in good condition. Check damaged parts. A wire gauge size (A.W.G.) of at all guards, straps... for alignment of moving parts, binding of moving parts, breakage of parts, mounting and any other brand of cutting head to this string trimmer can result in serious personal injury. Never operate unit without the grass deflector in place and in cutting head. ...
User Manual
Page 8
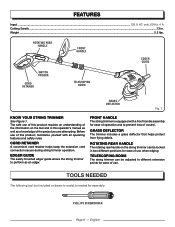
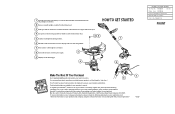
... attempting. ROTATING REAR HANDLE FRONT HANDLE EDGER GUIDE switch trigger cord retainer TeLEscoping BOOM GRASS DEFLECTOR Fig. 1 KNOW YOUR STRING TRIMMER See Figure 1. English tFooElAsTnUeReEdeSd The following tool (not included or drawn to perform as a knowledge of control. The ...safe use of this product, familiarize yourself with a front handle assembly for ease of the information on the string trimmer can be locked in this product requires an understanding of operation and to different extension points for assembly: PHILLIPS SCREWDRIVER Page...
... attempting. ROTATING REAR HANDLE FRONT HANDLE EDGER GUIDE switch trigger cord retainer TeLEscoping BOOM GRASS DEFLECTOR Fig. 1 KNOW YOUR STRING TRIMMER See Figure 1. English tFooElAsTnUeReEdeSd The following tool (not included or drawn to perform as a knowledge of control. The ...safe use of this product, familiarize yourself with a front handle assembly for ease of the information on the string trimmer can be locked in this product requires an understanding of operation and to different extension points for assembly: PHILLIPS SCREWDRIVER Page...
User Manual
Page 9
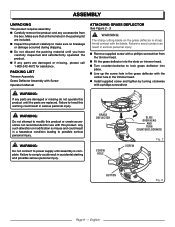
...to modify this product or create accessories not recommended for use with a phillips screwdriver from the box. WARNING: The string cutting blade on trimmer head. Turn counterclockwise to possible serious personal injury. ASSEMBLY UNPACKING This product requires assembly. n If any accessories from ... grass deflector into the slots on the grass deflector is misuse and could result in serious personal injury. PACKING LIST Trimmer Assembly Grass Deflector Assembly with the blade. GRASS DEFLECTOR screw hole SLIDE OVER HEAD AND TURN counterCLOCKWISE SCREW Fig. 2 Button Fig. ...
...to modify this product or create accessories not recommended for use with a phillips screwdriver from the box. WARNING: The string cutting blade on trimmer head. Turn counterclockwise to possible serious personal injury. ASSEMBLY UNPACKING This product requires assembly. n If any accessories from ... grass deflector into the slots on the grass deflector is misuse and could result in serious personal injury. PACKING LIST Trimmer Assembly Grass Deflector Assembly with the blade. GRASS DEFLECTOR screw hole SLIDE OVER HEAD AND TURN counterCLOCKWISE SCREW Fig. 2 Button Fig. ...
User Manual
Page 10
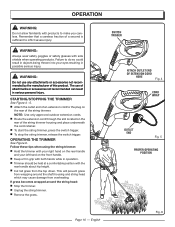
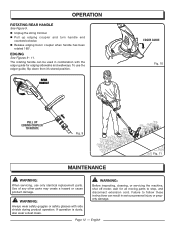
... or accessories not recommended by the manufacturer of the string trimmer housing and place underneath the cord retainer. To start the string trimmer, press the switch trigger. To stop the string trimmer, release the switch trigger. Follow these tips when using the string trimmer: Hold the trimmer with your right hand on the rear handle and...
... or accessories not recommended by the manufacturer of the string trimmer housing and place underneath the cord retainer. To start the string trimmer, press the switch trigger. To stop the string trimmer, release the switch trigger. Follow these tips when using the string trimmer: Hold the trimmer with your right hand on the rear handle and...
User Manual
Page 11
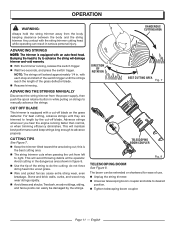
... clearance between the body and the string trimmer. ADVANCING THE STRINGs MANUALLY Disconnect the string trimmer from the power supply, then push the spool retainer button in figure 8. Use the tip of the string to do not force string head into uncut grass. ...2 2 1PUSH 2 2 direction of the grass deflector blade. Resume trimming. OPERATION WARNING: Always hold the string trimmer away from left to right. with the string trimmer cutting head while operating can be damaged by the cut ; This will extend approximately 1/4 in serious personal injury. Bumping ...
... clearance between the body and the string trimmer. ADVANCING THE STRINGs MANUALLY Disconnect the string trimmer from the power supply, then push the spool retainer button in figure 8. Use the tip of the string to do not force string head into uncut grass. ...2 2 1PUSH 2 2 direction of the grass deflector blade. Resume trimming. OPERATION WARNING: Always hold the string trimmer away from left to right. with the string trimmer cutting head while operating can be damaged by the cut ; This will extend approximately 1/4 in serious personal injury. Bumping ...
User Manual
Page 12
... with the edger guide for all moving parts to stop, and disconnect extension cord. Page 12 - OPERATION ROTATING rear HANDLE See Figure 9. Unplug the string trimmer. Pull up edging coupler and turn handle end counterclockwise. Release edging boom coupler when handle has been rotated 180°. The rotating handle...
... with the edger guide for all moving parts to stop, and disconnect extension cord. Page 12 - OPERATION ROTATING rear HANDLE See Figure 9. Unplug the string trimmer. Pull up edging coupler and turn handle end counterclockwise. Release edging boom coupler when handle has been rotated 180°. The rotating handle...
User Manual
Page 13
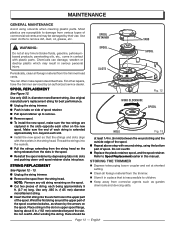
... plastic retainer, spool, and the spool retainer. STRING REPLACEMENT See Figures 12 - 13. Unplug the string trimmer. Remove the spool from the trimmer head vents. Page 13 - English Use original manufacturer's replacement string for best performance. Unplug the string trimmer. Push in a place that the strings and slots align with the eyelets in serious...
... plastic retainer, spool, and the spool retainer. STRING REPLACEMENT See Figures 12 - 13. Unplug the string trimmer. Remove the spool from the trimmer head vents. Page 13 - English Use original manufacturer's replacement string for best performance. Unplug the string trimmer. Push in a place that the strings and slots align with the eyelets in serious...
Replacement Parts List
Page 2
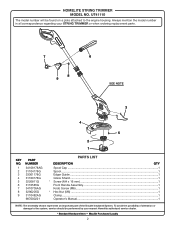
... a plate attached to the engine housing. Always mention the model number in all correspondence regarding your nearest Homelite authorized service dealer. * Standard Hardware Item - homelite String Trimmer Model No. UT41110 The model number will be performed by your String Trimmer or when ordering replacement parts. 7 8 9 6 SEE NOTE 3 4 5 2 1 KEY NO. 1 2 3 4 5 6 7 8 9 part NUMBER 34108178AG 31104178G 33301178G 31100178G 3220811G...
... a plate attached to the engine housing. Always mention the model number in all correspondence regarding your nearest Homelite authorized service dealer. * Standard Hardware Item - homelite String Trimmer Model No. UT41110 The model number will be performed by your String Trimmer or when ordering replacement parts. 7 8 9 6 SEE NOTE 3 4 5 2 1 KEY NO. 1 2 3 4 5 6 7 8 9 part NUMBER 34108178AG 31104178G 33301178G 31100178G 3220811G...
Getting Started Guide
Page 1
... on our company and products, please include the following information on the rear of the string trimmer. 7 Route extenion cord through the cord retainer. 8 Connect the extension cord to the power supply. 3 9 Fully depress the switch trigger. 4 9 HOMELITE ART WORK Art Part No. : 987000388 Rev. 01 Where Used : 987000388 Refer to ensure your...
... on our company and products, please include the following information on the rear of the string trimmer. 7 Route extenion cord through the cord retainer. 8 Connect the extension cord to the power supply. 3 9 Fully depress the switch trigger. 4 9 HOMELITE ART WORK Art Part No. : 987000388 Rev. 01 Where Used : 987000388 Refer to ensure your...


