
User Manual
Page 3
... A moment of inattention while operating the lawn mower may block your product will cause a drop in line voltage resulting in moving parts. Keep blades sharp and guards in place and in working condition. If the plug does not fit fully into the wall outlet, reverse the plug. An ...Keep clear of the discharge opening at the rate for which it is recommended when working condition. Stop the motor and wait until the blade comes to operate the product without proper instruction. Keep the area clear of rubber gloves and footwear is intended. Do not ...
... A moment of inattention while operating the lawn mower may block your product will cause a drop in line voltage resulting in moving parts. Keep blades sharp and guards in place and in working condition. If the plug does not fit fully into the wall outlet, reverse the plug. An ...Keep clear of the discharge opening at the rate for which it is recommended when working condition. Stop the motor and wait until the blade comes to operate the product without proper instruction. Keep the area clear of rubber gloves and footwear is intended. Do not ...
User Manual
Page 4
... of material toward anyone. Vibration is running. Avoid holes, ruts, bumps, rocks, or other safety protective devices in the blade area until the blade comes to a complete stop the motor and check immediately for the lawn mower. GENERAL SAFETY RULES Ground Fault Circuit Interrupter (GFCI...motor, disconnect the power cord, and wait until you are available having builtin GFCI protection and may be thrown by the lawn mower blade can cause severe injuries to persons. If you must be performed by an authorized service center to the product. Use only ...
... of material toward anyone. Vibration is running. Avoid holes, ruts, bumps, rocks, or other safety protective devices in the blade area until the blade comes to a complete stop the motor and check immediately for the lawn mower. GENERAL SAFETY RULES Ground Fault Circuit Interrupter (GFCI...motor, disconnect the power cord, and wait until you are available having builtin GFCI protection and may be thrown by the lawn mower blade can cause severe injuries to persons. If you must be performed by an authorized service center to the product. Use only ...

User Manual
Page 8
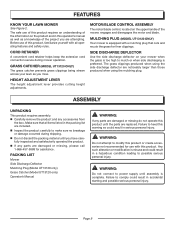
to 3-3/4 in. CORD RETAINER GRASS CATCHER (MODEL UT13120 ONLY) HEIGHT ADJUSTMENT LEVER MOTOR/BLADE CONTROL ASSEMBLY SIDE DISCHARGE DEFLECTOR MULCHING PLUG (MODEL UT13120 ONLY) Page 8 Fig. 2 Height Adjustments 1-3/4 in . to 3-3/4 in . FEATURES&#...
to 3-3/4 in. CORD RETAINER GRASS CATCHER (MODEL UT13120 ONLY) HEIGHT ADJUSTMENT LEVER MOTOR/BLADE CONTROL ASSEMBLY SIDE DISCHARGE DEFLECTOR MULCHING PLUG (MODEL UT13120 ONLY) Page 8 Fig. 2 Height Adjustments 1-3/4 in . to 3-3/4 in . FEATURES&#...
User Manual
Page 9
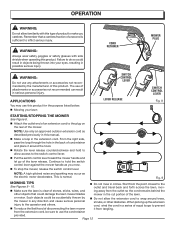
...features and safety rules. Make sure that cuts and recuts the grass for use of the mower, engages and disengages the motor and blade. PACKING LIST Mower Side Discharge Deflector Mulching Plug (Model UT13120 only) Grass Catcher (Model UT13120 only) Operator's Manual WARNING: If any... as you have carefully inspected and satisfactorily operated the product. If any accessories from the box. Page 9 MOTOR/BLADE CONTROL ASSEMBLY The motor/blade control, located on the product and in the packing list are included. Inspect the product carefully to heed this ...
...features and safety rules. Make sure that cuts and recuts the grass for use of the mower, engages and disengages the motor and blade. PACKING LIST Mower Side Discharge Deflector Mulching Plug (Model UT13120 only) Grass Catcher (Model UT13120 only) Operator's Manual WARNING: If any... as you have carefully inspected and satisfactorily operated the product. If any accessories from the box. Page 9 MOTOR/BLADE CONTROL ASSEMBLY The motor/blade control, located on the product and in the packing list are included. Inspect the product carefully to heed this ...
User Manual
Page 11
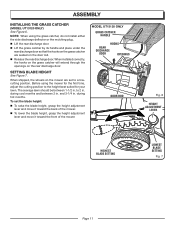
...the rear discharge door. MODEL UT13120 ONLY GRASS CATCHER HANDLE HOOKS REAR DISCHARGE DOOR OPENINGS DOOR ROD Fig. 6 HEIGHT ADJUSTMENT LEVER HIGHEST BLADE SETTING LOWEST BLADE SETTING Fig. 7 Page 11 NOTE: When using the mower for the first time, adjust the cutting position to the height best... suited for your lawn. SETTING BLADE HEIGHT See Figure 7. To set to 2 in . ASSEMBLY INSTALLING THE GRASS CATCHER (MODEL UT13120 ONLY) See Figure 6. Before using the grass ...
...the rear discharge door. MODEL UT13120 ONLY GRASS CATCHER HANDLE HOOKS REAR DISCHARGE DOOR OPENINGS DOOR ROD Fig. 6 HEIGHT ADJUSTMENT LEVER HIGHEST BLADE SETTING LOWEST BLADE SETTING Fig. 7 Page 11 NOTE: When using the mower for the first time, adjust the cutting position to the height best... suited for your lawn. SETTING BLADE HEIGHT See Figure 7. To set to 2 in . ASSEMBLY INSTALLING THE GRASS CATCHER (MODEL UT13120 ONLY) See Figure 6. Before using the grass ...
User Manual
Page 12
... retainer provided. Start from the extension cord, be accidentally thrown by the manufacturer of the lawn. Continue to do so could damage the lawn mower blades mower in the extension cord. Remember that could result in circles. or motor. WARNING: Always wear safety goggles or safety glasses with this manual. ...
... retainer provided. Start from the extension cord, be accidentally thrown by the manufacturer of the lawn. Continue to do so could damage the lawn mower blades mower in the extension cord. Remember that could result in circles. or motor. WARNING: Always wear safety goggles or safety glasses with this manual. ...
User Manual
Page 13
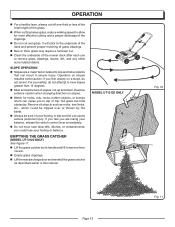
... grass. Tall grass can result in this manual. EMPTYING THE GRASS CATCHER (MODEL UT13120 ONLY) See Figure 11. Lift the grass catcher by the blade. Always be sure of your footing or balance. If you feel you feel uneasy on a slope, do not attempt to remove from mower. ...
... grass. Tall grass can result in this manual. EMPTYING THE GRASS CATCHER (MODEL UT13120 ONLY) See Figure 11. Lift the grass catcher by the blade. Always be sure of your footing or balance. If you feel you feel uneasy on a slope, do not attempt to remove from mower. ...
User Manual
Page 14
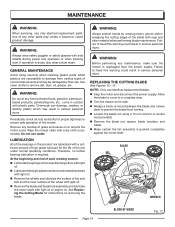
... grease, etc. Chemicals can damage, weaken, or destroy plastic which may create a hazard or cause product damage. Remove any other material when performing blade maintenance. Failure to a complete stop. Turn the mower on the rear discharge door with light oil. � Lubricate the height ...beginning and end of each mowing season: � Lubricate the springs on its side. � Wedge a block of the blade with light oil. � Remove the wheels and lubricate the surface of the axle bolt and the inner surface of any buildup of...
... grease, etc. Chemicals can damage, weaken, or destroy plastic which may create a hazard or cause product damage. Remove any other material when performing blade maintenance. Failure to a complete stop. Turn the mower on the rear discharge door with light oil. � Lubricate the height ...beginning and end of each mowing season: � Lubricate the springs on its side. � Wedge a block of the blade with light oil. � Remove the wheels and lubricate the surface of the axle bolt and the inner surface of any buildup of...
User Manual
Page 15
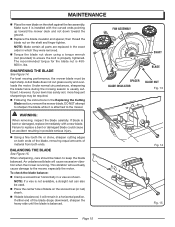
...wrench (not provided) to ensure the bolt is properly tightened. Failure to replace a bent or damaged blade could cause an accident resulting in the Replacing the Cutting Blade section, remove the mower blade. NOTE: If a vise is not available, a straight nail can also be required. ...finger tighten. If either end of material from both ends. BALANCING THE BLADE See Figure 15. An unbalanced blade will eventually cause damage to the mower, especially the motor. FAN ASSEMBLY SHAFT BLADE SPACER BLADE INSULATOR BLADE NUT Fig. 13 Fig. 14 Fig. 15 Page 15 This vibration...
...wrench (not provided) to ensure the bolt is properly tightened. Failure to replace a bent or damaged blade could cause an accident resulting in the Replacing the Cutting Blade section, remove the mower blade. NOTE: If a vise is not available, a straight nail can also be required. ...finger tighten. If either end of material from both ends. BALANCING THE BLADE See Figure 15. An unbalanced blade will eventually cause damage to the mower, especially the motor. FAN ASSEMBLY SHAFT BLADE SPACER BLADE INSULATOR BLADE NUT Fig. 13 Fig. 14 Fig. 15 Page 15 This vibration...
User Manual
Page 16
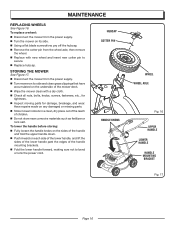
... Page 16 STORING THE MOWER See Figure 17. Disconnect the mower from the power supply. Turn mower on its side. Using a flat blade screwdriver, pry off the hubcap. Remove the cotter pin from the power supply. � Turn the mower on its side and clean grass...
... Page 16 STORING THE MOWER See Figure 17. Disconnect the mower from the power supply. Turn mower on its side. Using a flat blade screwdriver, pry off the hubcap. Remove the cotter pin from the power supply. � Turn the mower on its side and clean grass...
User Manual
Page 17
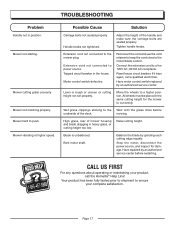
...in the house. Adjust the height of mower housing and blade dragging in the same cutting height for damage. Reconnect the cord and use the cord retainer to keep the cord close to cut evenly. If it trips again, call the Homelite® Help Line! Raise cutting height. All wheels must... be placed in heavy grass, or cutting height too low. Blade is rough or uneven or cutting height not set properly. Have repaired by an authorized...
...in the house. Adjust the height of mower housing and blade dragging in the same cutting height for damage. Reconnect the cord and use the cord retainer to keep the cord close to cut evenly. If it trips again, call the Homelite® Help Line! Raise cutting height. All wheels must... be placed in heavy grass, or cutting height too low. Blade is rough or uneven or cutting height not set properly. Have repaired by an authorized...
User Manual
Page 18
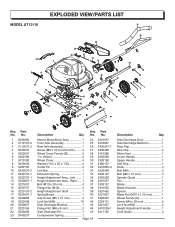
... Discharge Deflector 1 Rear Flap 1 Wire Clip 2 Motor Vent 1 Lower Handle 1 Upper Handle 1 Soft Grip 1 Knob 4 Bolt (M8 2 Bolt (M6 x 12 mm 3 Spindle Guard 1 Fan 1 Blade 1 Blade Insulator 1 Spacer 1 Blade Nut (M10 x 1.25 mm 1 Wheel Ferrule (A 1 Screw (M4 x 20 mm 2 Lock Nut (M4 2 Height Adjustment Handle 1 Cord Guide 3 No. EXPLODED VIEW49/PARTS LIST MODEL...
... Discharge Deflector 1 Rear Flap 1 Wire Clip 2 Motor Vent 1 Lower Handle 1 Upper Handle 1 Soft Grip 1 Knob 4 Bolt (M8 2 Bolt (M6 x 12 mm 3 Spindle Guard 1 Fan 1 Blade 1 Blade Insulator 1 Spacer 1 Blade Nut (M10 x 1.25 mm 1 Wheel Ferrule (A 1 Screw (M4 x 20 mm 2 Lock Nut (M4 2 Height Adjustment Handle 1 Cord Guide 3 No. EXPLODED VIEW49/PARTS LIST MODEL...
User Manual
Page 19
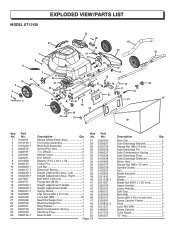
... (M6 x 8 mm 2 Side Discharge Pin 1 Side Compression Spring 1 Side Discharge Door 1 Side Discharge Deflector 1 Motor Vent 1 Flange Nut (M6 x 12 mm 3 Spindle Guard 1 Fan 1 Blade Insulator 1 Spacer 1 Blade 1 Blade Nut (M10 x 1.25 mm 1 Upper Handle 1 Lower Handle 1 Soft Grip 1 Bolt (M8 2 Screw (M4 x 20 mm pan hd 2 Grass Catcher Frame 1 Knob 4 Lock Nut...
... (M6 x 8 mm 2 Side Discharge Pin 1 Side Compression Spring 1 Side Discharge Door 1 Side Discharge Deflector 1 Motor Vent 1 Flange Nut (M6 x 12 mm 3 Spindle Guard 1 Fan 1 Blade Insulator 1 Spacer 1 Blade 1 Blade Nut (M10 x 1.25 mm 1 Upper Handle 1 Lower Handle 1 Soft Grip 1 Bolt (M8 2 Screw (M4 x 20 mm pan hd 2 Grass Catcher Frame 1 Knob 4 Lock Nut...
Parts List
Page 1
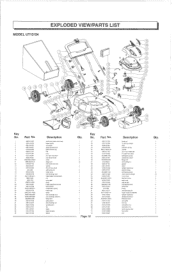
T LI T MODEL UT13124 2 3 5 0 6 7 8 9 10 e e 13 12 • tkeitm4 8 20 23 22 21 ota o ... adjustment handle spring board compression spring rubber cap screw side discharge door side discharge deflector flange bolt spring board side discharge pin spindle guard fan blade blade insulator spacer Qty. Key No. 1 37 1 38 2 39 1 40 1 41 2 42 4 43 1 44 2 45 4 46 ...8SJA005-10002 8141-517001 8184-282101 8413-517002 8413-517001 8020-516204 8181-516403 8025-516201 Description blade nut Tin left front wheel deck extension spring link bar 20 in left ) radiator resistance ...
T LI T MODEL UT13124 2 3 5 0 6 7 8 9 10 e e 13 12 • tkeitm4 8 20 23 22 21 ota o ... adjustment handle spring board compression spring rubber cap screw side discharge door side discharge deflector flange bolt spring board side discharge pin spindle guard fan blade blade insulator spacer Qty. Key No. 1 37 1 38 2 39 1 40 1 41 2 42 4 43 1 44 2 45 4 46 ...8SJA005-10002 8141-517001 8184-282101 8413-517002 8413-517001 8020-516204 8181-516403 8025-516201 Description blade nut Tin left front wheel deck extension spring link bar 20 in left ) radiator resistance ...
