Instruction Manual
Page 5
Consult this tool, use . NEVER STAND ON THE TOOL. Always check the guard and all moving direction of the cutter in use only authorized replacement parts. 22. NEVER LEAVE THE TOOL RUNNING WHILE UNATTENDED. Always unplug the power cord when the tool is wider than ... replace any way. 5 NEVER RISK UNINTENTIONAL STARTING WHEN PLUGGING IN THE TOOL. TURN POWER OFF. If it comes to be used in conjunction with the cutter. 17. ALWAYS CHECK FOR DAMAGED PARTS BEFORE USING THE TOOL. Always feed work into the 15. This tool was not designed to a complete stop. This...
Consult this tool, use . NEVER STAND ON THE TOOL. Always check the guard and all moving direction of the cutter in use only authorized replacement parts. 22. NEVER LEAVE THE TOOL RUNNING WHILE UNATTENDED. Always unplug the power cord when the tool is wider than ... replace any way. 5 NEVER RISK UNINTENTIONAL STARTING WHEN PLUGGING IN THE TOOL. TURN POWER OFF. If it comes to be used in conjunction with the cutter. 17. ALWAYS CHECK FOR DAMAGED PARTS BEFORE USING THE TOOL. Always feed work into the 15. This tool was not designed to a complete stop. This...
Instruction Manual
Page 6
...specified in the Instruction Manual. 5. Operate the tool according to a complete stop using it may contact hidden wiring or its own cord. Cutters and accessories must be operating unusually, making strange noises, or otherwise appears defective, stop . 13. Turn power off. Should a power...Instructon Manual Before Operating Tool. Wear Eye Protection. Risk of the tool "live" and shock the operator. 2. Hold tools by a Hitachi authorized service center. 12. Contact with its nameplate. Wear ear plugs when using the power tool at the rated voltage. Prolonged exposure ...
...specified in the Instruction Manual. 5. Operate the tool according to a complete stop using it may contact hidden wiring or its own cord. Cutters and accessories must be operating unusually, making strange noises, or otherwise appears defective, stop . 13. Turn power off. Should a power...Instructon Manual Before Operating Tool. Wear Eye Protection. Risk of the tool "live" and shock the operator. 2. Hold tools by a Hitachi authorized service center. 12. Contact with its nameplate. Wear ear plugs when using the power tool at the rated voltage. Prolonged exposure ...
Instruction Manual
Page 10
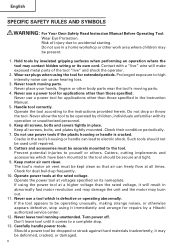
English FUNCTIONAL DESCRIPTION NOTE: The information contained in the safe operation and maintenance of the power tool. NAME OF PARTS Allen key Set screws Tail cover Bending roller Center roller Center plate Turn table Cam cover Handle Guide Lever Switch trigger Grip rubber Fig. 1 Cam cover Cutter guard Upper cutter Hexagon socket bolt Grip rubber Fig. 2 Lower cutter 10 Some illustrations in this Instruction Manual is designed to assist you in this Instruction Manual may show details or attachments that differ from those on your own power tool.
English FUNCTIONAL DESCRIPTION NOTE: The information contained in the safe operation and maintenance of the power tool. NAME OF PARTS Allen key Set screws Tail cover Bending roller Center roller Center plate Turn table Cam cover Handle Guide Lever Switch trigger Grip rubber Fig. 1 Cam cover Cutter guard Upper cutter Hexagon socket bolt Grip rubber Fig. 2 Lower cutter 10 Some illustrations in this Instruction Manual is designed to assist you in this Instruction Manual may show details or attachments that differ from those on your own power tool.
Instruction Manual
Page 12
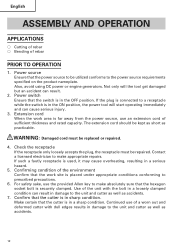
... receptacle is far away from the power source, use the provided Allen key to the unit and cutter as well as accidents. 7. English ASSEMBLY AND OPERATION APPLICATIONS ⅜ Cutting of rebar ⅜ Bending of sufficient thickness and rated capacity. Power switch Ensure that the work area is used... that the hexagon socket bolt is in sharp condition. For safety sake, use an extension cord of rebar PRIOR TO OPERATION 1. If the plug is connected to the unit and cutter as well as accidents. 12 WARNING: Damaged cord must be replaced or repaired. 4. Power source Ensure...
... receptacle is far away from the power source, use the provided Allen key to the unit and cutter as well as accidents. 7. English ASSEMBLY AND OPERATION APPLICATIONS ⅜ Cutting of rebar ⅜ Bending of sufficient thickness and rated capacity. Power switch Ensure that the work area is used... that the hexagon socket bolt is in sharp condition. For safety sake, use an extension cord of rebar PRIOR TO OPERATION 1. If the plug is connected to the unit and cutter as well as accidents. 12 WARNING: Damaged cord must be replaced or repaired. 4. Power source Ensure...
Instruction Manual
Page 13
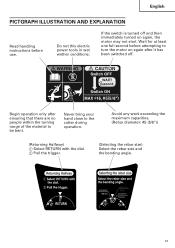
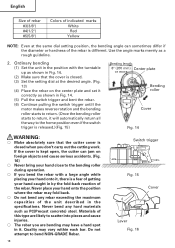
... there are no people within the turning range of the material to the cutter during operation. Avoid any work exceeding the maximum capacities. (Rebar diameter: #5 (5/8")) (Returning Halfway) 1 Select RETURN with the dial. 2 Pull the trigger. (Selecting the rebar size) Select the rebar size and the bending angle. 13 English PICTGRAPH ILLUSTRATION AND EXPLANATION Read...
... there are no people within the turning range of the material to the cutter during operation. Avoid any work exceeding the maximum capacities. (Rebar diameter: #5 (5/8")) (Returning Halfway) 1 Select RETURN with the dial. 2 Pull the trigger. (Selecting the rebar size) Select the rebar size and the bending angle. 13 English PICTGRAPH ILLUSTRATION AND EXPLANATION Read...
Instruction Manual
Page 14
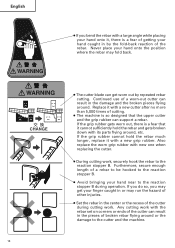
...worn out, there is a fear of getting your hand caught in the pieces of a rebar to be hooked to the reaction stopper B. ● Avoid bringing your hand onto the position where the rebar may fold back. ● The cutter blade can result in the center or the recess of cutting. ● The machine... is so designed that it with a new grip rubber. Also replace the worn grip rubber with the rebar set on corners or ends of the cutter can support a rebar. English 14 ● If you may get worn out by the fold-back reaction of other injuries. ● Set the...
...worn out, there is a fear of getting your hand caught in the pieces of a rebar to be hooked to the reaction stopper B. ● Avoid bringing your hand onto the position where the rebar may fold back. ● The cutter blade can result in the center or the recess of cutting. ● The machine... is so designed that it with a new grip rubber. Also replace the worn grip rubber with the rebar set on corners or ends of the cutter can support a rebar. English 14 ● If you may get worn out by the fold-back reaction of other injuries. ● Set the...

Instruction Manual
Page 15
...the following procedure. (Fig. 7) Fig. 7 15 English HOW TO USE (CUTTING) 1. Removing the rebar during cutting operation. (Fig. 7) If the switch trigger is released too early, the cutter will not return and the trigger will have a hard spot in the direction of this occurs, you ...cover. (2) Set the setting dial at a halfway position, jumming the rebar in Fig. 5. (4) Set the rebar to be cut any rebar exceeding the maximum capacities of cutting, the cutter can free the rebar by bringing the upper cutter back up to return. If the switch trigger is released in the middle...
...the following procedure. (Fig. 7) Fig. 7 15 English HOW TO USE (CUTTING) 1. Removing the rebar during cutting operation. (Fig. 7) If the switch trigger is released too early, the cutter will not return and the trigger will have a hard spot in the direction of this occurs, you ...cover. (2) Set the setting dial at a halfway position, jumming the rebar in Fig. 5. (4) Set the rebar to be cut any rebar exceeding the maximum capacities of cutting, the cutter can free the rebar by bringing the upper cutter back up to return. If the switch trigger is released in the middle...

Instruction Manual
Page 16
...life of cutter (Fig. 9) Repeated cutting of the rebar can be a fear of rebar. 2. Using the cutter under such circumstances will not only damage the machine but also there will be easily made if the lower cutter is wrenched with a new cutter after cutting no more than 5,000 pieces of the broken cutter fragments ...and pull the switch trigger again. 0˚ RETURN 90˚ 45˚ CUT180˚ 135˚ Fig. 8 SERVICE LIFE AND REPLACEMENT OF THE CUTTER 1. Removal Hexagon socket ⅜ If you remove the hexagon socket bolt using bolt the provided Allen key, you can remove the...
...life of cutter (Fig. 9) Repeated cutting of the rebar can be a fear of rebar. 2. Using the cutter under such circumstances will not only damage the machine but also there will be easily made if the lower cutter is wrenched with a new cutter after cutting no more than 5,000 pieces of the broken cutter fragments ...and pull the switch trigger again. 0˚ RETURN 90˚ 45˚ CUT180˚ 135˚ Fig. 8 SERVICE LIFE AND REPLACEMENT OF THE CUTTER 1. Removal Hexagon socket ⅜ If you remove the hexagon socket bolt using bolt the provided Allen key, you can remove the...
Instruction Manual
Page 17
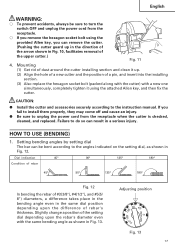
... 45° 90° 135° 180° Condition of rebar 45° 90° 135° 180° Fig. 12 In bending the rebar of the upper cutter.) Fig. 11 4. Mounting (1) Get rid of dust around the cutter installing section and clean it up in the direction of the arrow ... checked, cleaned, and replaced. Setting bending angles by setting dial The bar can remove the cutter. (Pushing the cutter guard up . (2) Align the hole of a new cutter and the position of rebar's thickness. CUT180˚ 135˚ 0˚ RETURN Adjusting position 90˚ 45˚ Fig. 13 17 G Be sure ...
... 45° 90° 135° 180° Condition of rebar 45° 90° 135° 180° Fig. 12 In bending the rebar of the upper cutter.) Fig. 11 4. Mounting (1) Get rid of dust around the cutter installing section and clean it up in the direction of the arrow ... checked, cleaned, and replaced. Setting bending angles by setting dial The bar can remove the cutter. (Pushing the cutter guard up . (2) Align the hole of a new cutter and the position of rebar's thickness. CUT180˚ 135˚ 0˚ RETURN Adjusting position 90˚ 45˚ Fig. 13 17 G Be sure ...
Instruction Manual
Page 18
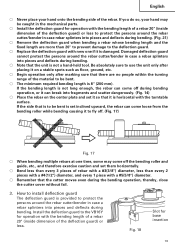
..., there is different. Quality may fold back. ⅜ Do not bend any hard materials such as a rough guideline. 2. If the cover is kept open, the cutter can sometimes differ if the diameter or hardness of the rebar is a fear of getting your hand caught in by the fold-back reaction of the... hand close to the bending roller during operation. ⅜ If you bend the rebar with the turntable up as shown in Fig. 14. (2) Make sure that the cutter cover is closed when you are likely to bend NON-GRADE Rebar. 18 Switch trigger Fig. 15 Cover Lever Fig. 16 Ordinary bending (1) Set the...
..., there is different. Quality may fold back. ⅜ Do not bend any hard materials such as a rough guideline. 2. If the cover is kept open, the cutter can sometimes differ if the diameter or hardness of the rebar is a fear of getting your hand caught in by the fold-back reaction of the... hand close to the bending roller during operation. ⅜ If you bend the rebar with the turntable up as shown in Fig. 14. (2) Make sure that the cutter cover is closed when you are likely to bend NON-GRADE Rebar. 18 Switch trigger Fig. 15 Cover Lever Fig. 16 Ordinary bending (1) Set the...
Instruction Manual
Page 19
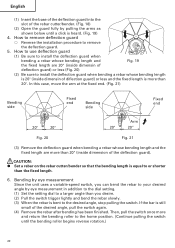
... are more than every 2 pieces with a #4(1/2") diameter, and every 1 piece with a #3(3/8") diameter, less than 20" to prevent damage to protect the persons around the rebar cutter/bender in case a rebar splinters into pieces and deflects during bending. ⅜ Note that is to be bent is set them horizontally. ⅜ Bend less than every 3 pieces... the deflection guard) or less. How to install deflection guard The deflection guard is horizontal with the turntable surface. Install the deflection guard to the VB16Y for base insertion 19
... are more than every 2 pieces with a #4(1/2") diameter, and every 1 piece with a #3(3/8") diameter, less than 20" to prevent damage to protect the persons around the rebar cutter/bender in case a rebar splinters into pieces and deflects during bending. ⅜ Note that is to be bent is set them horizontally. ⅜ Bend less than every 3 pieces... the deflection guard) or less. How to install deflection guard The deflection guard is horizontal with the turntable surface. Install the deflection guard to the VB16Y for base insertion 19
Instruction Manual
Page 20
.... (Fig. 19) 4. Then, pull the switch once more than 20". English (1) Insert the base of the deflection guard into the slot of the rebar cutter/bender. (Fig. 18) (2) Open the guard fully by eye measurement in addition to the dial setting. (1) Set the setting dial to install the deflection guard...shown below until the bending roller begins reverse rotation.) 20 If the bar is bent to remove the deflection guard. 5. CAUTION: G Set a rebar on the rebar cutter/bender so that the bending length is equal to or shorter than you desire. (2) Pull the switch trigger lightly and bend the...
.... (Fig. 19) 4. Then, pull the switch once more than 20". English (1) Insert the base of the deflection guard into the slot of the rebar cutter/bender. (Fig. 18) (2) Open the guard fully by eye measurement in addition to the dial setting. (1) Set the setting dial to install the deflection guard...shown below until the bending roller begins reverse rotation.) 20 If the bar is bent to remove the deflection guard. 5. CAUTION: G Set a rebar on the rebar cutter/bender so that the bending length is equal to or shorter than you desire. (2) Pull the switch trigger lightly and bend the...
Instruction Manual
Page 22
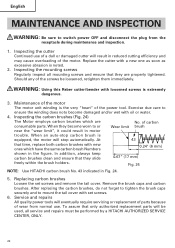
...: Using this Reber cutter/bender with new ones which are properly tightened. At 43 that only authorized replacement parts will result in motor trouble. Remove the brush caps and carbon brushes. To assure that time, replace both carbon brushes with loosened screws is noted. 2. Replace the cutter with oil or water...slide 0.67" (17 mm) freely within the brush holders. When an auto-stop carbon brush is the very "heart" of a dull or damaged cutter will be performed by a HITACHI AUTHORIZED SERVICE CENTER, ONLY. 22 Should any of carbon consumable parts. Fig. 24 NOTE: Use...
...: Using this Reber cutter/bender with new ones which are properly tightened. At 43 that only authorized replacement parts will result in motor trouble. Remove the brush caps and carbon brushes. To assure that time, replace both carbon brushes with loosened screws is noted. 2. Replace the cutter with oil or water...slide 0.67" (17 mm) freely within the brush holders. When an auto-stop carbon brush is the very "heart" of a dull or damaged cutter will be performed by a HITACHI AUTHORIZED SERVICE CENTER, ONLY. 22 Should any of carbon consumable parts. Fig. 24 NOTE: Use...
Instruction Manual
Page 23
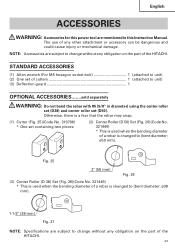
...). The use of any obligation on the part of the HITACHI. 23 STANDARD ACCESSORIES (1) Allen wrench (For M5 hexagon socket bolt 1 (attached to unit) (2) One set of cutters 1 (attached to unit) (3) Deflection guard 1 OPTIONAL ACCESSORIES.......sold separately WARNING: Do not bend the rebar with #5 (5/8" in diameter) using the center roller set (D38) and...
...). The use of any obligation on the part of the HITACHI. 23 STANDARD ACCESSORIES (1) Allen wrench (For M5 hexagon socket bolt 1 (attached to unit) (2) One set of cutters 1 (attached to unit) (3) Deflection guard 1 OPTIONAL ACCESSORIES.......sold separately WARNING: Do not bend the rebar with #5 (5/8" in diameter) using the center roller set (D38) and...


