
Instruction Manual
Page 7
... strange noises, or otherwise appears defective, stop . 15. Solvents such as a disc grinder. 22. hertz A amperes no no load speed W watt ........... Pay strict attention to securely grip the Sander Polisher. 21. Do not wipe them with such solvents. Always hold the body handle... use a tool which is running unattended. NEVER leave tool running . 26. Carefully handle power tools. Definitions for repairs by a Hitachi authorized service center. 14. English 13. Do not operate on this machine near welding machine. 23. Should the revolving speed suddenly ...
... strange noises, or otherwise appears defective, stop . 15. Solvents such as a disc grinder. 22. hertz A amperes no no load speed W watt ........... Pay strict attention to securely grip the Sander Polisher. 21. Do not wipe them with such solvents. Always hold the body handle... use a tool which is running unattended. NEVER leave tool running . 26. Carefully handle power tools. Definitions for repairs by a Hitachi authorized service center. 14. English 13. Do not operate on this machine near welding machine. 23. Should the revolving speed suddenly ...
Instruction Manual
Page 11
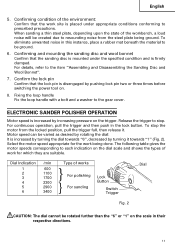
...pin two or three times before switching the power tool on the trigger. ELECTRONIC SANDER POLISHER OPERATION Motor speed is placed under the specified condition and is disengaged by turning ... work site is increased by increasing pressure on . 8. Confirming and mounting the sanding disc and wool bonnet Confirm that the lock pin is firmly clamped. For continuous operation, ...the dial scale and shows the types of works Dial 1 2 3 600 1100 1700 } For polishing Lock 4 5 6 2300 2900 3400 } For sanding Button Switch Trigger Fig. 2 CAUTION: The dial cannot be ground. 6. To ...
...pin two or three times before switching the power tool on the trigger. ELECTRONIC SANDER POLISHER OPERATION Motor speed is placed under the specified condition and is disengaged by turning ... work site is increased by increasing pressure on . 8. Confirming and mounting the sanding disc and wool bonnet Confirm that the lock pin is firmly clamped. For continuous operation, ...the dial scale and shows the types of works Dial 1 2 3 600 1100 1700 } For polishing Lock 4 5 6 2300 2900 3400 } For sanding Button Switch Trigger Fig. 2 CAUTION: The dial cannot be ground. 6. To ...
Instruction Manual
Page 12
... it is danger that the motor will resume rotation at the correct motor speed. 2. Polishing with wool bonnet using fine sanding disc. There is treated for finishing. Precaution after use Do not lay the sander polisher down even when loaded. Polishing compound or wax are many shavings and much dirt and dust until it will...
... it is danger that the motor will resume rotation at the correct motor speed. 2. Polishing with wool bonnet using fine sanding disc. There is treated for finishing. Precaution after use Do not lay the sander polisher down even when loaded. Polishing compound or wax are many shavings and much dirt and dust until it will...
Instruction Manual
Page 13
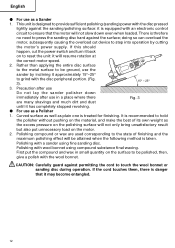
... firmly secure it by tying a string around it from the receptacle to avoid serious trouble. ⅷ For use as a Sander (Fig. 4) (1) After placing the sanding disc on the rubber pad, thread the washer nut onto the spindle. (2) Press the lock pin to secure the spindle and tighten...Hood Fig. 6 13 English ASSEMBLING AND DISASSEMBLING THE SANDING DISC AND WOOL BONNET WARNING: Be sure to switch power OFF and disconnect the plug from flying out while polishing. Washer Nut Rubber Pad Sanding Disc Spindle ⅷ For use as a Polisher (Fig. 5) (1) Insert the washer nut through the rubber...
... firmly secure it by tying a string around it from the receptacle to avoid serious trouble. ⅷ For use as a Sander (Fig. 4) (1) After placing the sanding disc on the rubber pad, thread the washer nut onto the spindle. (2) Press the lock pin to secure the spindle and tighten...Hood Fig. 6 13 English ASSEMBLING AND DISASSEMBLING THE SANDING DISC AND WOOL BONNET WARNING: Be sure to switch power OFF and disconnect the plug from flying out while polishing. Washer Nut Rubber Pad Sanding Disc Spindle ⅷ For use as a Polisher (Fig. 5) (1) Insert the washer nut through the rubber...
Instruction Manual
Page 14
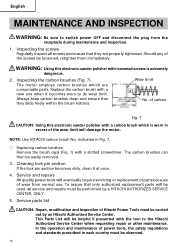
... inspection. 1. Wear limit 43 No. Service parts list CAUTION: Repair, modification and inspection of carbon Fig. 7 CAUTION: Using this electronic sander polisher with a new one when it at once. 4. The carbon brushes can then be loosened, retighten them immediately. Cleaning lock pin section If...country must be helpful if presented with the tool to switch power OFF and disconnect the plug from normal use. of Hitachi Power Tools must be performed by an Hitachi Authorized Service Center. indicated in Fig. 7. ⅜ Replacing carbon brushes: Remove the brush caps (Fig. 1) ...
... inspection. 1. Wear limit 43 No. Service parts list CAUTION: Repair, modification and inspection of carbon Fig. 7 CAUTION: Using this electronic sander polisher with a new one when it at once. 4. The carbon brushes can then be loosened, retighten them immediately. Cleaning lock pin section If...country must be helpful if presented with the tool to switch power OFF and disconnect the plug from normal use. of Hitachi Power Tools must be performed by an Hitachi Authorized Service Center. indicated in Fig. 7. ⅜ Replacing carbon brushes: Remove the brush caps (Fig. 1) ...