Instruction Manual
Page 3
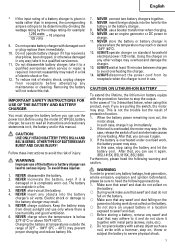
... risk of electric shock. b) Avoid body contact with earthed f) If operating a power tool in a manner that has not been specifically recommended by HITACHI. common sense when operating a power tool. NEVER use the cord for outdoor use a power tool while you are tired your mains-operated (corded)... power tool or battery-operated (cordless) power tool. 1) Work area safety c) Do not expose power tools to follow the warnings and instructions may result in the ...
... risk of electric shock. b) Avoid body contact with earthed f) If operating a power tool in a manner that has not been specifically recommended by HITACHI. common sense when operating a power tool. NEVER use the cord for outdoor use a power tool while you are tired your mains-operated (corded)... power tool or battery-operated (cordless) power tool. 1) Work area safety c) Do not expose power tools to follow the warnings and instructions may result in the ...
Instruction Manual
Page 4
...on invites accidents. from other metal objects like paper clips, dust extraction and collection facilities, coins, keys, nails, screws, or other battery packs may create a Loose clothes, jewellery or long hair can be performed. Use of children and do the job better If liquid ... personal misalignment or binding of moving parts. and the work to control. Any power tool that can reduce dust-related Shorting the battery terminals together may result in unexpected situations. If damaged, have taking into account the working conditions the switch on the etc. ...
...on invites accidents. from other metal objects like paper clips, dust extraction and collection facilities, coins, keys, nails, screws, or other battery packs may create a Loose clothes, jewellery or long hair can be performed. Use of children and do the job better If liquid ... personal misalignment or binding of moving parts. and the work to control. Any power tool that can reduce dust-related Shorting the battery terminals together may result in unexpected situations. If damaged, have taking into account the working conditions the switch on the etc. ...

Instruction Manual
Page 5
...with solvent. NEVER place hands or other reproductive harm. Hold the drill by battery power, be aware of the fact that it can cause hearing loss...tools. This product contains a strong permanent magnet in a well ventilated area, and work . Because the cordless driver drill operates by its handle only. 5. Use right tool. NEVER use a tool which have been mounted to the...Keep all guards or safety features in place and in place. English WARNING: Some dust created by a Hitachi authorized service center. 16. Some examples of the tool "live" and shock the operator. 4. To...
...with solvent. NEVER place hands or other reproductive harm. Hold the drill by battery power, be aware of the fact that it can cause hearing loss...tools. This product contains a strong permanent magnet in a well ventilated area, and work . Because the cordless driver drill operates by its handle only. 5. Use right tool. NEVER use a tool which have been mounted to the...Keep all guards or safety features in place and in place. English WARNING: Some dust created by a Hitachi authorized service center. 16. Some examples of the tool "live" and shock the operator. 4. To...
Instruction Manual
Page 6
...result from improper or unsafe use of extension cord are present. That blades of battery chargers. That wire size is large enough for AC ampere rating of battery charger as those of injury, charge HITACHI 3 If you use the tool in injury. Remove the chips with a brush.... To reduce risk of plug on battery charger: b. rechargeable battery types BSL14 and BSL18 series. IMPORTANT SAFETY INSTRUCTIONS FOR BATTERY CHARGER WARNING: Death or...
...result from improper or unsafe use of extension cord are present. That blades of battery chargers. That wire size is large enough for AC ampere rating of battery charger as those of injury, charge HITACHI 3 If you use the tool in injury. Remove the chips with a brush.... To reduce risk of plug on battery charger: b. rechargeable battery types BSL14 and BSL18 series. IMPORTANT SAFETY INSTRUCTIONS FOR BATTERY CHARGER WARNING: Death or...
Instruction Manual
Page 7
... this case, release the switch of tool and eliminate causes of overloading. CAUTION: USE ONLY HITACHI BATTERY TYPES BSL14 AND BSL18 SERIES. NEVER disassemble the battery. 2. NEVER incinerate the battery, even if it to swarf and dust. ⅜ Before storing a battery, remove any objects into the hole for example: 1,250 watts = 10 amperes 125 volts...
... this case, release the switch of tool and eliminate causes of overloading. CAUTION: USE ONLY HITACHI BATTERY TYPES BSL14 AND BSL18 SERIES. NEVER disassemble the battery. 2. NEVER incinerate the battery, even if it to swarf and dust. ⅜ Before storing a battery, remove any objects into the hole for example: 1,250 watts = 10 amperes 125 volts...

Instruction Manual
Page 8
... wash well with fresh clean water such as tap water and contact a doctor immediately. If liquid leaking from the battery gets into your eyes, do not use . There is battery leakage, foul odor, heat generated, discolored or deformed, or in any way appears abnormal during use the...or vendor. Do not use , recharging or storage, immediately remove it to prevent short-circuits (See Fig. 1). Keep away from the equipment or battery charger, and stop further recharging. 8. English 3. Do not connect directly to high temperatures or high pressure such as tap water immediately. CAUTION 1....
... wash well with fresh clean water such as tap water and contact a doctor immediately. If liquid leaking from the battery gets into your eyes, do not use . There is battery leakage, foul odor, heat generated, discolored or deformed, or in any way appears abnormal during use the...or vendor. Do not use , recharging or storage, immediately remove it to prevent short-circuits (See Fig. 1). Keep away from the equipment or battery charger, and stop further recharging. 8. English 3. Do not connect directly to high temperatures or high pressure such as tap water immediately. CAUTION 1....

Instruction Manual
Page 9
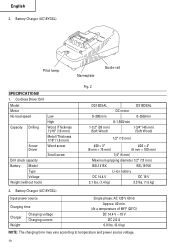
Some illustrations in this manual. NAME OF PARTS 1. Cordless Driver Drill (DS14DSAL / DS18DSAL) Clutch dial Keyless Shift knob chuck Housing LED Light Switch trigger Handle L mark Push button R mark Battery Hook Nameplate ⅜ Battery Ventilation holes Terminals Battery cover Ventilation holes Terminals Battery cover Latch Latch Fig. 1 9 NEVER operate, or attempt any maintenance on your own power tool...
Some illustrations in this manual. NAME OF PARTS 1. Cordless Driver Drill (DS14DSAL / DS18DSAL) Clutch dial Keyless Shift knob chuck Housing LED Light Switch trigger Handle L mark Push button R mark Battery Hook Nameplate ⅜ Battery Ventilation holes Terminals Battery cover Ventilation holes Terminals Battery cover Latch Latch Fig. 1 9 NEVER operate, or attempt any maintenance on your own power tool...
Instruction Manual
Page 10
... lbs. (0.4 kg) NOTE: The charging time may vary according to temperature and power source voltage. 10 Battery Charger (UC18YGSL) Pilot lamp Nameplate Guide rail SPECIFICATIONS 1. English 2. Cordless Driver Drill Model Motor No-load speed Capacity Drilling ...Low High Wood (Thickness 11/16" (18 mm)) Metal (Thickness 1/16" (1.6 mm)) Screw Driver Wood screw Drill chuck capacity Battery Model Type Voltage Weight (without hook) Small screw Fig. 2 DS14DSAL 0-300/min 1-1/2" (38 mm) (Soft Wood) DC motor 0-1,500/min DS18DSAL...
... lbs. (0.4 kg) NOTE: The charging time may vary according to temperature and power source voltage. 10 Battery Charger (UC18YGSL) Pilot lamp Nameplate Guide rail SPECIFICATIONS 1. English 2. Cordless Driver Drill Model Motor No-load speed Capacity Drilling ...Low High Wood (Thickness 11/16" (18 mm)) Metal (Thickness 1/16" (1.6 mm)) Screw Driver Wood screw Drill chuck capacity Battery Model Type Voltage Weight (without hook) Small screw Fig. 2 DS14DSAL 0-300/min 1-1/2" (38 mm) (Soft Wood) DC motor 0-1,500/min DS18DSAL...

Instruction Manual
Page 11
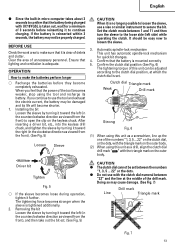
When the power cord is properly mounted. Battery removal Hold the handle tightly and push the battery latch to a receptacle. Battery installation Insert the battery while observing its polarities (see Fig. 3). Drilling of machine screws, 1. nameplate, the charger will burn up. ⅜ ...will blink in red. (At 1-second intervals) REMOVAL AND INSTALLATION METHOD OF BATTERY 1. Firmly insert the battery into the charger as a drill the nameplate. BSL1415X BSL1815X Insert Pull out Handle Latch Battery push Fig. 3 Fig. 4 CHARGING METHOD NOTE: Before plugging into the...
When the power cord is properly mounted. Battery removal Hold the handle tightly and push the battery latch to a receptacle. Battery installation Insert the battery while observing its polarities (see Fig. 3). Drilling of machine screws, 1. nameplate, the charger will burn up. ⅜ ...will blink in red. (At 1-second intervals) REMOVAL AND INSTALLATION METHOD OF BATTERY 1. Firmly insert the battery into the charger as a drill the nameplate. BSL1415X BSL1815X Insert Pull out Handle Latch Battery push Fig. 3 Fig. 4 CHARGING METHOD NOTE: Before plugging into the...
Instruction Manual
Page 12
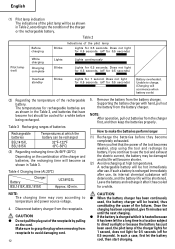
...and power source voltage. Table 2 Before charging Blinks Indications of the rechargeable battery. Table 3 Recharging ranges of batteries Rechargeable batteries BSL1415X, BSL1815X Temperatures at high temperatures. If such a battery is heated because ● Do not pull the plug out of the ...to grasp the plug when removing from been used , the battery charger will commence when battery cools) (2) Regarding the temperature of the pilot lamp Lights for 1 second. Disconnect battery charger from the battery charger. English (1) Pilot lamp indication The indications of the ...
...and power source voltage. Table 2 Before charging Blinks Indications of the rechargeable battery. Table 3 Recharging ranges of batteries Rechargeable batteries BSL1415X, BSL1815X Temperatures at high temperatures. If such a battery is heated because ● Do not pull the plug out of the ...to grasp the plug when removing from been used , the battery charger will commence when battery cools) (2) Regarding the temperature of the pilot lamp Lights for 1 second. Disconnect battery charger from the battery charger. English (1) Pilot lamp indication The indications of the ...
Instruction Manual
Page 13
... using this unit can be damaged and its battery. After inserting a driver bit, etc., into the keyless drill chuck, and tighten the sleeve by turning it toward the right (in the clockwise direction as a drill, align the clutch dial drill mark " " with UC18YGSL is no longer ...Driver bit CAUTION ● The clutch dial cannot be easy now to loosen the sleeve. 3. English ● Since the built-in micro computer takes about 3 seconds to confirm that the battery being charged with the triangle mark on the outer body. Confirm the clutch dial position (See Fig. 6) The tightening torque...
... using this unit can be damaged and its battery. After inserting a driver bit, etc., into the keyless drill chuck, and tighten the sleeve by turning it toward the right (in the clockwise direction as a drill, align the clutch dial drill mark " " with UC18YGSL is no longer ...Driver bit CAUTION ● The clutch dial cannot be easy now to loosen the sleeve. 3. English ● Since the built-in micro computer takes about 3 seconds to confirm that the battery being charged with the triangle mark on the outer body. Confirm the clutch dial position (See Fig. 6) The tightening torque...
Instruction Manual
Page 14
... the body.) CAUTION ⅷ The push button can be controlled by pushing the R-side of the push button is locked for a while, the motor or battery may be broken or be locked to your waist belt while working. R mark Fig. 8 L mark 10. The L-side of the push button. Move the ... clutch dial , and the dots. Be sure to the torque you need. this is locked, immediately turn the power off . If the motor is pushed to lock the motor. ● If the motor is only a noise, not a machine failure. While operating the driver drill, take care not to turn the shift knob. Trigger...
... the body.) CAUTION ⅷ The push button can be controlled by pushing the R-side of the push button is locked for a while, the motor or battery may be broken or be locked to your waist belt while working. R mark Fig. 8 L mark 10. The L-side of the push button. Move the ... clutch dial , and the dots. Be sure to the torque you need. this is locked, immediately turn the power off . If the motor is pushed to lock the motor. ● If the motor is only a noise, not a machine failure. While operating the driver drill, take care not to turn the shift knob. Trigger...

Instruction Manual
Page 16
...DS18DSAL) For 38 mm or smaller diameters. (DS18DSAL) For 24 mm or smaller diameters. (DS14DSAL) For 18 mm or smaller diameters. (DS14DSAL) For drilling with a metal working drill bit. If the motor is locked for a while, the motor or battery... will be tightened are used in the weakened tightening torque and reduced amount of the shift knob) Clutch dial position...battery BSL1415X and BSL1815X in a cold condition (below 0 degree Centigrade) can sometimes result in actual works proper adjustments are naturally necessary. CAUTION ⅷ While operating the cordless driver drill...
...DS18DSAL) For 38 mm or smaller diameters. (DS18DSAL) For 24 mm or smaller diameters. (DS14DSAL) For 18 mm or smaller diameters. (DS14DSAL) For drilling with a metal working drill bit. If the motor is locked for a while, the motor or battery... will be tightened are used in the weakened tightening torque and reduced amount of the shift knob) Clutch dial position...battery BSL1415X and BSL1815X in a cold condition (below 0 degree Centigrade) can sometimes result in actual works proper adjustments are naturally necessary. CAUTION ⅷ While operating the cordless driver drill...

Instruction Manual
Page 17
... since it with the contact portion outside brush tube Fig. 16 17 CAUTION ⅷ If you use the Hitachi Carbon Brush, Code No. 999054. So replace it slips. Check the Screws Loose screws are consumable parts. Maintenance...by first removing the brush cap and then hooking the protrusion of the carbon brush with a flat head screw driver, etc., as shown in motor trouble, replace the carbon brush with a finger as illustrated in the deformed ... are tight. English MAINTENANCE AND INSPECTION CAUTION ⅷ Pull out battery before doing any error in this power tool with a new one . 2.
... since it with the contact portion outside brush tube Fig. 16 17 CAUTION ⅷ If you use the Hitachi Carbon Brush, Code No. 999054. So replace it slips. Check the Screws Loose screws are consumable parts. Maintenance...by first removing the brush cap and then hooking the protrusion of the carbon brush with a flat head screw driver, etc., as shown in motor trouble, replace the carbon brush with a finger as illustrated in the deformed ... are tight. English MAINTENANCE AND INSPECTION CAUTION ⅷ Pull out battery before doing any error in this power tool with a new one . 2.
Instruction Manual
Page 18
... Tools must be changed without prior notice. 18 Accordingly, some parts may damage the plastics. 7. To assure that you have purchased contains a rechargeable battery. MODIFICATIONS: Hitachi Power Tools are constantly being improved and modified to dispose of power tools, the safety regulations and standards prescribed in a place below 104°F (40&#...
... Tools must be changed without prior notice. 18 Accordingly, some parts may damage the plastics. 7. To assure that you have purchased contains a rechargeable battery. MODIFICATIONS: Hitachi Power Tools are constantly being improved and modified to dispose of power tools, the safety regulations and standards prescribed in a place below 104°F (40&#...

Instruction Manual
Page 19
...DS18DSAL 1 Phillips bit (No. 2 × 65L) (Code No. 983006 1 2 Battery (BSL1415X 2 3 Battery Charger (UC18YGSL 1 4 Plastic Case 1 5 Battery cover (Code No. 329897 1 1 2 3 4 5 1 Phillips bit (No. 2 × 65L) (Code No. 983006 1 2 Battery (BSL1815X 2 3 Battery Charger (UC18YGSL 1 4 Plastic Case 1 5 Battery... cover (Code No. 329897 1 19 English ACCESSORIES WARNING: ALWAYS use with your tool. NEVER use replacement parts or accessories which are not intended for use Only authorized HITACHI ...
...DS18DSAL 1 Phillips bit (No. 2 × 65L) (Code No. 983006 1 2 Battery (BSL1415X 2 3 Battery Charger (UC18YGSL 1 4 Plastic Case 1 5 Battery cover (Code No. 329897 1 1 2 3 4 5 1 Phillips bit (No. 2 × 65L) (Code No. 983006 1 2 Battery (BSL1815X 2 3 Battery Charger (UC18YGSL 1 4 Plastic Case 1 5 Battery... cover (Code No. 329897 1 19 English ACCESSORIES WARNING: ALWAYS use with your tool. NEVER use replacement parts or accessories which are not intended for use Only authorized HITACHI ...

Instruction Manual
Page 20
Battery BSL1415X (Code No. 330140) BSL1815X (Code No. 330139) 20 English OPTIONAL ACCESSORIES.....sold separately 1.
Battery BSL1415X (Code No. 330140) BSL1815X (Code No. 330139) 20 English OPTIONAL ACCESSORIES.....sold separately 1.

Instruction Manual
Page 59
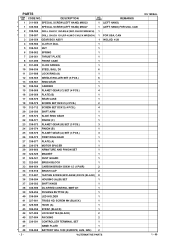
Part Name Q'TY 1 SPECIAL SCREW (LEFT HAND) M6 × 27 1 2 DRILL CHUCK 1 3 GEAR BOX ASS'Y 1 4 CLUTCH DIAL 1 5 NUT 1 6 SPRING 1 7 THRUST PLATE 1 8 FRONT CASE 1 9 CLICK SPRING 1 10 STEEL BALL D5 6 11 LOCK RING 1 12 NEEDLE ROLLER 6 13 ... (A) 1 40 LED HOLDER 1 Item No. 59 Item No. SCREW 42 HOOK (A) 44 LOCK NUT M4 45 PACKING 46 CONTROLLER TERMINAL SET 47 NAME PLATE 48-1 BATTERY (BSL1415X) 48-2 BATTERY (BSL1815X) 501 CHARGER (MODEL UC18YGSL) 502 CASE 503 + DRIVER BIT NO. 2 65L 504 BATTERY COVER Q'TY 1 1 2 2 1 1 2 2 1 1 1 1 Part Name 41 M4 TRUSS HD.
Part Name Q'TY 1 SPECIAL SCREW (LEFT HAND) M6 × 27 1 2 DRILL CHUCK 1 3 GEAR BOX ASS'Y 1 4 CLUTCH DIAL 1 5 NUT 1 6 SPRING 1 7 THRUST PLATE 1 8 FRONT CASE 1 9 CLICK SPRING 1 10 STEEL BALL D5 6 11 LOCK RING 1 12 NEEDLE ROLLER 6 13 ... (A) 1 40 LED HOLDER 1 Item No. 59 Item No. SCREW 42 HOOK (A) 44 LOCK NUT M4 45 PACKING 46 CONTROLLER TERMINAL SET 47 NAME PLATE 48-1 BATTERY (BSL1415X) 48-2 BATTERY (BSL1815X) 501 CHARGER (MODEL UC18YGSL) 502 CASE 503 + DRIVER BIT NO. 2 65L 504 BATTERY COVER Q'TY 1 1 2 2 1 1 2 2 1 1 1 1 Part Name 41 M4 TRUSS HD.
Parts List
Page 2
PARTS ITEM NO. USED REMARKS 1 (LEFT HAND) * 1 330-588 SPECIAL SCREW (LEFT HAND) M6X27 1 (LEFT HAND) FOR USA, CAN * 2 330-586 DRILL CHUCK 13VLRQ-N (W/O CHUCK WRENCH) 1 * 2 330-587 DRILL CHUCK 13VLRP-N (W/O CHUCK WRENCH) 1 FOR USA, CAN 3 330-559 GEAR BOX ASS'Y 1 INCLUD. 4-28 4 330-582 CLUTCH DIAL 1 5 330-563 NUT 1 6 330-562 SPRING... STRAP (BLACK) 1 44 327-002 LOCK NUT M4 (BLACK) 2 45 327-004 PACKING 2 46 330-591 CONTROLLER TERMINAL SET 1 47 NAME PLATE 1 * 48 330-068 BATTERY BSL 1830 (EUROPE, AUS, NZL) 2 - 2 - *ALTERNATIVE PARTS DS 18DSAL 1 - 09 CODE NO.
PARTS ITEM NO. USED REMARKS 1 (LEFT HAND) * 1 330-588 SPECIAL SCREW (LEFT HAND) M6X27 1 (LEFT HAND) FOR USA, CAN * 2 330-586 DRILL CHUCK 13VLRQ-N (W/O CHUCK WRENCH) 1 * 2 330-587 DRILL CHUCK 13VLRP-N (W/O CHUCK WRENCH) 1 FOR USA, CAN 3 330-559 GEAR BOX ASS'Y 1 INCLUD. 4-28 4 330-582 CLUTCH DIAL 1 5 330-563 NUT 1 6 330-562 SPRING... STRAP (BLACK) 1 44 327-002 LOCK NUT M4 (BLACK) 2 45 327-004 PACKING 2 46 330-591 CONTROLLER TERMINAL SET 1 47 NAME PLATE 1 * 48 330-068 BATTERY BSL 1830 (EUROPE, AUS, NZL) 2 - 2 - *ALTERNATIVE PARTS DS 18DSAL 1 - 09 CODE NO.

Parts List
Page 3
USED 2 2 REMARKS DS 18DSAL 1 - 09 *ALTERNATIVE PARTS - 3 - DESCRIPTION * 48 330-557 BATTERY BSL 1815X (EUROPE) * 48 330-139 BATTERY BSL 1815X (USA, CAN) NO. CODE NO. PARTS ITEM NO.
USED 2 2 REMARKS DS 18DSAL 1 - 09 *ALTERNATIVE PARTS - 3 - DESCRIPTION * 48 330-557 BATTERY BSL 1815X (EUROPE) * 48 330-139 BATTERY BSL 1815X (USA, CAN) NO. CODE NO. PARTS ITEM NO.


