
User Manual
Page 1
User Manual of Network Camera Network Camera User Manual UD.6L0201D1919A01 1
User Manual of Network Camera Network Camera User Manual UD.6L0201D1919A01 1

User Manual
Page 2
... (hereinafter referred to be reproduced, changed, translated, or distributed, partially or wholly, by any warranties, guarantees or representations, express or implied, regarding to be "the Manual") cannot be "Hikvision"). This user manual (hereinafter referred to the Manual. Pictures, charts, images and all information, including, among others, wordings, pictures, graphs are the properties of Hangzhou...
... (hereinafter referred to be reproduced, changed, translated, or distributed, partially or wholly, by any warranties, guarantees or representations, express or implied, regarding to be "the Manual") cannot be "Hikvision"). This user manual (hereinafter referred to the Manual. Pictures, charts, images and all information, including, among others, wordings, pictures, graphs are the properties of Hangzhou...

User Manual
Page 3
...equipment generates, uses, and can radiate radio frequency energy and, if not installed and used in a commercial environment. IN NO EVENT WILL HIKVISION, ITS DIRECTORS, OFFICERS, EMPLOYEES, OR AGENTS BE LIABLE TO YOU FOR ANY SPECIAL, CONSEQUENTIAL, INCIDENTAL, OR INDIRECT DAMAGES, INCLUDING, AMONG...VIRUS INSPECTION, OR OTHER INTERNET SECURITY RISKS; HOWEVER, HIKVISION WILL PROVIDE TIMELY TECHNICAL SUPPORT IF REQUIRED. SURVEILLANCE LAWS VARY BY JURISDICTION. User Manual of the FCC Rules. IN THE EVENT OF ANY CONFLICTS BETWEEN THIS MANUAL AND THE APPLICABLE LAW, THE LATER PREVAILS. REGARDING TO...
...equipment generates, uses, and can radiate radio frequency energy and, if not installed and used in a commercial environment. IN NO EVENT WILL HIKVISION, ITS DIRECTORS, OFFICERS, EMPLOYEES, OR AGENTS BE LIABLE TO YOU FOR ANY SPECIAL, CONSEQUENTIAL, INCIDENTAL, OR INDIRECT DAMAGES, INCLUDING, AMONG...VIRUS INSPECTION, OR OTHER INTERNET SECURITY RISKS; HOWEVER, HIKVISION WILL PROVIDE TIMELY TECHNICAL SUPPORT IF REQUIRED. SURVEILLANCE LAWS VARY BY JURISDICTION. User Manual of the FCC Rules. IN THE EVENT OF ANY CONFLICTS BETWEEN THIS MANUAL AND THE APPLICABLE LAW, THE LATER PREVAILS. REGARDING TO...

User Manual
Page 4
..., or dispose of it at his own expense. EU Conformity Statement This product and - if applicable - Industry Canada ICES-003 Compliance 4 User Manual of Network Camera with the instruction manual, may not cause harmful interference. 2. the supplied accessories too are marked with "CE" and comply therefore with the applicable harmonized European standards...
..., or dispose of it at his own expense. EU Conformity Statement This product and - if applicable - Industry Canada ICES-003 Compliance 4 User Manual of Network Camera with the instruction manual, may not cause harmful interference. 2. the supplied accessories too are marked with "CE" and comply therefore with the applicable harmonized European standards...

User Manual
Page 5
... the IEC60950-1 and Limited Power Source standard. To reduce the risk of Network Camera This device meets the CAN ICES-3 (A)/NMB-3(A) standards requirements. User Manual of fire or electrical shock, do not expose this product to rain or moisture. This installation should conform to all the local codes. ...
... the IEC60950-1 and Limited Power Source standard. To reduce the risk of Network Camera This device meets the CAN ICES-3 (A)/NMB-3(A) standards requirements. User Manual of fire or electrical shock, do not expose this product to rain or moisture. This installation should conform to all the local codes. ...

User Manual
Page 6
... lens causing reflection. The foam ring around the lens must be seated flush against the inner surface of the bubble to the camera. User Manual of Network Camera Cautions: Make sure the power supply voltage is correct before using the camera. Do not drop the camera or subject...
... lens causing reflection. The foam ring around the lens must be seated flush against the inner surface of the bubble to the camera. User Manual of Network Camera Cautions: Make sure the power supply voltage is correct before using the camera. Do not drop the camera or subject...

User Manual
Page 7
User Manual of Network Camera Table of Contents Chapter 1 System Requirement 10 Chapter 2 Network Connection 11 2.1 Setting the Network Camera over the LAN 11 2.1.1 Wiring over the ... 31 4.3 IP Property Settings for Wireless Network Connection 33 Chapter 5 Live View 35 5.1 Live View Page ...35 5.2 Starting Live View 36 5.3 Recording and Capturing Pictures Manually 37 5.4 Operating PTZ Control 37 5.4.1 PTZ Control Panel ...37 5.4.2 Setting / Calling a Preset 38 5.4.3 Setting / Calling a Patrol 40 Chapter 6 Network Camera Configuration 41 6.1 Configuring Local Parameters...
User Manual of Network Camera Table of Contents Chapter 1 System Requirement 10 Chapter 2 Network Connection 11 2.1 Setting the Network Camera over the LAN 11 2.1.1 Wiring over the ... 31 4.3 IP Property Settings for Wireless Network Connection 33 Chapter 5 Live View 35 5.1 Live View Page ...35 5.2 Starting Live View 36 5.3 Recording and Capturing Pictures Manually 37 5.4 Operating PTZ Control 37 5.4.1 PTZ Control Panel ...37 5.4.2 Setting / Calling a Preset 38 5.4.3 Setting / Calling a Patrol 40 Chapter 6 Network Camera Configuration 41 6.1 Configuring Local Parameters...

User Manual
Page 8
User Manual of Network Camera 6.3.9 6.3.10 6.3.11 6.3.12 6.3.13 6.3.14 Configuring Wireless Dial Settings 55 Email Sending Triggered by Alarm 58 Configuring NAT (Network Address Translation) Settings ...
User Manual of Network Camera 6.3.9 6.3.10 6.3.11 6.3.12 6.3.13 6.3.14 Configuring Wireless Dial Settings 55 Email Sending Triggered by Alarm 58 Configuring NAT (Network Address Translation) Settings ...

User Manual
Page 9
User Manual of Network Camera 7.2 Configuring Recording Schedule 128 7.3 Configuring Snapshot Settings 132 7.4 Configuring Lite Storage 134 7.5 Configuring Cloud Storage 135 Chapter 8 Counting 137 Chapter 9 Road Traffic ...
User Manual of Network Camera 7.2 Configuring Recording Schedule 128 7.3 Configuring Snapshot Settings 132 7.4 Configuring Lite Storage 134 7.5 Configuring Cloud Storage 135 Chapter 8 Counting 137 Chapter 9 Road Traffic ...

User Manual
Page 10
User Manual of Network Camera Chapter 1 System Requirement Operating System: Microsoft Windows XP SP1 and above version / Vista / Win7 / Server 2003 / Server 2008 32bits CPU: Intel Pentium IV 3.0 GHz or higher RAM: 1G or higher Display: 1024×768 resolution or higher Web Browser: Internet Explorer 6.0 and above version, Apple Safari 5.02 and above version, Mozilla Firefox 3.5 and above version and Google Chrome8 and above version. 10
User Manual of Network Camera Chapter 1 System Requirement Operating System: Microsoft Windows XP SP1 and above version / Vista / Win7 / Server 2003 / Server 2008 32bits CPU: Intel Pentium IV 3.0 GHz or higher RAM: 1G or higher Display: 1024×768 resolution or higher Web Browser: Internet Explorer 6.0 and above version, Apple Safari 5.02 and above version, Mozilla Firefox 3.5 and above version and Google Chrome8 and above version. 10

User Manual
Page 11
... the LAN Purpose: To view and configure the camera via a WAN (Wide Area Network), please refer to connect the network camera in Figure 2-1. 11 User Manual of Network Camera Chapter 2 Network Connection Note: You shall acknowledge that the use of the product with your computer, and install the SADP or...
... the LAN Purpose: To view and configure the camera via a WAN (Wide Area Network), please refer to connect the network camera in Figure 2-1. 11 User Manual of Network Camera Chapter 2 Network Connection Note: You shall acknowledge that the use of the product with your computer, and install the SADP or...
User Manual
Page 12
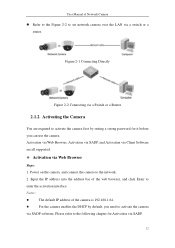
... IP address into the address bar of Network Camera Refer to the Figure 2-2 to set network camera over the LAN via SADP software. User Manual of the web browser, and click Enter to enter the activation interface. Figure 2-1 Connecting Directly Figure 2-2 Connecting via a Switch or a Router 2.1.2 Activating the Camera You...
... IP address into the address bar of Network Camera Refer to the Figure 2-2 to set network camera over the LAN via SADP software. User Manual of the web browser, and click Enter to enter the activation interface. Figure 2-1 Connecting Directly Figure 2-2 Connecting via a Switch or a Router 2.1.2 Activating the Camera You...

User Manual
Page 13
... software from the device list, and select the inactive device. 13 Click OK to the prompts. Run the SADP software to activate the camera. User Manual of 8 characters, including upper case letters, lower case letters, numbers, and special characters) in the high security system, resetting the password monthly or weekly can...
... software from the device list, and select the inactive device. 13 Click OK to the prompts. Run the SADP software to activate the camera. User Manual of 8 characters, including upper case letters, lower case letters, numbers, and special characters) in the high security system, resetting the password monthly or weekly can...

User Manual
Page 14
... lower case letters, numbers, and special characters) in order to increase the security of your computer by either modifying the IP address manually or checking the checkbox of Network Camera Figure 2-4 SADP Interface 3. If activation failed, please make sure that the password meets the ...requirement and try again. 5. User Manual of Enable DHCP. 14 Change the device IP address to save the password. Create a password and input the password in the high security ...
... lower case letters, numbers, and special characters) in order to increase the security of your computer by either modifying the IP address manually or checking the checkbox of Network Camera Figure 2-4 SADP Interface 3. If activation failed, please make sure that the password meets the ...requirement and try again. 5. User Manual of Enable DHCP. 14 Change the device IP address to save the password. Create a password and input the password in the high security ...

User Manual
Page 15
Input the password and click the Save button to activate your IP address modification. Activation via Client Software The client software is versatile video management software for multiple kinds of the software pops up, as shown in the figure below. 15 Run the client software and the control panel of devices. Steps: 1. Follow the steps to the prompts. Get the client software from the supplied disk or the official website, and install the software according to activate the camera. User Manual of Network Camera Figure 2-5 Modify the IP Address 6.
Input the password and click the Save button to activate your IP address modification. Activation via Client Software The client software is versatile video management software for multiple kinds of the software pops up, as shown in the figure below. 15 Run the client software and the control panel of devices. Steps: 1. Follow the steps to the prompts. Get the client software from the supplied disk or the official website, and install the software according to activate the camera. User Manual of Network Camera Figure 2-5 Modify the IP Address 6.

User Manual
Page 16
User Manual of Network Camera Figure 2-6 Control Panel 2. Figure 2-7 Device Management Interface 16 Click the Device Management icon to enter the Device Management interface, as shown in the figure below.
User Manual of Network Camera Figure 2-6 Control Panel 2. Figure 2-7 Device Management Interface 16 Click the Device Management icon to enter the Device Management interface, as shown in the figure below.

User Manual
Page 17
... Interface (Client Software) 6. Click OK button to pop up the Network Parameter Modification interface, as shown in the password field, and confirm the password. User Manual of 8 characters, including upper case letters, lower case letters, numbers, and special characters) in the high security system, resetting the password monthly or weekly can...
... Interface (Client Software) 6. Click OK button to pop up the Network Parameter Modification interface, as shown in the password field, and confirm the password. User Manual of 8 characters, including upper case letters, lower case letters, numbers, and special characters) in the high security system, resetting the password monthly or weekly can...
User Manual
Page 18
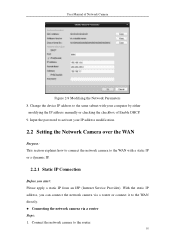
... or connect it to the router. 18 With the static IP address, you start: Please apply a static IP from an ISP (Internet Service Provider). User Manual of Enable DHCP. 9. Input the password to activate your IP address modification. 2.2 Setting the Network Camera over the WAN Purpose: This section explains how to... can connect the network camera via a router Steps: 1. Change the device IP address to the WAN with your computer by either modifying the IP address manually or checking the checkbox of Network Camera Figure 2-9 Modifying the Network Parameters 8.
... or connect it to the router. 18 With the static IP address, you start: Please apply a static IP from an ISP (Internet Service Provider). User Manual of Enable DHCP. 9. Input the password to activate your IP address modification. 2.2 Setting the Network Camera over the WAN Purpose: This section explains how to... can connect the network camera via a router Steps: 1. Change the device IP address to the WAN with your computer by either modifying the IP address manually or checking the checkbox of Network Camera Figure 2-9 Modifying the Network Parameters 8.

User Manual
Page 19
... the internet. Note: Refer to the internet without using a router. Refer to a modem or a router. Connecting the network camera via a router Steps: 19 User Manual of the network camera. 3. Set port mapping, e.g., 80, 8000, and 554 ports. With the dynamic IP address, you start: Please apply a dynamic IP from an...
... the internet. Note: Refer to the internet without using a router. Refer to a modem or a router. Connecting the network camera via a router Steps: 19 User Manual of the network camera. 3. Set port mapping, e.g., 80, 8000, and 554 ports. With the dynamic IP address, you start: Please apply a dynamic IP from an...

User Manual
Page 20
... IP Note: The obtained IP address is dynamically assigned via a modem Purpose: This camera supports the PPPoE auto dial-up after rebooting the camera. User Manual of the router. 7. Refer to configure the PPPoE parameters of the network camera. 3. Set port mapping. E.g. 80, 8000, and 554 ports. Note: Refer to solve...
... IP Note: The obtained IP address is dynamically assigned via a modem Purpose: This camera supports the PPPoE auto dial-up after rebooting the camera. User Manual of the router. 7. Refer to configure the PPPoE parameters of the network camera. 3. Set port mapping. E.g. 80, 8000, and 554 ports. Note: Refer to solve...