
Maintenance and Service Guide
Page 3
......vii Product Information...1-1 Features ...1-8 Operation...1-14 Specifications ...1-18 Internal Design...1-24 Removal and Replacement 2-1 Disassembly Flowchart ...2-3 Removing the Battery ...2-4 Removing an SDRAM Module...2-5 Removing the Wireless LAN Mini PCI Card 2-7 Removing the Hard Disk Drive...2-9 Recovering the Factory Software...2-11 Replacing Small Parts ...2-12 Removing the Keyboard Cover...2-13 Removing the Speaker Assembly ...2-15...
......vii Product Information...1-1 Features ...1-8 Operation...1-14 Specifications ...1-18 Internal Design...1-24 Removal and Replacement 2-1 Disassembly Flowchart ...2-3 Removing the Battery ...2-4 Removing an SDRAM Module...2-5 Removing the Wireless LAN Mini PCI Card 2-7 Removing the Hard Disk Drive...2-9 Recovering the Factory Software...2-11 Replacing Small Parts ...2-12 Removing the Keyboard Cover...2-13 Removing the Speaker Assembly ...2-15...
Maintenance and Service Guide
Page 4
...Replaceable Module Diagram 1-24 Figure 2-1. Removing an SDRAM Module 2-6 Figure 2-5. Removing the Hard Disk Drive Tray 2-10 Figure 2-9. Removing the Keyboard ...2-17 Figure 2-13. Removing the Motherboard 2-51 Figure 2-35. Removing the Battery ...2-4 Figure 2-3. Removing the Hard Disk Drive 2-9 Figure 2-8. Removing the CD/DVD Drive... Top Case...2-31 Figure 2-22. Removing the Floppy Drive 2-35 Figure 2-24. AMD CPU Module Installation 2-39 Figure 2-32 Removing the CPU Module 2-39 Figure 2-33. Resetting the Notebook ...1-17 Figure 1-8. Removing the Heat Sink (with ...
...Replaceable Module Diagram 1-24 Figure 2-1. Removing an SDRAM Module 2-6 Figure 2-5. Removing the Hard Disk Drive Tray 2-10 Figure 2-9. Removing the Keyboard ...2-17 Figure 2-13. Removing the Motherboard 2-51 Figure 2-35. Removing the Battery ...2-4 Figure 2-3. Removing the Hard Disk Drive 2-9 Figure 2-8. Removing the CD/DVD Drive... Top Case...2-31 Figure 2-22. Removing the Floppy Drive 2-35 Figure 2-24. AMD CPU Module Installation 2-39 Figure 2-32 Removing the CPU Module 2-39 Figure 2-33. Resetting the Notebook ...1-17 Figure 1-8. Removing the Heat Sink (with ...
Maintenance and Service Guide
Page 31
... below. Reassembly notes are displayed throughout this chapter to remove and replace the notebook's components and assemblies. Symbols like these to verify the sizes of the removal steps. Service Manual Removal and Replacement 2-1 Table 2-1. Removal Cross-Reference Assembly, display (page 2-23)...keyboard (page 2-16) • Door, Mini PCI (page 2-7) • Door, SDRAM (page 2-5) Doors, PCMCIA (page 2-60) Drive, CD/DVD (page 2-20) Drive, floppy (page 2-32) • Drive, hard disk (page 2-9) • Feet, rubber (page 2-12) Heat sink (with fan) (page 2-40) • Keyboard (page ...
... below. Reassembly notes are displayed throughout this chapter to remove and replace the notebook's components and assemblies. Symbols like these to verify the sizes of the removal steps. Service Manual Removal and Replacement 2-1 Table 2-1. Removal Cross-Reference Assembly, display (page 2-23)...keyboard (page 2-16) • Door, Mini PCI (page 2-7) • Door, SDRAM (page 2-5) Doors, PCMCIA (page 2-60) Drive, CD/DVD (page 2-20) Drive, floppy (page 2-32) • Drive, hard disk (page 2-9) • Feet, rubber (page 2-12) Heat sink (with fan) (page 2-40) • Keyboard (page ...
Maintenance and Service Guide
Page 39
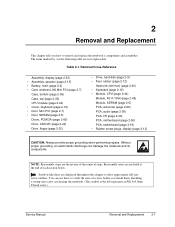
Removing the Hard Disk Drive (User-Replaceable) Required Equipment 1 Phillips screwdriver Removal Procedure NOTE: If you are installing a new hard disk drive, load the factory software and operating system on the drive as described in "Recovering the Factory Software", as shown on the next page. 1. On the bottom of the notebook, remove the hard disk drive rubber screw plugs and...
Removing the Hard Disk Drive (User-Replaceable) Required Equipment 1 Phillips screwdriver Removal Procedure NOTE: If you are installing a new hard disk drive, load the factory software and operating system on the drive as described in "Recovering the Factory Software", as shown on the next page. 1. On the bottom of the notebook, remove the hard disk drive rubber screw plugs and...
Maintenance and Service Guide
Page 40
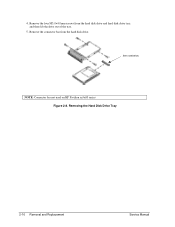
Remove the connector bar from the hard disk drive and hard disk drive tray, and then lift the drive out of the tray. 5. Removing the Hard Disk Drive Tray 2-10 Removal and Replacement Service Manual See note below NOTE: Connector bar not used on HP Pavilion ze5x00 series Figure 2-8. 4. Remove the four M3.0×4.0mm screws from the hard disk drive.
Remove the connector bar from the hard disk drive and hard disk drive tray, and then lift the drive out of the tray. 5. Removing the Hard Disk Drive Tray 2-10 Removal and Replacement Service Manual See note below NOTE: Connector bar not used on HP Pavilion ze5x00 series Figure 2-8. 4. Remove the four M3.0×4.0mm screws from the hard disk drive.
Maintenance and Service Guide
Page 41
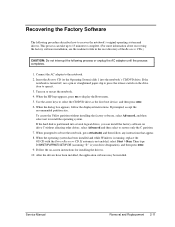
... the recommended partition size. Service Manual Removal and Replacement 2-11 Connect the AC adapter to display the Boot menu. 5. When the HP logo appears, press esc to the notebook. 2. To create the Utility partition without affecting other drives. Use the arrow keys to install the operating system... 9. Follow the on the drive door to press the release switch on -screen instructions for installing the drivers. 10. Then type D:\SWSETUP\APPINSTL\SETUP.EXE (assuming "D:" is not enabled, select Start > Run. If the hard disk is running, replace the OS CD with the Driver...
... the recommended partition size. Service Manual Removal and Replacement 2-11 Connect the AC adapter to display the Boot menu. 5. When the HP logo appears, press esc to the notebook. 2. To create the Utility partition without affecting other drives. Use the arrow keys to install the operating system... 9. Follow the on the drive door to press the release switch on -screen instructions for installing the drivers. 10. Then type D:\SWSETUP\APPINSTL\SETUP.EXE (assuming "D:" is not enabled, select Start > Run. If the hard disk is running, replace the OS CD with the Driver...
Maintenance and Service Guide
Page 54
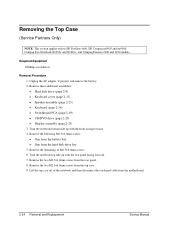
... panel. 8. Remove the two M2.5×4.0mm screws from the motherboard. 2-24 Removal and Replacement Service Manual Unplug the AC adapter, if present, and remove the battery. 2. Turn the notebook bottom side up with the front facing forward. 4. Remove the remaining 14 M2.5×6.0mm screws... hard disk drive bay 5. Remove the following M2.5×4.0mm screws: • One from the battery bay • One from the top case. 9. Removing the Top Case (Service Partners Only) NOTE: This section applies only to HP Pavilion 4x00, HP Compaq nx9005 and nx9000, Compaq Evo Notebook N1050v...
... panel. 8. Remove the two M2.5×4.0mm screws from the motherboard. 2-24 Removal and Replacement Service Manual Unplug the AC adapter, if present, and remove the battery. 2. Turn the notebook bottom side up with the front facing forward. 4. Remove the remaining 14 M2.5×6.0mm screws... hard disk drive bay 5. Remove the following M2.5×4.0mm screws: • One from the battery bay • One from the top case. 9. Removing the Top Case (Service Partners Only) NOTE: This section applies only to HP Pavilion 4x00, HP Compaq nx9005 and nx9000, Compaq Evo Notebook N1050v...
Maintenance and Service Guide
Page 56
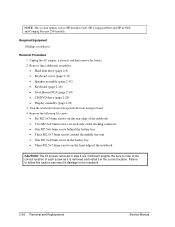
... assemblies: • Hard disk drive (page 2-9) • Keyboard cover (page 2-13) • Speaker assembly (page 2-15) • Keyboard (page 2-16) • Switchboard PCA (page 2-19) • CD/DVD drive (page 2-20) • Display assembly (page 2-23) 3. Failure to follow this caution can result in damage to HP Pavilion 5x00, HP Compaq nx9010 and HP nx9008, and Compaq...
... assemblies: • Hard disk drive (page 2-9) • Keyboard cover (page 2-13) • Speaker assembly (page 2-15) • Keyboard (page 2-16) • Switchboard PCA (page 2-19) • CD/DVD drive (page 2-20) • Display assembly (page 2-23) 3. Failure to follow this caution can result in damage to HP Pavilion 5x00, HP Compaq nx9010 and HP nx9008, and Compaq...
Maintenance and Service Guide
Page 59
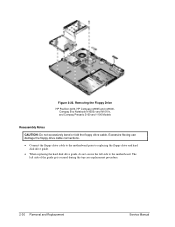
...procedure.) 4. Remove the two M2.5×4.0mm screws that secure the floppy drive to the motherboard. (Note that secure the hard disk drive guide to the motherboard. 6. Remove these additional assemblies: • Hard disk drive (page 2-9) • Keyboard cover (page 2-13) • Keyboard... the motherboard cable. 5. Remove the floppy drive. Service Manual Removal and Replacement 2-29 Removing the Floppy Drive (Service Partners Only) NOTE: This section applies only to HP Pavilion ze4x00, HP Compaq nx9005 and nx9000, Compaq Evo Notebook N1050v and N1010v, and Compaq Presario 2100 ...
...procedure.) 4. Remove the two M2.5×4.0mm screws that secure the floppy drive to the motherboard. (Note that secure the hard disk drive guide to the motherboard. 6. Remove these additional assemblies: • Hard disk drive (page 2-9) • Keyboard cover (page 2-13) • Keyboard... the motherboard cable. 5. Remove the floppy drive. Service Manual Removal and Replacement 2-29 Removing the Floppy Drive (Service Partners Only) NOTE: This section applies only to HP Pavilion ze4x00, HP Compaq nx9005 and nx9000, Compaq Evo Notebook N1050v and N1010v, and Compaq Presario 2100 ...
Maintenance and Service Guide
Page 60
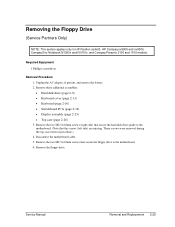
... to replacing the floppy drive and hard disk drive guide. • When replacing the hard disk drive guide, do not secure the left side of the guide gets secured during the top case replacement procedure. 2-30 Removal and Replacement Service Manual The left side to the motherboard. Removing the Floppy Drive HP Pavilion 4x00, HP Compaq nx9005 and nx9000, Compaq Evo Notebook N1050v...
... to replacing the floppy drive and hard disk drive guide. • When replacing the hard disk drive guide, do not secure the left side of the guide gets secured during the top case replacement procedure. 2-30 Removal and Replacement Service Manual The left side to the motherboard. Removing the Floppy Drive HP Pavilion 4x00, HP Compaq nx9005 and nx9000, Compaq Evo Notebook N1050v...
Maintenance and Service Guide
Page 61
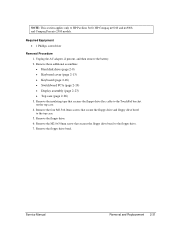
....0×3.0mm screw that secures the floppy drive flex cable to the floppy drive. 7. Remove the four M2.5×6.0mm screws that secure the floppy drive and floppy drive bezel to HP Pavilion 5x00, HP Compaq nx9010 and nx9008, and Compaq Presario 2500 models. Remove these additional assemblies: • Hard disk drive (page 2-9) • Keyboard cover (page 2-13) •...
....0×3.0mm screw that secures the floppy drive flex cable to the floppy drive. 7. Remove the four M2.5×6.0mm screws that secure the floppy drive and floppy drive bezel to HP Pavilion 5x00, HP Compaq nx9010 and nx9008, and Compaq Presario 2500 models. Remove these additional assemblies: • Hard disk drive (page 2-9) • Keyboard cover (page 2-13) •...
Maintenance and Service Guide
Page 63
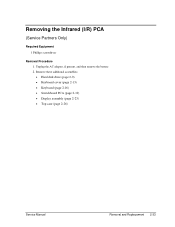
Unplug the AC adapter, if present, and then remove the battery. 2. Remove these additional assemblies: • Hard disk drive (page 2-9) • Keyboard cover (page 2-13) • Keyboard (page 2-16) • Switchboard PCA (page 2-19) • Display assembly (page 2-23) • Top case (page 2-26) Service Manual Removal and Replacement 2-33 Removing the Infrared (I/R) PCA (Service Partners Only) Required Equipment 1 Phillips screwdriver Removal Procedure 1.
Unplug the AC adapter, if present, and then remove the battery. 2. Remove these additional assemblies: • Hard disk drive (page 2-9) • Keyboard cover (page 2-13) • Keyboard (page 2-16) • Switchboard PCA (page 2-19) • Display assembly (page 2-23) • Top case (page 2-26) Service Manual Removal and Replacement 2-33 Removing the Infrared (I/R) PCA (Service Partners Only) Required Equipment 1 Phillips screwdriver Removal Procedure 1.
Maintenance and Service Guide
Page 65
..., and then remove the battery. 2. Remove the audio PCA cable from the motherboard. 4. Required Equipment 1 Phillips screwdriver Removal Procedure 1. Remove these additional assemblies: • Hard disk drive (page 2-9) • Keyboard cover (page 2-13) • Keyboard (page 2-16) • Switchboard PCA (page 2-19) • Display assembly (page 2-23)...on the bottom case. 5. Remove the two M2.0×3.0mm flathead screws that secure the audio PCA shield to HP Pavilion 5300 and 5200, HP Compaq nx9010, and Compaq Presario 2500 models. Service Manual Removal and Replacement 2-35
..., and then remove the battery. 2. Remove the audio PCA cable from the motherboard. 4. Required Equipment 1 Phillips screwdriver Removal Procedure 1. Remove these additional assemblies: • Hard disk drive (page 2-9) • Keyboard cover (page 2-13) • Keyboard (page 2-16) • Switchboard PCA (page 2-19) • Display assembly (page 2-23)...on the bottom case. 5. Remove the two M2.0×3.0mm flathead screws that secure the audio PCA shield to HP Pavilion 5300 and 5200, HP Compaq nx9010, and Compaq Presario 2500 models. Service Manual Removal and Replacement 2-35
Maintenance and Service Guide
Page 67
...Hard disk drive (page 2-9) • Keyboard cover (page 2-13) • Keyboard (page 2-16) • Switchboard PCA (page 2-19) • Display assembly (page 2-23) • Top case (page 2-26) Service Manual Removal and Replacement 2-37 Removing the Heat Sink (with Fan) (Service Partners Only) NOTE: This section applies only to HP Pavilion 4x00, HP... Compaq nx9005 and nx9000, Compaq Evo Notebook N1050v and N1010v, and Compaq ...
...Hard disk drive (page 2-9) • Keyboard cover (page 2-13) • Keyboard (page 2-16) • Switchboard PCA (page 2-19) • Display assembly (page 2-23) • Top case (page 2-26) Service Manual Removal and Replacement 2-37 Removing the Heat Sink (with Fan) (Service Partners Only) NOTE: This section applies only to HP Pavilion 4x00, HP... Compaq nx9005 and nx9000, Compaq Evo Notebook N1050v and N1010v, and Compaq ...
Maintenance and Service Guide
Page 69
NOTE: This section applies only to HP Pavilion 5x00, HP Compaq nx9010 and HP nx9008, and Compaq Presario 2500 models. Unplug the AC adapter, if present, and then remove the battery. 2. Remove these additional assemblies: • Hard disk drive (page 2-9) • Keyboard cover (page 2-13) • Keyboard (page 2-16) • Switchboard PCA (page 2-19) • Display assembly (page 2-23) • Top case (page 2-26) Service Manual Removal and Replacement 2-39 Required Equipment 0 Phillips screwdriver Removal Procedure 1.
NOTE: This section applies only to HP Pavilion 5x00, HP Compaq nx9010 and HP nx9008, and Compaq Presario 2500 models. Unplug the AC adapter, if present, and then remove the battery. 2. Remove these additional assemblies: • Hard disk drive (page 2-9) • Keyboard cover (page 2-13) • Keyboard (page 2-16) • Switchboard PCA (page 2-19) • Display assembly (page 2-23) • Top case (page 2-26) Service Manual Removal and Replacement 2-39 Required Equipment 0 Phillips screwdriver Removal Procedure 1.
Maintenance and Service Guide
Page 71
... applies only to HP Pavilion 4x00, HP Compaq nx9005 and nx9000, Compaq Evo Notebook N1050v and N1010v, and Compaq Presario 2100 and 1100 models. Remove these additional assemblies: • Hard disk drive (page 2-9) &#...8226; Keyboard cover (page 2-13) • Keyboard (page 2-16) • Switchboard PCA (page 2-19) • Display assembly (page 2-23) • Top case (page 2-26) • Heat sink (page 2-40) Service Manual Removal and Replacement...
... applies only to HP Pavilion 4x00, HP Compaq nx9005 and nx9000, Compaq Evo Notebook N1050v and N1010v, and Compaq Presario 2100 and 1100 models. Remove these additional assemblies: • Hard disk drive (page 2-9) &#...8226; Keyboard cover (page 2-13) • Keyboard (page 2-16) • Switchboard PCA (page 2-19) • Display assembly (page 2-23) • Top case (page 2-26) • Heat sink (page 2-40) Service Manual Removal and Replacement...
Maintenance and Service Guide
Page 100
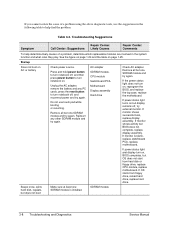
... and display turn notebook on page 1-25. Startup Does not boot on , reprogram the BIOS, and replace the top case, replace the motherboard. Reinsert any PC cards, press the reset button to turn on but one SDRAM module and try again. CPU module Switchboard PCA Motherboard Display assembly Hard drive Beeps once, spins hard disk, repeats, but...
... and display turn notebook on page 1-25. Startup Does not boot on , reprogram the BIOS, and replace the top case, replace the motherboard. Reinsert any PC cards, press the reset button to turn on but one SDRAM module and try again. CPU module Switchboard PCA Motherboard Display assembly Hard drive Beeps once, spins hard disk, repeats, but...
Maintenance and Service Guide
Page 101
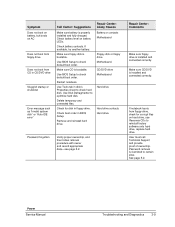
.... Repair Center: Comments Make sure floppy drive is installed and connected correctly. If notebook boots from CD in BIOS Setup. Symptom Does not boot on battery, but boots on AC Does not boot from floppy drive Does not boot from floppy drive, check for disk in disk's Properties sheet to reinstall factory software onto hard drive, replace hard drive.
.... Repair Center: Comments Make sure floppy drive is installed and connected correctly. If notebook boots from CD in BIOS Setup. Symptom Does not boot on battery, but boots on AC Does not boot from floppy drive Does not boot from floppy drive, check for disk in disk's Properties sheet to reinstall factory software onto hard drive, replace hard drive.
Maintenance and Service Guide
Page 105
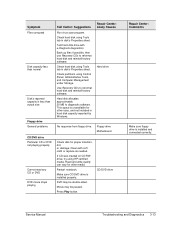
...notebook. Service Manual Troubleshooting and Diagnostics 3-13 Symptom Files corrupted Disk capacity less than actual size Floppy drive General problems CD/DVD drive... hard disk using HP certified media. If CD was created on CD-RW drive,...replace as needed. Back up files if possible, then use Recovery CDs to reformat hard disk and reinstall factory software. Use Recovery CDs to reformat hard disk and reinstall factory software. Check partitions using Tools tab in hard disk capacity reported by Windows. Repair Center: Likely Causes Hard drive No response from floppy drive. Hard...
...notebook. Service Manual Troubleshooting and Diagnostics 3-13 Symptom Files corrupted Disk capacity less than actual size Floppy drive General problems CD/DVD drive... hard disk using HP certified media. If CD was created on CD-RW drive,...replace as needed. Back up files if possible, then use Recovery CDs to reformat hard disk and reinstall factory software. Use Recovery CDs to reformat hard disk and reinstall factory software. Check partitions using Tools tab in hard disk capacity reported by Windows. Repair Center: Likely Causes Hard drive No response from floppy drive. Hard...
Maintenance and Service Guide
Page 111
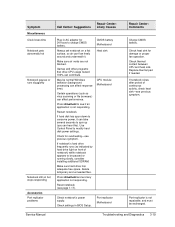
... ctrl+alt+del and end any application not responding. If notebook slows after period of notebook) while notebook appears to see previous symptom. Press ctrl+alt+del to be paused or running slowly, consider installing additional SDRAM. Make sure hard drive has adequate free space. Replace thermal pad if needed. May be exchanged. Delete temporary and...
... ctrl+alt+del and end any application not responding. If notebook slows after period of notebook) while notebook appears to see previous symptom. Press ctrl+alt+del to be paused or running slowly, consider installing additional SDRAM. Make sure hard drive has adequate free space. Replace thermal pad if needed. May be exchanged. Delete temporary and...


