
Reference Guide
Page 8
... To safeguard your data 28 To extend the life of the display 28 To clean your notebook 28 Batteries and Power Management 29 Managing Power Consumption 30 How the notebook manages power automatically 30 Using Battery Power 32 To check battery status 32 To respond to a low-... turn wireless communication on and off 42 Making Wireless Bluetooth Connections (select models only 44 To turn Bluetooth communication on and off 44 To prepare for Bluetooth connections 45 To send or receive files using Bluetooth 46 Add-On Devices ...47 Connecting PC Cards 48 To insert or remove a PC Card 48...
... To safeguard your data 28 To extend the life of the display 28 To clean your notebook 28 Batteries and Power Management 29 Managing Power Consumption 30 How the notebook manages power automatically 30 Using Battery Power 32 To check battery status 32 To respond to a low-... turn wireless communication on and off 42 Making Wireless Bluetooth Connections (select models only 44 To turn Bluetooth communication on and off 44 To prepare for Bluetooth connections 45 To send or receive files using Bluetooth 46 Add-On Devices ...47 Connecting PC Cards 48 To insert or remove a PC Card 48...
Reference Guide
Page 9
... hard drive 62 To replace the hard drive holder 63 To prepare a new hard drive 64 Troubleshooting and Maintenance 65 Troubleshooting Your Notebook 66 Audio problems 66 CD-ROM and DVD problems 67 Display problems 68 Hard drive problems 69 Heat problems 70 Infrared problems 70... (LAN) problems 72 Memory problems 73 Modem problems 73 PC Card problems 76 Performance problems 76 Power and battery problems 77 Printing problems 79 Serial, parallel, and USB problems 80 Startup problems 81 Wireless problems 82 Configuring Your Notebook 84 To run the BIOS Setup utility 84 To change ...
... hard drive 62 To replace the hard drive holder 63 To prepare a new hard drive 64 Troubleshooting and Maintenance 65 Troubleshooting Your Notebook 66 Audio problems 66 CD-ROM and DVD problems 67 Display problems 68 Hard drive problems 69 Heat problems 70 Infrared problems 70... (LAN) problems 72 Memory problems 73 Modem problems 73 PC Card problems 76 Performance problems 76 Power and battery problems 77 Printing problems 79 Serial, parallel, and USB problems 80 Startup problems 81 Wireless problems 82 Configuring Your Notebook 84 To run the BIOS Setup utility 84 To change ...
Reference Guide
Page 43
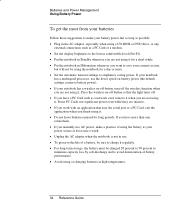
... by self-discharge and to emphasize saving power. Some PC Cards use the lower speed on battery power (the default settings conserve battery power). • If your notebook has a wireless on -off button so that uses the serial port or a PC Card, exit the application when you finish using it. •...; Do not leave batteries unused for a short while. • Put the notebook in Standby whenever you are not using it...
... by self-discharge and to emphasize saving power. Some PC Cards use the lower speed on battery power (the default settings conserve battery power). • If your notebook has a wireless on -off button so that uses the serial port or a PC Card, exit the application when you finish using it. •...; Do not leave batteries unused for a short while. • Put the notebook in Standby whenever you are not using it...

Reference Guide
Page 54
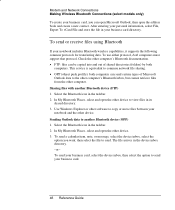
... open. 1. Make sure Bluetooth communication is present in the taskbar. 3. Reference Guide 45 If the Wireless Configuration icon is turned on. 2. To turn off Bluetooth communication, without turning off your business card file so you can easily send it to be stored automatically. To prepare for sharing files, both... it to other Bluetooth users. • Set the computer type to Laptop. • Select the security mode you want to store your notebook, press the wireless on-off button. This also turns off 802.11 communication if it into Hibernation also turns off the...
... open. 1. Make sure Bluetooth communication is present in the taskbar. 3. Reference Guide 45 If the Wireless Configuration icon is turned on. 2. To turn off Bluetooth communication, without turning off your business card file so you can easily send it to be stored automatically. To prepare for sharing files, both... it to other Bluetooth users. • Set the computer type to Laptop. • Select the security mode you want to store your notebook, press the wireless on-off button. This also turns off 802.11 communication if it into Hibernation also turns off the...
Reference Guide
Page 55
... • FTP: files can be copied into and out of Microsoft Outlook data to copy or move files between your notebook includes Bluetooth wireless capabilities, it supports the following common protocols for transferring data. Check the other device. In My Bluetooth Places, select and... either protocol, both computers. Sharing files with another Bluetooth device (OPP) 1. This service is equivalent to send. After entering your business card directory. To send a calendar item, note, or message, select the device inbox, select the option you can send certain types of shared...
... • FTP: files can be copied into and out of Microsoft Outlook data to copy or move files between your notebook includes Bluetooth wireless capabilities, it supports the following common protocols for transferring data. Check the other device. In My Bluetooth Places, select and... either protocol, both computers. Sharing files with another Bluetooth device (OPP) 1. This service is equivalent to send. After entering your business card directory. To send a calendar item, note, or message, select the device inbox, select the option you can send certain types of shared...
Reference Guide
Page 91
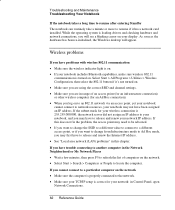
... list of computers on . Wireless problems If you have problems with wireless 802.11 communication • Make sure the wireless indicator light is on. • If your notebook includes Bluetooth capabilities, make sure wireless 802.11 communication is loading ...drivers and checking hardware and network connections, you have been assigned an IP address. If you will appear. Select Start > All Programs > Utilities > Wireless Configuration, then select the 802.11 button if it has a network card...
... list of computers on . Wireless problems If you have problems with wireless 802.11 communication • Make sure the wireless indicator light is on. • If your notebook includes Bluetooth capabilities, make sure wireless 802.11 communication is loading ...drivers and checking hardware and network connections, you have been assigned an IP address. If you will appear. Select Start > All Programs > Utilities > Wireless Configuration, then select the 802.11 button if it has a network card...
Reference Guide
Page 119
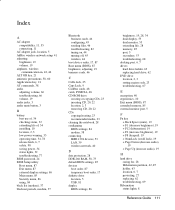
... sending files, 46 troubleshooting, 82 tuning on, 44 turning off, 45 wireless, 44 boot device order, 17, 87 Boot menu (BIOS), 87 brightness, adjusting, 19 business cards, 46 C Cable lock, 25 Caps Lock, 9 Cardbus cards, 48 cards, PCMCIA, 48 CD-ROM drive creating or copying CDs, 23 inserting CD..., 20, 22 location, 2, 3 removing CD, 20, 22 CDs copying/creating, 23 recommended media, 23 cleaning the notebook, 28 configuring BIOS settings, 84 modem, 38 connecting IEEE 1394 devices, 53 LAN, 39 wireless network, ...
... sending files, 46 troubleshooting, 82 tuning on, 44 turning off, 45 wireless, 44 boot device order, 17, 87 Boot menu (BIOS), 87 brightness, adjusting, 19 business cards, 46 C Cable lock, 25 Caps Lock, 9 Cardbus cards, 48 cards, PCMCIA, 48 CD-ROM drive creating or copying CDs, 23 inserting CD..., 20, 22 location, 2, 3 removing CD, 20, 22 CDs copying/creating, 23 recommended media, 23 cleaning the notebook, 28 configuring BIOS settings, 84 modem, 38 connecting IEEE 1394 devices, 53 LAN, 39 wireless network, ...

Reference Guide
Page 120
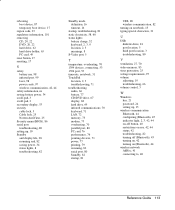
... PC card, 48 installing battery, 10 hard drive, 62 hard drive holder, 63 Internet Service Provider, 36 K keyboard ergonomic precautions, 10 non US, 21 status lights, 2, 3, 9 troubleshooting, 71 Keypad Lock, 2, 3, 9 L LAN connecting to, 39 troubleshooting, 72 wireless, 40 LAN port indicator lights, 39 location, 5 laser safety, 98 lights LAN port, 39 status, 2, 3, 8, 9 locking notebook...
... PC card, 48 installing battery, 10 hard drive, 62 hard drive holder, 63 Internet Service Provider, 36 K keyboard ergonomic precautions, 10 non US, 21 status lights, 2, 3, 9 troubleshooting, 71 Keypad Lock, 2, 3, 9 L LAN connecting to, 39 troubleshooting, 72 wireless, 40 LAN port indicator lights, 39 location, 5 laser safety, 98 lights LAN port, 39 status, 2, 3, 8, 9 locking notebook...
Reference Guide
Page 121
... removing CD, 20, 22 DVD, 20, 22 hard drive, 62 hard drive holder, 63 PC card, 49 reset button, 17 resetting, 17 S safety battery use, 98 infrared port, 99 laser, 98 power cords, 97 wireless communication, 42, 44 safety information, iii saving battery power, 34 scroll pad, 3 scroll pad...LAN, 72 memory, 73 modem, 73 overheating, 70 parallel port, 80 PC card, 76 performance, 76 pointing devices, 71 power, 77 printing, 79 resuming, 82 serial port, 80 Standby, 82 startup, 81 USB, 80 wireless communication, 82 turning on notebook, 13 typing special characters, 21 U USB diskette drive, 81 port ...
... removing CD, 20, 22 DVD, 20, 22 hard drive, 62 hard drive holder, 63 PC card, 49 reset button, 17 resetting, 17 S safety battery use, 98 infrared port, 99 laser, 98 power cords, 97 wireless communication, 42, 44 safety information, iii saving battery power, 34 scroll pad, 3 scroll pad...LAN, 72 memory, 73 modem, 73 overheating, 70 parallel port, 80 PC card, 76 performance, 76 pointing devices, 71 power, 77 printing, 79 resuming, 82 serial port, 80 Standby, 82 startup, 81 USB, 80 wireless communication, 82 turning on notebook, 13 typing special characters, 21 U USB diskette drive, 81 port ...

Maintenance and Service Guide
Page 3
... Information...1-1 Features ...1-8 Operation...1-14 Specifications ...1-18 Internal Design...1-24 Removal and Replacement 2-1 Disassembly Flowchart ...2-3 Removing the Battery ...2-4 Removing an SDRAM Module...2-5 Removing the Wireless LAN Mini PCI Card 2-7 Removing the Hard Disk Drive...2-9 Recovering the Factory Software...2-11 Replacing Small Parts ...2-12 Removing the Keyboard Cover...2-13 Removing the Speaker Assembly ...2-15...
... Information...1-1 Features ...1-8 Operation...1-14 Specifications ...1-18 Internal Design...1-24 Removal and Replacement 2-1 Disassembly Flowchart ...2-3 Removing the Battery ...2-4 Removing an SDRAM Module...2-5 Removing the Wireless LAN Mini PCI Card 2-7 Removing the Hard Disk Drive...2-9 Recovering the Factory Software...2-11 Replacing Small Parts ...2-12 Removing the Keyboard Cover...2-13 Removing the Speaker Assembly ...2-15...
Maintenance and Service Guide
Page 31
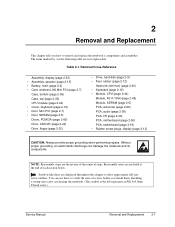
...proper grounding, an electrostatic discharge can damage the notebook. (The symbol at the end of the removal steps. Removal Cross-Reference Assembly, display (page 2-23) • Assembly, speaker (page 2-15) • Battery, main (page 2-4) • Card, wireless LAN Mini PCI (page 2-7) Case, bottom (...: Always provide proper grounding when performing repairs. NOTE: Reassembly steps are displayed throughout this chapter to remove and replace the notebook's components and assemblies. You can use these are the reverse of each section below. 2 Removal and Replacement This chapter ...
...proper grounding, an electrostatic discharge can damage the notebook. (The symbol at the end of the removal steps. Removal Cross-Reference Assembly, display (page 2-23) • Assembly, speaker (page 2-15) • Battery, main (page 2-4) • Card, wireless LAN Mini PCI (page 2-7) Case, bottom (...: Always provide proper grounding when performing repairs. NOTE: Reassembly steps are displayed throughout this chapter to remove and replace the notebook's components and assemblies. You can use these are the reverse of each section below. 2 Removal and Replacement This chapter ...
Maintenance and Service Guide
Page 37
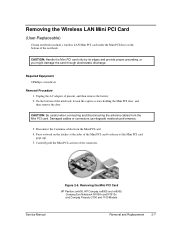
... PCI Card (User-Replaceable) Certain notebooks include a wireless LAN Mini PCI card under the Mini PCI door on the latches at the sides of the Mini PCI card to release it (the Mini PCI card pops up). 5. Unplug the AC adapter, if present, and then remove the battery. 2. Removing the Mini PCI Card HP Pavilion ze4x00, HP Compaq nx9005 and...
... PCI Card (User-Replaceable) Certain notebooks include a wireless LAN Mini PCI card under the Mini PCI door on the latches at the sides of the Mini PCI card to release it (the Mini PCI card pops up). 5. Unplug the AC adapter, if present, and then remove the battery. 2. Removing the Mini PCI Card HP Pavilion ze4x00, HP Compaq nx9005 and...
Maintenance and Service Guide
Page 80
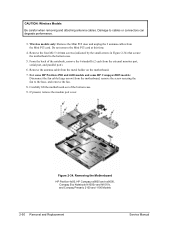
... the metal holder on the motherboard. 7. Remove the antenna cable from the Mini PCI card. Removing the Motherboard HP Pavilion 4x00, HP Compaq nx9005 and nx9000, Compaq Evo Notebook N1050v and N1010v, and Compaq Presario 2100 and 1100 Models 2-50 Removal and Replacement Service Manual CAUTION: Wireless Models Be careful when removing and attaching antenna cables.
... the metal holder on the motherboard. 7. Remove the antenna cable from the Mini PCI card. Removing the Motherboard HP Pavilion 4x00, HP Compaq nx9005 and nx9000, Compaq Evo Notebook N1050v and N1010v, and Compaq Presario 2100 and 1100 Models 2-50 Removal and Replacement Service Manual CAUTION: Wireless Models Be careful when removing and attaching antenna cables.

Maintenance and Service Guide
Page 82
...cables or connectors can degrade performance. 3. NOTE: The 4 screws that secure the hard disk drive guide are M2.0×4.0mm screws. CAUTION: Wireless Models Be careful when removing and attaching antenna cables. Damage to the bottom case. 5. Remove the hard disk drive guide. The screw in...6. The remaining 3 screws are 2 different sizes. Do not remove the Mini PCI card at this time. 4. Make sure these screws are installed in the upper left corner is a M2.5×6.0mm screw. Figure 2-35. Wireless models only: Remove the Mini PCI door, and then unplug the 2 antenna cables...
...cables or connectors can degrade performance. 3. NOTE: The 4 screws that secure the hard disk drive guide are M2.0×4.0mm screws. CAUTION: Wireless Models Be careful when removing and attaching antenna cables. Damage to the bottom case. 5. Remove the hard disk drive guide. The screw in...6. The remaining 3 screws are 2 different sizes. Do not remove the Mini PCI card at this time. 4. Make sure these screws are installed in the upper left corner is a M2.5×6.0mm screw. Figure 2-35. Wireless models only: Remove the Mini PCI door, and then unplug the 2 antenna cables...
Maintenance and Service Guide
Page 85
...display the boot menu, and then boot from the floppy drive. 6. Wireless Models Only • Before installing the motherboard, make sure the round coaxial cables from the Partnership Web ...site (see the HP logo, press esc to update the display/LCD identification stored on the motherboard for the...After replacing the display assembly or motherboard, you must also replace the thermal pad on the notebook. 5. Download the notebook Series service package from the antenna PCAs are replacing the CPU module, you must use the...
...display the boot menu, and then boot from the floppy drive. 6. Wireless Models Only • Before installing the motherboard, make sure the round coaxial cables from the Partnership Web ...site (see the HP logo, press esc to update the display/LCD identification stored on the motherboard for the...After replacing the display assembly or motherboard, you must also replace the thermal pad on the notebook. 5. Download the notebook Series service package from the antenna PCAs are replacing the CPU module, you must use the...
Maintenance and Service Guide
Page 86
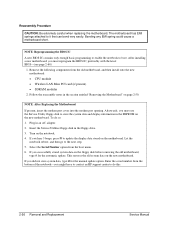
...the new motherboard. Enter the serial number from the old motherboard, and then install onto the new motherboard: • CPU module • Wireless LAN Mini PCI card (if present) • SDRAM modules 2. NOTE: After Replacing the Motherboard If present, insert the modem port cover into the modem port ...5. Plug in the floppy drive. 3. If you might have to contact an HP support center to store the system data and display information in the section entitled "Removing the Motherboard" on the notebook. 4. Let the notebook reboot, and then go to it that can bend very easily. Remove the ...
...the new motherboard. Enter the serial number from the old motherboard, and then install onto the new motherboard: • CPU module • Wireless LAN Mini PCI card (if present) • SDRAM modules 2. NOTE: After Replacing the Motherboard If present, insert the modem port cover into the modem port ...5. Plug in the floppy drive. 3. If you might have to contact an HP support center to store the system data and display information in the section entitled "Removing the Motherboard" on the notebook. 4. Let the notebook reboot, and then go to it that can bend very easily. Remove the ...

Maintenance and Service Guide
Page 92
..., I/R PCA, left screws. Do not replace the 2 left and right antennas (wireless models only) PCA, motherboard PCA, switchboard Socket, PCMCIA Speaker assembly Removal Procedure Keyboard cover(page 2-13) Speaker (page 2-15) Keyboard (page 2-16) Switchboard PCA(page 2-... 2 antenna PCAs. 1. Disconnect the front antenna PCA cables from the motherboard. 2-62 Removal and Replacement Service Manual Unplug the PCMCIA socket from the Mini PCI card (page 2-7). Press the tabs on the bottom case when removing or replacing either of the panel, and then lift it from the bottom case.
..., I/R PCA, left screws. Do not replace the 2 left and right antennas (wireless models only) PCA, motherboard PCA, switchboard Socket, PCMCIA Speaker assembly Removal Procedure Keyboard cover(page 2-13) Speaker (page 2-15) Keyboard (page 2-16) Switchboard PCA(page 2-... 2 antenna PCAs. 1. Disconnect the front antenna PCA cables from the motherboard. 2-62 Removal and Replacement Service Manual Unplug the PCMCIA socket from the Mini PCI card (page 2-7). Press the tabs on the bottom case when removing or replacing either of the panel, and then lift it from the bottom case.
Maintenance and Service Guide
Page 110
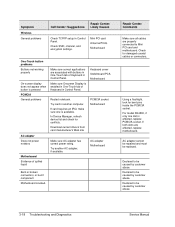
... Diagnostics Service Manual Symptom Wireless General problems Call Center: Suggestions Repair Center: Likely Causes Check TCP/IP setup in Control Panel. Keyboard cover Switchboard PCA Motherboard PCMCIA socket Motherboard AC adapter Motherboard Bent or broken connectors, or burnt component Motherboard cracked. Declared to Mini PCI card and motherboard. If card requires an IRQ...
... Diagnostics Service Manual Symptom Wireless General problems Call Center: Suggestions Repair Center: Likely Causes Check TCP/IP setup in Control Panel. Keyboard cover Switchboard PCA Motherboard PCMCIA socket Motherboard AC adapter Motherboard Bent or broken connectors, or burnt component Motherboard cracked. Declared to Mini PCI card and motherboard. If card requires an IRQ...
Maintenance and Service Guide
Page 145
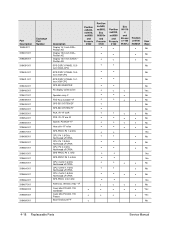
..., Cel-M 1.7 GHz Northwood uFCPGA CPU, Cel-M 1.8 GHz Northwood uFCPGA SPS-PROC C/2.0 GHz Antennas, Wireless R&L-1F Card, Mini PCI-802.11B worldwide Card, Mini PCI-802.11B France Base Enclosure FF Pavilion ze5x00, nx9010, nx9008 and Presario 2500 Pavilion ze4x00, nx9005, Evo N1050v and Presario 2100 • Pavilion ze4200, nx9000 and Presario 2100 Evo N1010...
..., Cel-M 1.7 GHz Northwood uFCPGA CPU, Cel-M 1.8 GHz Northwood uFCPGA SPS-PROC C/2.0 GHz Antennas, Wireless R&L-1F Card, Mini PCI-802.11B worldwide Card, Mini PCI-802.11B France Base Enclosure FF Pavilion ze5x00, nx9010, nx9008 and Presario 2500 Pavilion ze4x00, nx9005, Evo N1050v and Presario 2100 • Pavilion ze4200, nx9000 and Presario 2100 Evo N1010...
Maintenance and Service Guide
Page 148
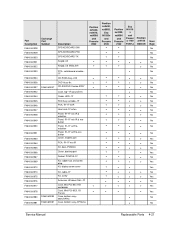
W2K/XPPro Case, bottom assy-XPHome Pavilion ze5x00, nx9010, nx9008 and Presario 2500 • • Pavilion ze4x00, nx9005, Evo N1050v and Presario 2100 • • • • • Pavilion ze4200, nx9000 and Presario 2100 • Evo N1010 v and Presari o 1100 F5771J • • &#... Kit, door-PCMCIA Cover, docking port Socket, PCMCIA-1F Kit, rubber foot and screw plug Kit, display screw cover Kit, cable-1F Kit, screw Antennas, Wireless R&L-1F Card, Mini PCI-802.11B worldwide Card, Mini PCI-8021.1B France Case, bottom assy-
W2K/XPPro Case, bottom assy-XPHome Pavilion ze5x00, nx9010, nx9008 and Presario 2500 • • Pavilion ze4x00, nx9005, Evo N1050v and Presario 2100 • • • • • Pavilion ze4200, nx9000 and Presario 2100 • Evo N1010 v and Presari o 1100 F5771J • • &#... Kit, door-PCMCIA Cover, docking port Socket, PCMCIA-1F Kit, rubber foot and screw plug Kit, display screw cover Kit, cable-1F Kit, screw Antennas, Wireless R&L-1F Card, Mini PCI-802.11B worldwide Card, Mini PCI-8021.1B France Case, bottom assy-


