
End User License Agreement
Page 2
... are owned by HP or its affiliates may not sublicense, assign or transfer the license or Software Product except as eligible for commercial timesharing or bureau use a Software Product identified as an upgrade, you may not reverse engineer, decompile, or disassemble the Software Product,...solution shall be used for restoring the hard disk of such license. To use . The transfer may only be governed by HP unless HP provides other applicable laws and international treaty provisions. TRANSFER. f. You shall not remove any Microsoft operating system software contained in ...
... are owned by HP or its affiliates may not sublicense, assign or transfer the license or Software Product except as eligible for commercial timesharing or bureau use a Software Product identified as an upgrade, you may not reverse engineer, decompile, or disassemble the Software Product,...solution shall be used for restoring the hard disk of such license. To use . The transfer may only be governed by HP unless HP provides other applicable laws and international treaty provisions. TRANSFER. f. You shall not remove any Microsoft operating system software contained in ...
Reference Guide
Page 2
... with regard to change without prior written permission of merchantability and fitness for additional copyright notices. registered trademarks of Adobe Systems Incorporated. Reverse engineering or disassembly is " and are subject to this manual or the examples herein. © Copyright Hewlett-Packard Company 2003. The programs that is prohibited without notice. See...
... with regard to change without prior written permission of merchantability and fitness for additional copyright notices. registered trademarks of Adobe Systems Incorporated. Reverse engineering or disassembly is " and are subject to this manual or the examples herein. © Copyright Hewlett-Packard Company 2003. The programs that is prohibited without notice. See...
Reference Guide
Page 107
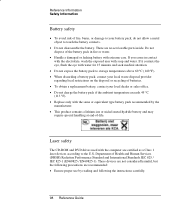
... recycling of batteries. • To obtain a replacement battery, contact your battery pack, do not allow a metal object to touch the battery contacts. • Do not disassemble the battery. If you come in fire or water. • Handle a damaged or leaking battery with the same or equivalent type battery pack recommended by...
... recycling of batteries. • To obtain a replacement battery, contact your battery pack, do not allow a metal object to touch the battery contacts. • Do not disassemble the battery. If you come in fire or water. • Handle a damaged or leaking battery with the same or equivalent type battery pack recommended by...

Maintenance and Service Guide
Page 3
Contents Introduction...vii Product Information...1-1 Features ...1-8 Operation...1-14 Specifications ...1-18 Internal Design...1-24 Removal and Replacement 2-1 Disassembly Flowchart ...2-3 Removing the Battery ...2-4 Removing an SDRAM Module...2-5 Removing the Wireless LAN Mini PCI Card 2-7 Removing the Hard Disk Drive...2-9 Recovering the Factory Software...2-11 ...
Contents Introduction...vii Product Information...1-1 Features ...1-8 Operation...1-14 Specifications ...1-18 Internal Design...1-24 Removal and Replacement 2-1 Disassembly Flowchart ...2-3 Removing the Battery ...2-4 Removing an SDRAM Module...2-5 Removing the Wireless LAN Mini PCI Card 2-7 Removing the Hard Disk Drive...2-9 Recovering the Factory Software...2-11 ...
Maintenance and Service Guide
Page 4
...Module Installation 2-39 Figure 2-32 Removing the CPU Module 2-39 Figure 2-33. Back View ...1-9 Figure 1-3. Replaceable Module Diagram 1-24 Figure 2-1. Disassembly Flow...2-3 Figure 2-2. Removing an SDRAM Module 2-5 Figure 2-4. Removing the Hard Disk Drive 2-9 Figure 2-8. Removing the Switchboard PCA 2-19 Figure ... 2-17. Removing the Floppy Drive 2-33 Figure 2-23. Removing the Heat Sink (with Fan 2-43 Figure 2-28. Resetting the Notebook ...1-17 Figure 1-8. Removing the Mini PCI Card 2-8 Figure 2-7. Removing the I/R PCA...2-37 Figure 2-25. Intel CPU Module Removal ...
...Module Installation 2-39 Figure 2-32 Removing the CPU Module 2-39 Figure 2-33. Back View ...1-9 Figure 1-3. Replaceable Module Diagram 1-24 Figure 2-1. Disassembly Flow...2-3 Figure 2-2. Removing an SDRAM Module 2-5 Figure 2-4. Removing the Hard Disk Drive 2-9 Figure 2-8. Removing the Switchboard PCA 2-19 Figure ... 2-17. Removing the Floppy Drive 2-33 Figure 2-23. Removing the Heat Sink (with Fan 2-43 Figure 2-28. Resetting the Notebook ...1-17 Figure 1-8. Removing the Mini PCI Card 2-8 Figure 2-7. Removing the I/R PCA...2-37 Figure 2-25. Intel CPU Module Removal ...
Maintenance and Service Guide
Page 33
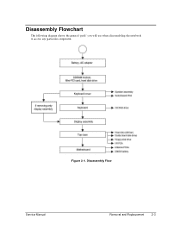
Figure 2-1. Disassembly Flow Service Manual Removal and Replacement 2-3 Disassembly Flowchart The following diagram shows the general "path" you will use when disassembling the notebook to access any particular component.
Figure 2-1. Disassembly Flow Service Manual Removal and Replacement 2-3 Disassembly Flowchart The following diagram shows the general "path" you will use when disassembling the notebook to access any particular component.
Service Manual
Page 3
Contents Product Information...1-1 Features ...1-48 Operation ...1-54 Specifications ...1-58 Internal Design ...1-64 Removal and Replacement 2-1 Disassembly Flowchart ...2-3 Removing the Battery...2-4 Removing a SDRAM Module...2-5 Removing the Wireless LAN Mini-PCI Card 2-7 Removing the Hard Disk Drive...2-9 Replacing Small Parts ...2-11 Removing the ...
Contents Product Information...1-1 Features ...1-48 Operation ...1-54 Specifications ...1-58 Internal Design ...1-64 Removal and Replacement 2-1 Disassembly Flowchart ...2-3 Removing the Battery...2-4 Removing a SDRAM Module...2-5 Removing the Wireless LAN Mini-PCI Card 2-7 Removing the Hard Disk Drive...2-9 Replacing Small Parts ...2-11 Removing the ...
Service Manual
Page 4
.... Removing the Motherboard 2-51 Figure 2-32. Removing a PCMCIA Door 2-60 Figure 2-38. Back View...1-49 Figure 1-3. Resetting the Notebook 1-57 Figure 1-8. Removing an SDRAM Module 2-5 Figure 2-4. Disconnecting the Speaker Cable 2-14 Figure 2-11. Removing the Top Case Screws...Removing an SDRAM Module 2-6 Figure 2-5. Replacing the Antennas 2-60 Figure 2-37. Exploded View...4-3 iv Service Manual Back View...1-52 Figure 1-6. Disassembly Flow ...2-3 Figure 2-2. Removing the Mini-PCI Card 2-7 Figure 2-6. Removing the CD/DVD Drive 2-21 Figure 2-16. Removing the Audio ...
.... Removing the Motherboard 2-51 Figure 2-32. Removing a PCMCIA Door 2-60 Figure 2-38. Back View...1-49 Figure 1-3. Resetting the Notebook 1-57 Figure 1-8. Removing an SDRAM Module 2-5 Figure 2-4. Disconnecting the Speaker Cable 2-14 Figure 2-11. Removing the Top Case Screws...Removing an SDRAM Module 2-6 Figure 2-5. Replacing the Antennas 2-60 Figure 2-37. Exploded View...4-3 iv Service Manual Back View...1-52 Figure 1-6. Disassembly Flow ...2-3 Figure 2-2. Removing the Mini-PCI Card 2-7 Figure 2-6. Removing the CD/DVD Drive 2-21 Figure 2-16. Removing the Audio ...
Service Manual
Page 74
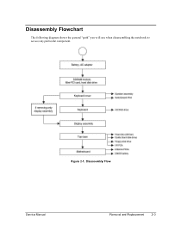
Figure 2-1. Disassembly Flow Service Manual Removal and Replacement 2-3 Disassembly Flowchart The following diagram shows the general "path" you will use when disassembling the notebook to access any particular component.
Figure 2-1. Disassembly Flow Service Manual Removal and Replacement 2-3 Disassembly Flowchart The following diagram shows the general "path" you will use when disassembling the notebook to access any particular component.


