Reference Guide
Page 14
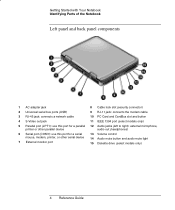
Getting Started with Your Notebook Identifying Parts of the Notebook Left panel and back panel components 1 AC adapter jack 8 Cable lock slot (security connector) 2 Universal serial bus ports (USB) 9 RJ-11 jack: connects the modem cable 3 RJ-45 jack: connects a network cable 10 PC Card and CardBus slot and button 4 S-Video out jack 11 IEEE 1394...
Getting Started with Your Notebook Identifying Parts of the Notebook Left panel and back panel components 1 AC adapter jack 8 Cable lock slot (security connector) 2 Universal serial bus ports (USB) 9 RJ-11 jack: connects the modem cable 3 RJ-45 jack: connects a network cable 10 PC Card and CardBus slot and button 4 S-Video out jack 11 IEEE 1394...
Reference Guide
Page 15
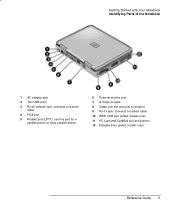
Getting Started with Your Notebook Identifying Parts of the Notebook 1 AC adapter jack 2 Two USB ports 3 RJ-45 network jack: connects a network cable 4 PS/2 port 5 Parallel port (LPT1): use this port for a parallel printer or other parallel device 6 External monitor port 7 S-Video out jack 8 Cable lock slot (security connector) 9 RJ-11 jack: connects a modem cable 10 IEEE 1394 port (select models only) 11 PC Card and CardBus slot and buttons 12 Diskette drive (select models only) Reference Guide 5
Getting Started with Your Notebook Identifying Parts of the Notebook 1 AC adapter jack 2 Two USB ports 3 RJ-45 network jack: connects a network cable 4 PS/2 port 5 Parallel port (LPT1): use this port for a parallel printer or other parallel device 6 External monitor port 7 S-Video out jack 8 Cable lock slot (security connector) 9 RJ-11 jack: connects a modem cable 10 IEEE 1394 port (select models only) 11 PC Card and CardBus slot and buttons 12 Diskette drive (select models only) Reference Guide 5
Reference Guide
Page 18
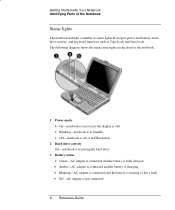
...is off) • Blinking-notebook is in Standby • Off-notebook is off or in Hibernation 2 Hard drive activity On-notebook is accessing the hard drive 3 Battery status • Green-AC adapter is connected and the battery is fully charged • Amber-AC adapter is connected and the battery ...is charging • Blinking-AC adapter is connected and the battery is missing or has a fault • Off-AC adapter is...
...is off) • Blinking-notebook is in Standby • Off-notebook is off or in Hibernation 2 Hard drive activity On-notebook is accessing the hard drive 3 Battery status • Green-AC adapter is connected and the battery is fully charged • Amber-AC adapter is connected and the battery ...is charging • Blinking-AC adapter is connected and the battery is missing or has a fault • Off-AC adapter is...
Reference Guide
Page 20
... down. 2. For information about reducing your risk, see the Safety & Comfort Guide on the notebook, and run the Windows setup program. When you will charge the battery, connect the AC adapter, turn on this CD included with your notebook for extended periods, you should use of properly. Rechargeable batteries must be recycled or disposed...
... down. 2. For information about reducing your risk, see the Safety & Comfort Guide on the notebook, and run the Windows setup program. When you will charge the battery, connect the AC adapter, turn on this CD included with your notebook for extended periods, you should use of properly. Rechargeable batteries must be recycled or disposed...
Reference Guide
Page 21
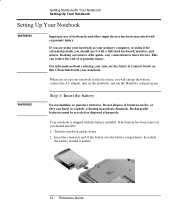
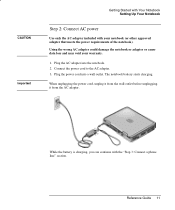
... power cord to the AC adapter. 3. The notebook battery starts charging. When unplugging the power cord, unplug it from the wall outlet before unplugging it from the AC adapter. Plug the power cord into the notebook. 2. While the battery...Notebook Setting Up Your Notebook Step 2: Connect AC power Use only the AC adapter included with the "Step 3: Connect a phone line" section. Using the wrong AC adapter could damage the notebook or adapter or cause data loss and may void your notebook (or other approved adapter that meets the power requirements of the notebook). Plug the AC adapter...
... power cord to the AC adapter. 3. The notebook battery starts charging. When unplugging the power cord, unplug it from the wall outlet before unplugging it from the AC adapter. Plug the power cord into the notebook. 2. While the battery...Notebook Setting Up Your Notebook Step 2: Connect AC power Use only the AC adapter included with the "Step 3: Connect a phone line" section. Using the wrong AC adapter could damage the notebook or adapter or cause data loss and may void your notebook (or other approved adapter that meets the power requirements of the notebook). Plug the AC adapter...
Reference Guide
Page 23
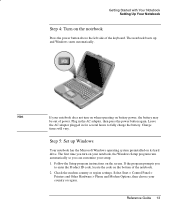
...AC adapter plugged in the AC adapter, then press the power button again. The first time you turn on when operating on your setup. 1. If the program prompts you can customize your notebook, the Windows Setup program runs automatically so you to fully charge the battery. The notebook boots up Windows Your notebook...power, the battery may be out of the keyboard. Getting Started with Your Notebook Setting Up Your Notebook Step 4: Turn on the screen. Follow the Setup program instructions on the notebook Press the power button above the left side of power. Charge times will vary...
...AC adapter plugged in the AC adapter, then press the power button again. The first time you turn on when operating on your setup. 1. If the program prompts you can customize your notebook, the Windows Setup program runs automatically so you to fully charge the battery. The notebook boots up Windows Your notebook...power, the battery may be out of the keyboard. Getting Started with Your Notebook Setting Up Your Notebook Step 4: Turn on the screen. Follow the Setup program instructions on the notebook Press the power button above the left side of power. Charge times will vary...
Reference Guide
Page 40
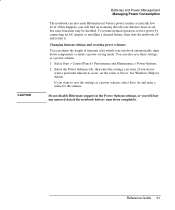
... and Maintenance > Power Options. 2. If you want to Never. To resume normal operation, restore power by connecting an AC adapter or installing a charged battery, then shut the notebook off and restart it. Changing timeout settings and creating power schemes You can adjust the length of timeouts after which your...or enters a power-saving mode. Select the Power Schemes tab, then enter the settings you will find on resuming that all your notebook automatically shuts down completely. Reference Guide 31 If this happens, you do not want . Do not disable Hibernate support in the Power ...
... and Maintenance > Power Options. 2. If you want to Never. To resume normal operation, restore power by connecting an AC adapter or installing a charged battery, then shut the notebook off and restart it. Changing timeout settings and creating power schemes You can adjust the length of timeouts after which your...or enters a power-saving mode. Select the Power Schemes tab, then enter the settings you will find on resuming that all your notebook automatically shuts down completely. Reference Guide 31 If this happens, you do not want . Do not disable Hibernate support in the Power ...
Reference Guide
Page 42
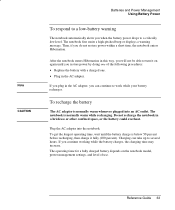
... Power To respond to a low-battery warning The notebook automatically alerts you do not restore power within a short time, the notebook enters Hibernation. To recharge the battery The AC adapter is normally warm whenever plugged into the notebook. Charging can continue to a critically low level....battery charges, the charging time may increase. The notebook first emits a high-pitched beep or displays a warning message. If you plug in the AC adapter. Plug the AC adapter into an AC outlet. Reference Guide 33 After the notebook enters Hibernation in a briefcase or other confined space,...
... Power To respond to a low-battery warning The notebook automatically alerts you do not restore power within a short time, the notebook enters Hibernation. To recharge the battery The AC adapter is normally warm whenever plugged into the notebook. Charging can continue to a critically low level....battery charges, the charging time may increase. The notebook first emits a high-pitched beep or displays a warning message. If you plug in the AC adapter. Plug the AC adapter into an AC outlet. Reference Guide 33 After the notebook enters Hibernation in a briefcase or other confined space,...
Reference Guide
Page 43
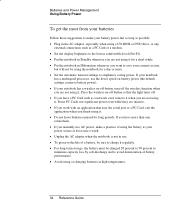
.... • For long-term storage, the battery must be using the notebook for long periods. If you are not using it. Some PC Cards use AC power, make your battery power last as long as possible: • Plug in the AC adapter, especially when using a CD-ROM or DVD drive, or any external ...connections such as a PC Card or a modem. • Set the display brightness to the lowest comfortable level (Fn+F1). • Put the notebook in Standby whenever you are not using it for...
.... • For long-term storage, the battery must be using the notebook for long periods. If you are not using it. Some PC Cards use AC power, make your battery power last as long as possible: • Plug in the AC adapter, especially when using a CD-ROM or DVD drive, or any external ...connections such as a PC Card or a modem. • Set the display brightness to the lowest comfortable level (Fn+F1). • Put the notebook in Standby whenever you are not using it for...
Reference Guide
Page 64
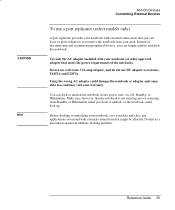
...) A port replicator provides your notebook with external connections that might be affected. Before docking or undocking your notebook, save your warranty. Do this as a precaution against an unlikely docking problem. Reference Guide 55 Use only the AC adapter included with external connections that you... dock or undock, or the notebook could damage the notebook or adapter and cause data loss, and may void your data and close any power ...
...) A port replicator provides your notebook with external connections that might be affected. Before docking or undocking your notebook, save your warranty. Do this as a precaution against an unlikely docking problem. Reference Guide 55 Use only the AC adapter included with external connections that you... dock or undock, or the notebook could damage the notebook or adapter and cause data loss, and may void your data and close any power ...
Reference Guide
Page 65
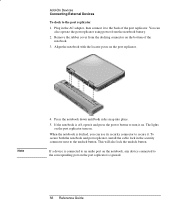
...cover from the notebook battery. 2. Press the notebook down until both the notebook and port replicator, install the cable lock in the AC adapter, then connect it to secure it and press the power button to the undock button. The lights on the port replicator turn it on. If the notebook is off, ...open it . Plug in the security connector next to turn on. When the notebook is docked, you...
...cover from the notebook battery. 2. Press the notebook down until both the notebook and port replicator, install the cable lock in the AC adapter, then connect it to secure it and press the power button to the undock button. The lights on the port replicator turn it on. If the notebook is off, ...open it . Plug in the security connector next to turn on. When the notebook is docked, you...
Reference Guide
Page 67
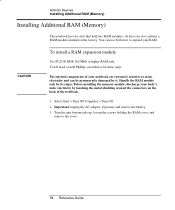
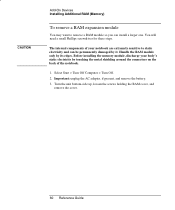
...unit bottom-side up, loosen the screws holding the RAM cover, and remove the cover. 58 Reference Guide The internal components of the notebook. 1. Important: unplug the AC adapter, if present, and remove the battery. 3. Select Start > Turn Off Computer > Turn Off. 2. You can use both slots to ...expand your notebook are extremely sensitive to static electricity and can be permanently damaged by it. At least one slot contains a RAM module installed ...
...unit bottom-side up, loosen the screws holding the RAM cover, and remove the cover. 58 Reference Guide The internal components of the notebook. 1. Important: unplug the AC adapter, if present, and remove the battery. 3. Select Start > Turn Off Computer > Turn Off. 2. You can use both slots to ...expand your notebook are extremely sensitive to static electricity and can be permanently damaged by it. At least one slot contains a RAM module installed ...
Reference Guide
Page 69
The internal components of the notebook. 1. Select Start > Turn Off Computer > Turn Off. 2. Important: unplug the AC adapter, if present, and remove the battery. 3. You will need a small Phillips screwdriver for these steps. Handle the RAM module only by its edges. Before installing ...
The internal components of the notebook. 1. Select Start > Turn Off Computer > Turn Off. 2. Important: unplug the AC adapter, if present, and remove the battery. 3. You will need a small Phillips screwdriver for these steps. Handle the RAM module only by its edges. Before installing ...
Reference Guide
Page 71
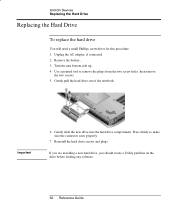
... hard drive out of the notebook. Gently slide the new drive into the hard drive compartment. If you are installing a new hard drive, you should create a Utility partition on the drive before loading any software. 62 Reference Guide Turn the unit bottom side up. 4. Important 6. Unplug the AC adapter, if connected. 2. Reinstall the...
... hard drive out of the notebook. Gently slide the new drive into the hard drive compartment. If you are installing a new hard drive, you should create a Utility partition on the drive before loading any software. 62 Reference Guide Turn the unit bottom side up. 4. Important 6. Unplug the AC adapter, if connected. 2. Reinstall the...

Reference Guide
Page 78
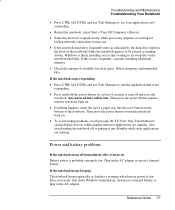
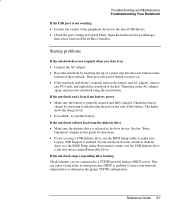
If necessary, connect the AC adapter, then make sure it is coming from elsewhere, such as from the fan or a PC Card drive. Reference Guide 69 If the hard drive makes a buzzing or whining noise • Back up the drive immediately. • See whether ... the disk you can format the hard disk and reinstall the original factory software using the QuickRestore System Recovery CD included with your notebook. Troubleshooting and Maintenance Troubleshooting Your Notebook If an external display does not work • Check the connections. • The external monitor may not be detected. In...
If necessary, connect the AC adapter, then make sure it is coming from elsewhere, such as from the fan or a PC Card drive. Reference Guide 69 If the hard drive makes a buzzing or whining noise • Back up the drive immediately. • See whether ... the disk you can format the hard disk and reinstall the original factory software using the QuickRestore System Recovery CD included with your notebook. Troubleshooting and Maintenance Troubleshooting Your Notebook If an external display does not work • Check the connections. • The external monitor may not be detected. In...
Reference Guide
Page 86
... your work, shut down Windows immediately, and insert a charged battery or plug in the AC adapter or insert a charged battery. Plug in the AC adapter. Then press the power button to turn the notebook back on. • If nothing happens, insert the tip of a paper clip into Standby ...while such applications are running . If the notebook keeps beeping The notebook beeps repeatedly or displays a warning when...
... your work, shut down Windows immediately, and insert a charged battery or plug in the AC adapter or insert a charged battery. Plug in the AC adapter. Then press the power button to turn the notebook back on. • If nothing happens, insert the tip of a paper clip into Standby ...while such applications are running . If the notebook keeps beeping The notebook beeps repeatedly or displays a warning when...

Reference Guide
Page 87
... battery operating time. • PC Card use a 60-watt, 3.16-amp adapter. • Move the notebook away from any of the suggestions listed in the "Batteries and Power Management" chapter in place. • Make sure you're using only the AC adapter included with your current task, .... • If available, try another battery and AC adapter. Troubleshooting and Maintenance Troubleshooting Your Notebook If the battery doesn't charge • Make sure the AC adapter is fully plugged into the power source and the notebook, and that the light on the Adapter is on. • If you're using a...
... battery operating time. • PC Card use a 60-watt, 3.16-amp adapter. • Move the notebook away from any of the suggestions listed in the "Batteries and Power Management" chapter in place. • Make sure you're using only the AC adapter included with your current task, .... • If available, try another battery and AC adapter. Troubleshooting and Maintenance Troubleshooting Your Notebook If the battery doesn't charge • Make sure the AC adapter is fully plugged into the power source and the notebook, and that the light on the Adapter is on. • If you're using a...
Reference Guide
Page 90
... drive • Make sure the diskette drive is selected as the boot device. See the "Basic Operation" chapter in the AC adapter again, and reset the notebook using a USB diskette drive, use the BIOS Setup utility Boot menu to make sure the USB diskette drive is the first ...working • Contact the vendor of the peripheral device for directions. • If you turn it on. • If the notebook still doesn't respond, remove the battery and AC adapter, remove any PC Cards, and undock the notebook if docked. Open the hardware Device Manager, then select Universal Serial Bus Controller.
... drive • Make sure the diskette drive is selected as the boot device. See the "Basic Operation" chapter in the AC adapter again, and reset the notebook using a USB diskette drive, use the BIOS Setup utility Boot menu to make sure the USB diskette drive is the first ...working • Contact the vendor of the peripheral device for directions. • If you turn it on. • If the notebook still doesn't respond, remove the battery and AC adapter, remove any PC Cards, and undock the notebook if docked. Open the hardware Device Manager, then select Universal Serial Bus Controller.
Reference Guide
Page 106
... dealer or Sales and Service office. To purchase a power cord (including one of the power cords listed below ) or a replacement AC adapter, contact your local area. For any power cord with the notebook AC adapter should use one for the local area. Country or Region Canada Mexico Philippines Taiwan United States East and West Europe... need to connect to a different outlet or voltage, you have to replace the fuse, be sure to install an approved fuse. Regulatory approval for the AC adapter has been obtained using the power cord for an area not listed below .
... dealer or Sales and Service office. To purchase a power cord (including one of the power cords listed below ) or a replacement AC adapter, contact your local area. For any power cord with the notebook AC adapter should use one for the local area. Country or Region Canada Mexico Philippines Taiwan United States East and West Europe... need to connect to a different outlet or voltage, you have to replace the fuse, be sure to install an approved fuse. Regulatory approval for the AC adapter has been obtained using the power cord for an area not listed below .
Reference Guide
Page 110
...your dealer, an experienced radio/television technician, or the following booklet, prepared by removing the unit's batteries and AC adapter), try the following: • Reorienting or relocating the receiving antenna. • Relocating the computer with respect to the receiver. &#...8226; Connecting the computer's AC adapter to provide reasonable protection against harmful interference in a particular installation. If requested, this device. This equipment complies with ...
...your dealer, an experienced radio/television technician, or the following booklet, prepared by removing the unit's batteries and AC adapter), try the following: • Reorienting or relocating the receiving antenna. • Relocating the computer with respect to the receiver. &#...8226; Connecting the computer's AC adapter to provide reasonable protection against harmful interference in a particular installation. If requested, this device. This equipment complies with ...


