2011 Business LCD Monitor Quick Reference Guide
Page 1
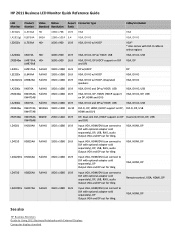
..., USB VGA, DVI-D, USB ZR2440w XW477A4, WUXGA 1920 x 1200 16:10 DVI-D, DP, HDMI; (HDCP support on DP, DVI-D, DP, USB XW477A8 HDMI and DVI) ZR2740w XW476A4, WQHD 2560 x 1440 16:9 XW476A8 DP, Dual-Link DVI, (HDCP support on DP Dual-Link DVI-D, DP, USB and DVI) LD4201 XH219AA Full-HD... VGA, HDMI/DVI (can connect to DVI with optional adapter sold separately), DP Output VGA and DP out for tiling VGA, HDMI, DP See also HP Business Monitors Guide to Using 2011 Business Notebooks with External Displays Computer display standard
..., USB VGA, DVI-D, USB ZR2440w XW477A4, WUXGA 1920 x 1200 16:10 DVI-D, DP, HDMI; (HDCP support on DP, DVI-D, DP, USB XW477A8 HDMI and DVI) ZR2740w XW476A4, WQHD 2560 x 1440 16:9 XW476A8 DP, Dual-Link DVI, (HDCP support on DP Dual-Link DVI-D, DP, USB and DVI) LD4201 XH219AA Full-HD... VGA, HDMI/DVI (can connect to DVI with optional adapter sold separately), DP Output VGA and DP out for tiling VGA, HDMI, DP See also HP Business Monitors Guide to Using 2011 Business Notebooks with External Displays Computer display standard

User Guide
Page 1
HP ZR2040w, ZR2240w, ZR2440w and ZR2740w LCD Monitors User Guide
HP ZR2040w, ZR2240w, ZR2440w and ZR2740w LCD Monitors User Guide

User Guide
Page 3
CAUTION: Text set off in this manner indicates that failure to follow directions could result in bodily harm or loss of information. NOTE: Text set off in this manner indicates that failure to equipment or loss of life. WARNING! Text set off in damage to follow directions could result in this manner provides important supplemental information. iii About This Guide This guide provides information on setting up the monitor and technical specifications.
CAUTION: Text set off in this manner indicates that failure to follow directions could result in bodily harm or loss of information. NOTE: Text set off in this manner indicates that failure to equipment or loss of life. WARNING! Text set off in damage to follow directions could result in this manner provides important supplemental information. iii About This Guide This guide provides information on setting up the monitor and technical specifications.
User Guide
Page 5
... Locating the Information Card (Select Models 18 Installing a Cable Lock ...19 Turning on the Monitor ...19 Adjusting the Monitor ...20 Portrait Orientation ...22 3 Operating the Monitor ...23 Overview of Operation ...23 ZR2040w and ZR2240w Model 23 ZR2440w Model ...25 ZR2740w Model ...26 Using the On-Screen Display Menu (Select Models 27 4 Locating Additional Information...
... Locating the Information Card (Select Models 18 Installing a Cable Lock ...19 Turning on the Monitor ...19 Adjusting the Monitor ...20 Portrait Orientation ...22 3 Operating the Monitor ...23 Overview of Operation ...23 ZR2040w and ZR2240w Model 23 ZR2440w Model ...25 ZR2740w Model ...26 Using the On-Screen Display Menu (Select Models 27 4 Locating Additional Information...
User Guide
Page 7
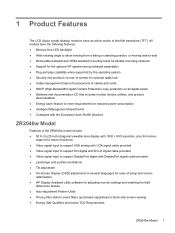
All models have an active matrix of setup and screen optimization ● HP Display Assistant utility software for adjusting monitor settings and enabling the theft deterrence feature ● Auto-adjustment Pattern Utility ● Privacy filter slots to insert filters (purchased... mounting holes for flexible mounting solutions ● Support for the optional HP speaker bar (purchased separately) ● Plug and play capability when supported by the operating system ● Security slot provision on rear of monitor for optional cable lock ● Cable management feature for placement of ...
All models have an active matrix of setup and screen optimization ● HP Display Assistant utility software for adjusting monitor settings and enabling the theft deterrence feature ● Auto-adjustment Pattern Utility ● Privacy filter slots to insert filters (purchased... mounting holes for flexible mounting solutions ● Support for the optional HP speaker bar (purchased separately) ● Plug and play capability when supported by the operating system ● Security slot provision on rear of monitor for optional cable lock ● Cable management feature for placement of ...

User Guide
Page 8
... with one upstream (connects to the computer) and four downstream (connect to USB devices) ports ● USB cable included to connect to the monitor's USB hub and to a USB connector on a computer ● SPDIF Digital Audio Output signal ● Analog audio output signal to support ...call ● On-Screen Display (OSD) adjustments in several languages for ease of setup and screen optimization ● HP Display Assistant utility software for adjusting monitor settings and enabling the theft deterrence feature ● Auto-adjustment Pattern Utility ● Privacy filter slots to insert ...
... with one upstream (connects to the computer) and four downstream (connect to USB devices) ports ● USB cable included to connect to the monitor's USB hub and to a USB connector on a computer ● SPDIF Digital Audio Output signal ● Analog audio output signal to support ...call ● On-Screen Display (OSD) adjustments in several languages for ease of setup and screen optimization ● HP Display Assistant utility software for adjusting monitor settings and enabling the theft deterrence feature ● Auto-adjustment Pattern Utility ● Privacy filter slots to insert ...
User Guide
Page 9
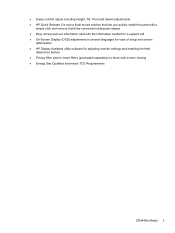
● 8-way comfort adjust including Height, Tilt, Pivot and Swivel adjustments ● HP Quick Release 2 is now a flush mount solution that lets you quickly install the panel with a simple click and remove it with the convenient sliding ... needed for a support call ● On-Screen Display (OSD) adjustments in several languages for ease of setup and screen optimization ● HP Display Assistant utility software for adjusting monitor settings and enabling the theft deterrence feature ● Privacy filter slots to insert filters (purchased separately) to block side screen viewing ●...
● 8-way comfort adjust including Height, Tilt, Pivot and Swivel adjustments ● HP Quick Release 2 is now a flush mount solution that lets you quickly install the panel with a simple click and remove it with the convenient sliding ... needed for a support call ● On-Screen Display (OSD) adjustments in several languages for ease of setup and screen optimization ● HP Display Assistant utility software for adjusting monitor settings and enabling the theft deterrence feature ● Privacy filter slots to insert filters (purchased separately) to block side screen viewing ●...
User Guide
Page 10
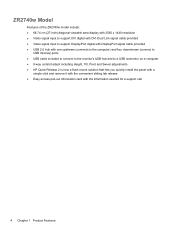
... of the ZR2740w model include: ● 68.74 cm (27-inch) diagonal viewable area display with 2560 x 1440 resolution... computer) and four downstream (connect to USB devices) ports ● USB cable included to connect to the monitor's USB hub and to a USB connector on a computer ● 8-way comfort adjust including Height, Tilt, Pivot and Swivel adjustments ●...; HP Quick Release 2 is now a flush mount solution that lets you quickly install the panel with a simple click and ...
... of the ZR2740w model include: ● 68.74 cm (27-inch) diagonal viewable area display with 2560 x 1440 resolution... computer) and four downstream (connect to USB devices) ports ● USB cable included to connect to the monitor's USB hub and to a USB connector on a computer ● 8-way comfort adjust including Height, Tilt, Pivot and Swivel adjustments ●...; HP Quick Release 2 is now a flush mount solution that lets you quickly install the panel with a simple click and ...
User Guide
Page 11
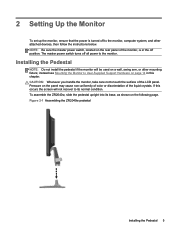
...base, as shown on a wall, swing arm, or other attached devices, then follow the instructions below. If this chapter. CAUTION: Whenever you handle the monitor, take care not to touch the surface of the liquid crystals. NOTE: Be sure the master power switch, located on the rear panel of the... monitor, is turned off to the monitor, computer system, and other mounting fixture; To assemble the ZR2040w, slide the pedestal upright into its normal condition. 2 Setting Up ...
...base, as shown on a wall, swing arm, or other attached devices, then follow the instructions below. If this chapter. CAUTION: Whenever you handle the monitor, take care not to touch the surface of the liquid crystals. NOTE: Be sure the master power switch, located on the rear panel of the... monitor, is turned off to the monitor, computer system, and other mounting fixture; To assemble the ZR2040w, slide the pedestal upright into its normal condition. 2 Setting Up ...

User Guide
Page 12
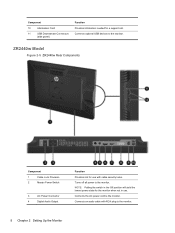
... into place. 3. The HP Quick Release 2 latch pops up when the monitor is locked in the back of the monitor. Connects the DisplayPort cable to the monitor. Provides slot for easy moving of the panel. 2. Models ZR2240w, ZR2440w, and ZR2740w use the HP Quick Release 2 mechanism for... use with cable security locks. Connects the DVI-D cable to the monitor. To mount the panel onto the pedestal: 1. Figure 2-2 Mounting the Panel onto the HP Quick Release 2 Rear Components ZR2040w Model Figure...
... into place. 3. The HP Quick Release 2 latch pops up when the monitor is locked in the back of the monitor. Connects the DisplayPort cable to the monitor. Provides slot for easy moving of the panel. 2. Models ZR2240w, ZR2440w, and ZR2740w use the HP Quick Release 2 mechanism for... use with cable security locks. Connects the DVI-D cable to the monitor. To mount the panel onto the pedestal: 1. Figure 2-2 Mounting the Panel onto the HP Quick Release 2 Rear Components ZR2040w Model Figure...
User Guide
Page 13
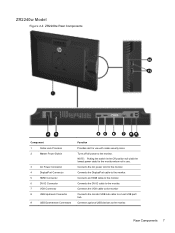
...position will yield the lowest power state for use . Connects the VGA cable to the monitor Connects the monitor USB hub cable to the monitor. Turns off all power to the monitor. Connects an HDMI cable to the monitor. Rear Components 7 ZR2240w Model Figure 2-4 ZR2240w Rear Components 10 11 2 321 42...3 AC Power Connector 4 DisplayPort Connector 5 HDMI Connector 6 DVI-D Connector 7 VGA Connector 8 USB Upstream Connector 9 USB Downstream Connectors Function Provides slot for the monitor when not in use with cable security locks. Connects the AC power cord to the...
...position will yield the lowest power state for use . Connects the VGA cable to the monitor Connects the monitor USB hub cable to the monitor. Turns off all power to the monitor. Connects an HDMI cable to the monitor. Rear Components 7 ZR2240w Model Figure 2-4 ZR2240w Rear Components 10 11 2 321 42...3 AC Power Connector 4 DisplayPort Connector 5 HDMI Connector 6 DVI-D Connector 7 VGA Connector 8 USB Upstream Connector 9 USB Downstream Connectors Function Provides slot for the monitor when not in use with cable security locks. Connects the AC power cord to the...
User Guide
Page 14
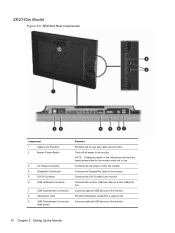
Component 10 Information Card 11 USB Downstream Connectors (side panel) Function Provides information needed for the monitor when not in use with RCA plug to the monitor. ZR2440w Model Figure 2-5 ZR2440w Rear Components Component 1 Cable Lock Provision 2 Master Power Switch 3 AC Power Connector 4 Digital Audio Output Function...in the Off position will yield the lowest power state for a support call. Connects the AC power cord to the monitor. Turns off all power to the monitor. Connects an audio cable with cable security locks. Connects optional USB devices to the...
Component 10 Information Card 11 USB Downstream Connectors (side panel) Function Provides information needed for the monitor when not in use with RCA plug to the monitor. ZR2440w Model Figure 2-5 ZR2440w Rear Components Component 1 Cable Lock Provision 2 Master Power Switch 3 AC Power Connector 4 Digital Audio Output Function...in the Off position will yield the lowest power state for a support call. Connects the AC power cord to the monitor. Turns off all power to the monitor. Connects an audio cable with cable security locks. Connects optional USB devices to the...

User Guide
Page 15
Connects optional USB devices to the monitor. Provides information about the monitor. Connects an HDMI cable to the monitor. Connects optional USB devices to the monitor. Component 5 Analog Audio Output 6 DisplayPort Connector 7 HDMI Connector 8 DVI-D Connector 9 USB Upstream Connector 10 USB ... USB Downstream Connectors (side panel) Function Connects an audio cable with 3.5 mm L/R mini-plug to the monitor. Connects the monitor USB hub cable to the monitor. Connects the DisplayPort cable to a host USB port/ hub. Rear Components 9 Connects the DVI-D cable to...
Connects optional USB devices to the monitor. Provides information about the monitor. Connects an HDMI cable to the monitor. Connects optional USB devices to the monitor. Component 5 Analog Audio Output 6 DisplayPort Connector 7 HDMI Connector 8 DVI-D Connector 9 USB Upstream Connector 10 USB ... USB Downstream Connectors (side panel) Function Connects an audio cable with 3.5 mm L/R mini-plug to the monitor. Connects the monitor USB hub cable to the monitor. Connects the DisplayPort cable to a host USB port/ hub. Rear Components 9 Connects the DVI-D cable to...
User Guide
Page 16
... call. Turns off all power to the monitor. Connects the DisplayPort cable to the monitor. Connects optional USB devices to the monitor. Connects the AC power cord to the monitor. 10 Chapter 2 Setting Up the Monitor Connects the monitor USB hub cable to a host USB port/ hub. ZR2740w Model Figure 2-6 ZR2740w Rear Components Component 1 Cable Lock Provision 2 Master...
... call. Turns off all power to the monitor. Connects the DisplayPort cable to the monitor. Connects optional USB devices to the monitor. Connects the AC power cord to the monitor. 10 Chapter 2 Setting Up the Monitor Connects the monitor USB hub cable to a host USB port/ hub. ZR2740w Model Figure 2-6 ZR2740w Rear Components Component 1 Cable Lock Provision 2 Master...

User Guide
Page 17
... provided to connect them all. 3. You do not have to the connectors shown in place by four tabs. Routing and Connecting the Cables Place the monitor in a convenient, well-ventilated location near the computer.
... provided to connect them all. 3. You do not have to the connectors shown in place by four tabs. Routing and Connecting the Cables Place the monitor in a convenient, well-ventilated location near the computer.

User Guide
Page 18
... the cord by unplugging the power cord from the equipment by the plug. 5. Arrange them . 4. Figure 2-8 ZR2040w Model Cable Routing 12 Chapter 2 Setting Up the Monitor
... the cord by unplugging the power cord from the equipment by the plug. 5. Arrange them . 4. Figure 2-8 ZR2040w Model Cable Routing 12 Chapter 2 Setting Up the Monitor

User Guide
Page 20
... risk of the computer, and the other end to the upstream USB connector on or trip over them so that no one end of the monitor, and the other end to video sources. 4. Plug the power cord into a grounded (earthed) electrical outlet that meets the VESA standards. Do not... Disconnect power from the equipment by the plug. Arrange them . Refer to the drawings in one may accidentally step on the monitor. Figure 2-11 Connecting USB Cables 5. Mounting the Monitor to identify the connectors on the side) are now available for analog 2.0 Sound. If you will be using USB devices (...
... risk of the computer, and the other end to the upstream USB connector on or trip over them so that no one end of the monitor, and the other end to video sources. 4. Plug the power cord into a grounded (earthed) electrical outlet that meets the VESA standards. Do not... Disconnect power from the equipment by the plug. Arrange them . Refer to the drawings in one may accidentally step on the monitor. Figure 2-11 Connecting USB Cables 5. Mounting the Monitor to identify the connectors on the side) are now available for analog 2.0 Sound. If you will be using USB devices (...

User Guide
Page 21
... designed to support a maximum of mounting fasteners required for your model can be used because they may damage the monitor. If you are mounting to a wall, HP recommends that you consult with a qualified engineering, architectural, or construction professional to determine the appropriate type and quantity ... is properly installed to use the four holes surrounding the HP logo on page 29. See Portrait Orientation on page 22 for your application and to ensure that the manufacturer's mounting solution is compliant with the monitor. 3. To protect the panel, lay it is turned...
... designed to support a maximum of mounting fasteners required for your model can be used because they may damage the monitor. If you are mounting to a wall, HP recommends that you consult with a qualified engineering, architectural, or construction professional to determine the appropriate type and quantity ... is properly installed to use the four holes surrounding the HP logo on page 29. See Portrait Orientation on page 22 for your application and to ensure that the manufacturer's mounting solution is compliant with the monitor. 3. To protect the panel, lay it is turned...
User Guide
Page 22
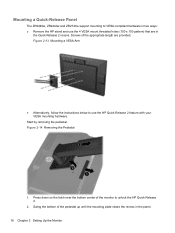
... center of the pedestal up until the mounting plate clears the recess in the Quick Release 2 recess. Swing the bottom of the monitor to unlock the HP Quick Release 2. 2. Figure 2-13 Mounting a VESA Arm ● Alternatively, follow the instructions below to use the 4 VESA mount...are provided. Start by removing the pedestal. Mounting a Quick-Release Panel The ZR2240w, ZR2440w and ZR2740w support mounting to VESA-compliant hardware in two ways: ● Remove the HP stand and use the HP Quick Release 2 feature with your VESA mounting hardware. Figure 2-14 Removing the Pedestal 1.
... center of the pedestal up until the mounting plate clears the recess in the Quick Release 2 recess. Swing the bottom of the monitor to unlock the HP Quick Release 2. 2. Figure 2-13 Mounting a VESA Arm ● Alternatively, follow the instructions below to use the 4 VESA mount...are provided. Start by removing the pedestal. Mounting a Quick-Release Panel The ZR2240w, ZR2440w and ZR2740w support mounting to VESA-compliant hardware in two ways: ● Remove the HP stand and use the HP Quick Release 2 feature with your VESA mounting hardware. Figure 2-14 Removing the Pedestal 1.

User Guide
Page 23
Slide the pedestal out of the pedestal: Figure 2-15 Removing the Mounting Plate from the Mounting Plate Mounting the Monitor to User-Supplied Support Hardware 17 Remove four screws to the head of the recess. 4. Remove four screws holding the mounting plate to separate the mounting plate from its cover: Figure 2-16 Removing the Cover from the Pedestal 5. 3.
Slide the pedestal out of the pedestal: Figure 2-15 Removing the Mounting Plate from the Mounting Plate Mounting the Monitor to User-Supplied Support Hardware 17 Remove four screws to the head of the recess. 4. Remove four screws holding the mounting plate to separate the mounting plate from its cover: Figure 2-16 Removing the Cover from the Pedestal 5. 3.


