ProtectTools (Select Models Only) - Windows Vista
Page 32
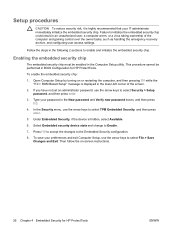
...or a virus taking ownership of the screen. 2. Open Computer Setup by turning on -screen instructions. 26 Chapter 4 Embedded Security for HP ProtectTools. Under Embedded Security, if the device is highly recommended that your password in the Computer Setup utility. To enable the embedded security ...chip: 1. In the Security menu, use the arrow keys to select Security > Setup password, and then press enter. 3. Type your IT administrator immediately initialize the...
...or a virus taking ownership of the screen. 2. Open Computer Setup by turning on -screen instructions. 26 Chapter 4 Embedded Security for HP ProtectTools. Under Embedded Security, if the device is highly recommended that your password in the Computer Setup utility. To enable the embedded security ...chip: 1. In the Security menu, use the arrow keys to select Security > Setup password, and then press enter. 3. Type your IT administrator immediately initialize the...
External Media Cards - Windows Vista
Page 4
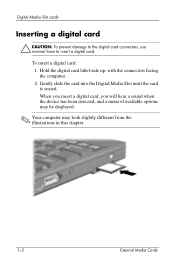
... label-side up, with the connectors facing the computer. 2. When you insert a digital card, you will hear a sound when the device has been detected, and a menu of available options may be displayed. ✎ Your computer may look slightly different from the illustrations in this chapter. 1-2 External Media Cards Gently slide the...
... label-side up, with the connectors facing the computer. 2. When you insert a digital card, you will hear a sound when the device has been detected, and a menu of available options may be displayed. ✎ Your computer may look slightly different from the illustrations in this chapter. 1-2 External Media Cards Gently slide the...
External Media Cards - Windows Vista
Page 12
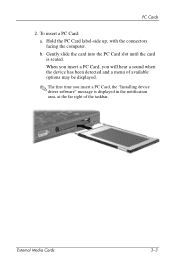
b. External Media Cards 3-3 To insert a PC Card: a. Hold the PC Card label-side up, with the connectors facing the computer. Gently slide the card into the PC Card slot until the card is displayed in the notification area, at the far right of the taskbar. When you insert a PC Card, you will hear a sound when the device has been detected and a menu of available options may be displayed. ✎ The first time you insert a PC Card, the "Installing device driver software" message is seated. PC Cards 2.
b. External Media Cards 3-3 To insert a PC Card: a. Hold the PC Card label-side up, with the connectors facing the computer. Gently slide the card into the PC Card slot until the card is displayed in the notification area, at the far right of the taskbar. When you insert a PC Card, you will hear a sound when the device has been detected and a menu of available options may be displayed. ✎ The first time you insert a PC Card, the "Installing device driver software" message is seated. PC Cards 2.
Modem and Local Area Networks
Page 7
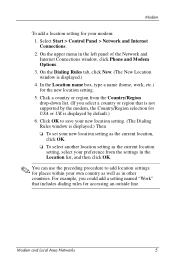
... setting as the current location, click OK. ❏ To select another location setting as in other countries. Modem and Local Area Networks 5 On the upper menu in the left panel of the Network and Internet Connections window, click Phone and Modem Options. 3. Modem To add a location setting for your own country...
... setting as the current location, click OK. ❏ To select another location setting as in other countries. Modem and Local Area Networks 5 On the upper menu in the left panel of the Network and Internet Connections window, click Phone and Modem Options. 3. Modem To add a location setting for your own country...
Modem and Local Area Networks
Page 8
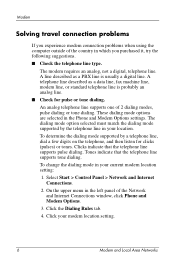
..., fax machine line, modem line, or standard telephone line is usually a digital line. These dialing mode options are selected in your location. On the upper menu in the left panel of the country in your modem location setting. 6 Modem and Local Area Networks The dialing mode option selected must match the...
..., fax machine line, modem line, or standard telephone line is usually a digital line. These dialing mode options are selected in your location. On the upper menu in the left panel of the country in your modem location setting. 6 Modem and Local Area Networks The dialing mode option selected must match the...
Modem and Local Area Networks
Page 9
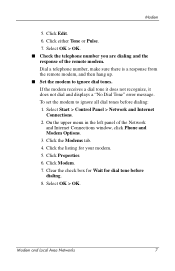
... the listing for dial tone before dialing: 1. Modem and Local Area Networks 7 Select Start > Control Panel > Network and Internet Connections. 2. Click Properties. 6. On the upper menu in the left panel of the remote modem. Click Modem. 7. If the modem receives a dial tone it does not recognize, it does not dial and...
... the listing for dial tone before dialing: 1. Modem and Local Area Networks 7 Select Start > Control Panel > Network and Internet Connections. 2. Click Properties. 6. On the upper menu in the left panel of the remote modem. Click Modem. 7. If the modem receives a dial tone it does not recognize, it does not dial and...

Modem and Local Area Networks
Page 10
... clearing the Wait for USA or UK is displayed by default. 7. Select Start > Control Panel > Network and Internet Connections. 2. Select OK > OK. On the upper menu in the left panel of the Network and Internet Connections window, click Phone and Modem Options. 3. Click the Dialing Rules tab. 4. Preinstalled communication software To...
... clearing the Wait for USA or UK is displayed by default. 7. Select Start > Control Panel > Network and Internet Connections. 2. Select OK > OK. On the upper menu in the left panel of the Network and Internet Connections window, click Phone and Modem Options. 3. Click the Dialing Rules tab. 4. Preinstalled communication software To...
MultiBoot
Page 4
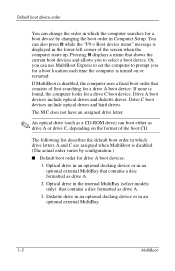
...the computer uses a fixed boot order that contains a disc formatted as a CD-ROM drive) can also press f9 while the "F9 = Boot device menu" message is displayed in the internal MultiBay (select models only) that shows the current boot devices and allows you for a drive C boot device. If ...MultiBoot is turned on the format of the screen when the computer starts up. Pressing f9 displays a menu that contains a disc formatted as drive A or drive C, depending on or restarted. You can boot either as drive A. 3. The following list describes the...
...the computer uses a fixed boot order that contains a disc formatted as a CD-ROM drive) can also press f9 while the "F9 = Boot device menu" message is displayed in the internal MultiBay (select models only) that shows the current boot devices and allows you for a drive C boot device. If ...MultiBoot is turned on the format of the screen when the computer starts up. Pressing f9 displays a menu that contains a disc formatted as drive A or drive C, depending on or restarted. You can boot either as drive A. 3. The following list describes the...
MultiBoot
Page 9
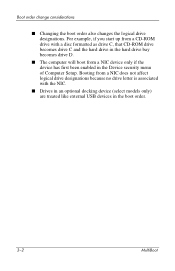
... is associated with the NIC. ■ Drives in an optional docking device (select models only) are treated like external USB devices in the Device security menu of Computer Setup.
... is associated with the NIC. ■ Drives in an optional docking device (select models only) are treated like external USB devices in the Device security menu of Computer Setup.

MultiBoot
Page 10
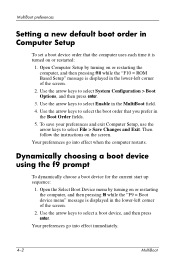
This feature prompts you can ■ Set a new default boot order that the computer uses each time the computer is displayed in Computer Setup. ■ Dynamically choose the boot device by pressing f9 while the "F9 = Boot device menu" message is turned on or restarted. MultiBoot 4-1 4 MultiBoot preferences Using MultiBoot, you for a boot device each time it is turned on, by changing the boot order in the lower-left corner of the screen when the computer starts up. ■ Use MultiBoot Express to set variable boot orders.
This feature prompts you can ■ Set a new default boot order that the computer uses each time the computer is displayed in Computer Setup. ■ Dynamically choose the boot device by pressing f9 while the "F9 = Boot device menu" message is turned on or restarted. MultiBoot 4-1 4 MultiBoot preferences Using MultiBoot, you for a boot device each time it is turned on, by changing the boot order in the lower-left corner of the screen when the computer starts up. ■ Use MultiBoot Express to set variable boot orders.
MultiBoot
Page 11
... restarts. Use the arrow keys to select File > Save Changes and Exit. Open the Select Boot Device menu by turning on or restarting the computer, and then pressing f9 while the "F9 = Boot device menu" message is displayed in the lower-left corner of the screen. 2. MultiBoot preferences Setting a new default boot...
... restarts. Use the arrow keys to select File > Save Changes and Exit. Open the Select Boot Device menu by turning on or restarting the computer, and then pressing f9 while the "F9 = Boot device menu" message is displayed in the lower-left corner of the screen. 2. MultiBoot preferences Setting a new default boot...
MultiBoot
Page 12
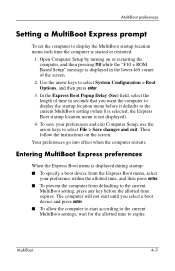
... to select File > Save changes and exit. The computer will not start until you want the computer to display the startup location menu before the allotted time expires. Open Computer Setup by turning on the screen. Your preferences go into effect when the computer restarts.... MultiBoot 4-3 Entering MultiBoot Express preferences When the Express Boot menu is displayed during startup: ■ To specify a boot device from defaulting to the current MultiBoot setting, press any key before it ...
... to select File > Save changes and exit. The computer will not start until you want the computer to display the startup location menu before the allotted time expires. Open Computer Setup by turning on the screen. Your preferences go into effect when the computer restarts.... MultiBoot 4-3 Entering MultiBoot Express preferences When the Express Boot menu is displayed during startup: ■ To specify a boot device from defaulting to the current MultiBoot setting, press any key before it ...

Notebook Tour
Page 9
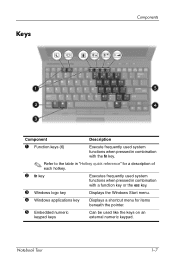
... Executes frequently used system functions when pressed in combination with a function key or the esc key. 3 Windows logo key Displays the Windows Start menu. 4 Windows applications key Displays a shortcut menu for items beneath the pointer. 5 Embedded numeric keypad keys Can be used like the keys on an external numeric keypad. Notebook Tour 1-7
... Executes frequently used system functions when pressed in combination with a function key or the esc key. 3 Windows logo key Displays the Windows Start menu. 4 Windows applications key Displays a shortcut menu for items beneath the pointer. 5 Embedded numeric keypad keys Can be used like the keys on an external numeric keypad. Notebook Tour 1-7
Notebook Tour - Windows Vista
Page 9
.... 2 fn key Executes frequently used system functions when pressed in combination with a function key or the esc key. 3 Windows logo key Displays the Windows Start menu. 4 Windows applications key Displays a shortcut menu for items beneath the pointer. 5 Embedded numeric keypad keys Can be used like the keys on an external numeric keypad.
.... 2 fn key Executes frequently used system functions when pressed in combination with a function key or the esc key. 3 Windows logo key Displays the Windows Start menu. 4 Windows applications key Displays a shortcut menu for items beneath the pointer. 5 Embedded numeric keypad keys Can be used like the keys on an external numeric keypad.
Pointing Devices and Keyboard
Page 2
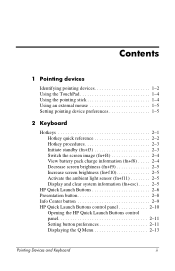
... brightness (fn+f9 2-5 Increase screen brightness (fn+f10 2-5 Activate the ambient light sensor (fn+f11 2-5 Display and clear system information (fn+esc). . . . . 2-5 HP Quick Launch Buttons 2-6 Presentation button 2-8 Info Center button 2-9 HP Quick Launch Buttons control panel 2-10 Opening the HP Quick Launch Buttons control panel 2-11 Setting button preferences 2-11 Displaying the...
... brightness (fn+f9 2-5 Increase screen brightness (fn+f10 2-5 Activate the ambient light sensor (fn+f11 2-5 Display and clear system information (fn+esc). . . . . 2-5 HP Quick Launch Buttons 2-6 Presentation button 2-8 Info Center button 2-9 HP Quick Launch Buttons control panel 2-10 Opening the HP Quick Launch Buttons control panel 2-11 Setting button preferences 2-11 Displaying the...
Pointing Devices and Keyboard
Page 15
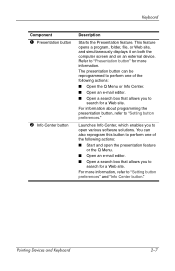
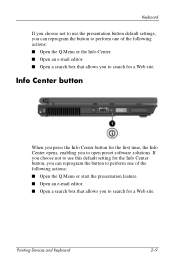
...this button to "Setting button preferences" and "Info Center button." Launches Info Center, which enables you to open the presentation feature or the Q Menu. ■ Open an e-mail editor. ■ Open a search box that allows you to search for a Web site. For information about... programming the presentation button, refer to search for more information, refer to perform one of the following actions: ■ Open the Q Menu or Info Center. ■ Open an e-mail editor. ■ Open a search box that allows you to "Setting button preferences." This feature ...
...this button to "Setting button preferences" and "Info Center button." Launches Info Center, which enables you to open the presentation feature or the Q Menu. ■ Open an e-mail editor. ■ Open a search box that allows you to search for a Web site. For information about... programming the presentation button, refer to search for more information, refer to perform one of the following actions: ■ Open the Q Menu or Info Center. ■ Open an e-mail editor. ■ Open a search box that allows you to "Setting button preferences." This feature ...
Pointing Devices and Keyboard
Page 17
..., enabling you to search for the Info Center button, you can reprogram the button to perform one of the following actions: ■ Open the Q Menu or the Info Center. ■ Open an e-mail editor. ■ Open a search box that allows you choose not to use the presentation button ...default settings, you can reprogram the button to perform one of the following actions: ■ Open the Q Menu or start the presentation feature. ■ Open an e-mail editor. ■ Open a search box that allows you to open preset software solutions. If...
..., enabling you to search for the Info Center button, you can reprogram the button to perform one of the following actions: ■ Open the Q Menu or the Info Center. ■ Open an e-mail editor. ■ Open a search box that allows you choose not to use the presentation button ...default settings, you can reprogram the button to perform one of the following actions: ■ Open the Q Menu or start the presentation feature. ■ Open an e-mail editor. ■ Open a search box that allows you to open preset software solutions. If...
Pointing Devices and Keyboard
Page 18
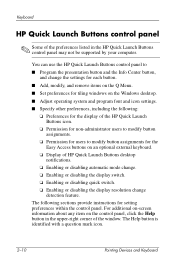
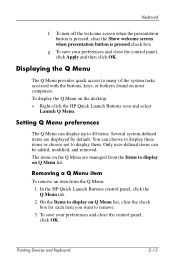
...preferences within the control panel. The following sections provide instructions for the Easy Access buttons on an optional external keyboard. ❏ Display of HP Quick Launch Buttons desktop notifications. ❏ Enabling or disabling automatic mode change. ❏ Enabling or disabling the display switch. ❏...settings for each button. ■ Add, modify, and remove items on the Q Menu. ■ Set preferences for tiling windows on the control panel, click the Help button in the HP Quick Launch Buttons control panel may not be supported by your computer. For additional on...
...preferences within the control panel. The following sections provide instructions for the Easy Access buttons on an optional external keyboard. ❏ Display of HP Quick Launch Buttons desktop notifications. ❏ Enabling or disabling automatic mode change. ❏ Enabling or disabling the display switch. ❏...settings for each button. ■ Add, modify, and remove items on the Q Menu. ■ Set preferences for tiling windows on the control panel, click the Help button in the HP Quick Launch Buttons control panel may not be supported by your computer. For additional on...
Pointing Devices and Keyboard
Page 19
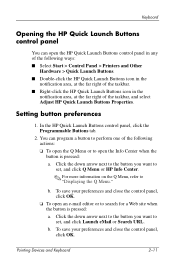
...panel in the notification area, at the far right of the following actions: ❏ To open the Q Menu or to open the Info Center when the button is pressed: a. Keyboard Opening the HP Quick Launch Buttons control panel You can program a button to perform one of the following ways: ■ ...site when the button is pressed: a. Click the down arrow next to the button you want to set, and click Q Menu or HP Info Center. ✎ For more information on the Q Menu, refer to set, and click Launch eMail or Search URL. Setting button preferences 1. Click the down arrow next to the...
...panel in the notification area, at the far right of the following actions: ❏ To open the Q Menu or to open the Info Center when the button is pressed: a. Keyboard Opening the HP Quick Launch Buttons control panel You can program a button to perform one of the following ways: ■ ...site when the button is pressed: a. Click the down arrow next to the button you want to set, and click Q Menu or HP Info Center. ✎ For more information on the Q Menu, refer to set, and click Launch eMail or Search URL. Setting button preferences 1. Click the down arrow next to the...
Pointing Devices and Keyboard
Page 21
...of the system tasks accessed with the buttons, keys, or hotkeys found on the desktop: » Right-click the HP Quick Launch Buttons icon and select Launch Q Menu. To turn off the welcome screen when the presentation button is pressed, clear the Show welcome screen when presentation button is... from the Items to display on Q Menu list, clear the check box for each item you want to display on Q Menu list. On the Items to remove. 3. Pointing Devices and Keyboard 2-13 Keyboard f. g. In the HP Quick Launch Buttons control panel, click the Q Menu tab. 2. To save your preferences and...
...of the system tasks accessed with the buttons, keys, or hotkeys found on the desktop: » Right-click the HP Quick Launch Buttons icon and select Launch Q Menu. To turn off the welcome screen when the presentation button is pressed, clear the Show welcome screen when presentation button is... from the Items to display on Q Menu list, clear the check box for each item you want to display on Q Menu list. On the Items to remove. 3. Pointing Devices and Keyboard 2-13 Keyboard f. g. In the HP Quick Launch Buttons control panel, click the Q Menu tab. 2. To save your preferences and...