Expansion Base Reference Guide
Page 22
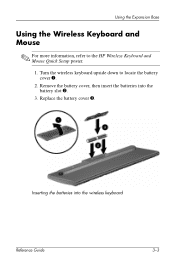
Remove the battery cover, then insert the batteries into the wireless keyboard Reference Guide 3-3 Using the Expansion Base Using the Wireless Keyboard and Mouse ✎ For more information, refer to locate the battery cover 1. 2. Inserting the batteries into the battery slot 2. 3. Replace the battery cover 3. Turn the wireless keyboard upside down to the HP Wireless Keyboard and Mouse Quick Setup poster. 1.
Remove the battery cover, then insert the batteries into the wireless keyboard Reference Guide 3-3 Using the Expansion Base Using the Wireless Keyboard and Mouse ✎ For more information, refer to locate the battery cover 1. 2. Inserting the batteries into the battery slot 2. 3. Replace the battery cover 3. Turn the wireless keyboard upside down to the HP Wireless Keyboard and Mouse Quick Setup poster. 1.
Expansion Base Reference Guide
Page 23
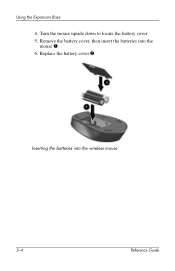
Replace the battery cover 2. Turn the mouse upside down to locate the battery cover. 5. Using the Expansion Base 4. Inserting the batteries into the mouse 1. 6. Remove the battery cover, then insert the batteries into the wireless mouse 3-4 Reference Guide
Replace the battery cover 2. Turn the mouse upside down to locate the battery cover. 5. Using the Expansion Base 4. Inserting the batteries into the mouse 1. 6. Remove the battery cover, then insert the batteries into the wireless mouse 3-4 Reference Guide

Startup and Reference Guide
Page 12
... or the Internet, you expose the notebook to "Replacing a Battery Pack" in the prevention, the detection, and often the repair of these occurrences. 1-10 Startup and Reference Guide-Part 1 These security and privacy occurrences can significantly help in Chapter 4. If the notebook does not respond, try the following ...-down list. ■ Press and hold down the power/standby button for at least 4 seconds. ■ Unplug the notebook from external power and remove the battery pack. Startup Turning Off the Notebook To turn off the notebook, select Start > Turn Off Computer > Turn Off.
... or the Internet, you expose the notebook to "Replacing a Battery Pack" in the prevention, the detection, and often the repair of these occurrences. 1-10 Startup and Reference Guide-Part 1 These security and privacy occurrences can significantly help in Chapter 4. If the notebook does not respond, try the following ...-down list. ■ Press and hold down the power/standby button for at least 4 seconds. ■ Unplug the notebook from external power and remove the battery pack. Startup Turning Off the Notebook To turn off the notebook, select Start > Turn Off Computer > Turn Off.

Startup and Reference Guide
Page 25
On: Notebook is receiving AC power. On: The notebook is turned on. On: The internal hard drive is malfunctioning and may need to be replaced. Produce stereo sound. Blinking: A battery pack is being accessed. On: The notebook is in Standby. Startup and Reference Guide-Part 2 2-7 Front System Components Component 1 Display release latch 2 Stereo speakers (2) 3 Power/standby light 4 Battery light 5 AC power light 6 Hard drive activity light Description Opens the notebook. Blinking: Notebook is receiving battery power.
On: Notebook is receiving AC power. On: The notebook is turned on. On: The internal hard drive is malfunctioning and may need to be replaced. Produce stereo sound. Blinking: A battery pack is being accessed. On: The notebook is in Standby. Startup and Reference Guide-Part 2 2-7 Front System Components Component 1 Display release latch 2 Stereo speakers (2) 3 Power/standby light 4 Battery light 5 AC power light 6 Hard drive activity light Description Opens the notebook. Blinking: Notebook is receiving battery power.
Startup and Reference Guide
Page 31
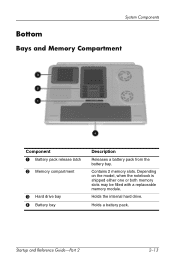
Contains 2 memory slots. System Components Bottom Bays and Memory Compartment Component 1 Battery pack release latch 2 Memory compartment 3 Hard drive bay 4 Battery bay Description Releases a battery pack from the battery bay. Holds the internal hard drive. Startup and Reference Guide-Part 2 2-13 Depending on the model, when the notebook is shipped either one or both memory slots may be filled with a replaceable memory module. Holds a battery pack.
Contains 2 memory slots. System Components Bottom Bays and Memory Compartment Component 1 Battery pack release latch 2 Memory compartment 3 Hard drive bay 4 Battery bay Description Releases a battery pack from the battery bay. Holds the internal hard drive. Startup and Reference Guide-Part 2 2-13 Depending on the model, when the notebook is shipped either one or both memory slots may be filled with a replaceable memory module. Holds a battery pack.

Startup and Reference Guide
Page 49
... Infrared or Drive Media 4-7 Using Default Power Settings 4-7 Identifying Power Controls and Indicators 4-8 Turning the Notebook or Display On or Off 4-9 Using Emergency Shutdown Procedures 4-10 Initiating or Resuming from Standby 4-11 Initiating...Battery and External Power. . . 4-17 Charging a Battery Pack 4-17 Monitoring the Charge in a Battery Pack 4-18 Managing Low-Battery Conditions 4-18 Resolving Low-Battery Conditions 4-19 Calibrating a Battery Pack 4-20 Storing a Battery Pack 4-23 Battery Conservation Settings 4-24 Replacing a Battery Pack 4-25 Disposing of a Used Battery...
... Infrared or Drive Media 4-7 Using Default Power Settings 4-7 Identifying Power Controls and Indicators 4-8 Turning the Notebook or Display On or Off 4-9 Using Emergency Shutdown Procedures 4-10 Initiating or Resuming from Standby 4-11 Initiating...Battery and External Power. . . 4-17 Charging a Battery Pack 4-17 Monitoring the Charge in a Battery Pack 4-18 Managing Low-Battery Conditions 4-18 Resolving Low-Battery Conditions 4-19 Calibrating a Battery Pack 4-20 Storing a Battery Pack 4-23 Battery Conservation Settings 4-24 Replacing a Battery Pack 4-25 Disposing of a Used Battery...

Startup and Reference Guide
Page 58
...■ Press and hold down the power/standby button for at least 4 seconds. ■ Unplug the notebook from external power and remove the battery pack For battery pack removal instructions, refer to use the normal Windows shutdown procedure, try the following emergency shutdown procedures in... loss of unsaved data. 4-10 Startup and Reference Guide-Part 2 Power Using Emergency Shutdown Procedures If the notebook does not respond and you are unable to the "Replacing a Battery Pack," section, later in this chapter. Ä CAUTION: Emergency shutdown procedures may result in the sequence ...
...■ Press and hold down the power/standby button for at least 4 seconds. ■ Unplug the notebook from external power and remove the battery pack For battery pack removal instructions, refer to use the normal Windows shutdown procedure, try the following emergency shutdown procedures in... loss of unsaved data. 4-10 Startup and Reference Guide-Part 2 Power Using Emergency Shutdown Procedures If the notebook does not respond and you are unable to the "Replacing a Battery Pack," section, later in this chapter. Ä CAUTION: Emergency shutdown procedures may result in the sequence ...

Startup and Reference Guide
Page 64
Power Using Battery Power Identifying the Power Lights Battery pack procedures refer to be replaced. Startup and Reference Guide-Part 2 On when notebook is connected to AC power. ✎ When AC power is malfunctioning and may need to the front panel lights shown below Component 1 Power/standby light 2 Battery light 3 AC power light 4-16 Description On when the notebook has power. ■ On in the absence of AC power, when the notebook is running on battery power. ■ Blinking when the battery pack is available, the battery will charge.
Power Using Battery Power Identifying the Power Lights Battery pack procedures refer to be replaced. Startup and Reference Guide-Part 2 On when notebook is connected to AC power. ✎ When AC power is malfunctioning and may need to the front panel lights shown below Component 1 Power/standby light 2 Battery light 3 AC power light 4-16 Description On when the notebook has power. ■ On in the absence of AC power, when the notebook is running on battery power. ■ Blinking when the battery pack is available, the battery will charge.

Startup and Reference Guide
Page 69
... In column and all settings in use. Select OK. Insert the battery pack into the notebook. Use the drop-down lists to Never. 4. To disable Hibernation, select Start > Control Panel > Performance and Maintenance > Power Options > Hibernate tab. For instructions, refer to "Replacing a Battery Pack," later in both columns to set each item in this...
... In column and all settings in use. Select OK. Insert the battery pack into the notebook. Use the drop-down lists to Never. 4. To disable Hibernation, select Start > Control Panel > Performance and Maintenance > Power Options > Hibernate tab. For instructions, refer to "Replacing a Battery Pack," later in both columns to set each item in this...

Startup and Reference Guide
Page 73
To replace the battery pack: 1. Removing a battery pack Startup and Reference Guide-Part 2 4-25 Turn the notebook upside down. ❏ To remove a battery pack, slide the battery release latch 1. (The battery pack tilts upward.) Then pull the battery pack out of work when removing a battery pack that is the only power source, initiate Hibernation or turn off the notebook before removing the battery pack. Power Replacing a Battery Pack Ä CAUTION: To prevent loss of the battery bay 2.
To replace the battery pack: 1. Removing a battery pack Startup and Reference Guide-Part 2 4-25 Turn the notebook upside down. ❏ To remove a battery pack, slide the battery release latch 1. (The battery pack tilts upward.) Then pull the battery pack out of work when removing a battery pack that is the only power source, initiate Hibernation or turn off the notebook before removing the battery pack. Power Replacing a Battery Pack Ä CAUTION: To prevent loss of the battery bay 2.

Startup and Reference Guide
Page 79
... for repair or replacement. Ä CAUTION: To prevent an unresponsive system and loss of work, do not begin this procedure until you have ■ Saved your work , closed all open applications, and shut down the notebook. ■ Disconnected the notebook from external power. 4. Remove the battery pack. 5. Turn the notebook upside down the notebook and close...
... for repair or replacement. Ä CAUTION: To prevent an unresponsive system and loss of work, do not begin this procedure until you have ■ Saved your work , closed all open applications, and shut down the notebook. ■ Disconnected the notebook from external power. 4. Remove the battery pack. 5. Turn the notebook upside down the notebook and close...

Startup and Reference Guide
Page 132
Closing the memory compartment 8-18 Startup and Reference Guide-Part 2 Reinsert and tighten the 2 memory compartment screws 2. 11. Replace the battery pack (if you removed a battery pack at the beginning of the notebook 1. 10. Hardware Options and Upgrades 9. Align the tabs on the memory compartment cover with the cover slots on the notebook, and then lower the cover and slide it toward the front of this procedure), reconnect external power, and then restart the notebook.
Closing the memory compartment 8-18 Startup and Reference Guide-Part 2 Reinsert and tighten the 2 memory compartment screws 2. 11. Replace the battery pack (if you removed a battery pack at the beginning of the notebook 1. 10. Hardware Options and Upgrades 9. Align the tabs on the memory compartment cover with the cover slots on the notebook, and then lower the cover and slide it toward the front of this procedure), reconnect external power, and then restart the notebook.

Startup and Reference Guide
Page 153
... calibrating 4-20 charging 1-6, 4-17, 4-21 conservation settings 4-24 discharging 4-21 identifying 1-2, 2-17 inserting 1-3 monitoring charge 4-18 recharging 4-22 removing 4-25 replacing 4-25 storing 4-23 when to remove 4-5 battery pack release latch 2-13 battery power conserving 4-24 when to use 4-6 Startup and Reference Guide Index-1 Index 1394 connector 2-10 A AC adapter connecting 1-5 identifying 1-2, 2-17...
... calibrating 4-20 charging 1-6, 4-17, 4-21 conservation settings 4-24 discharging 4-21 identifying 1-2, 2-17 inserting 1-3 monitoring charge 4-18 recharging 4-22 removing 4-25 replacing 4-25 storing 4-23 when to remove 4-5 battery pack release latch 2-13 battery power conserving 4-24 when to use 4-6 Startup and Reference Guide Index-1 Index 1394 connector 2-10 A AC adapter connecting 1-5 identifying 1-2, 2-17...

Expansion Base - Maintenance and Service Guide
Page 14
... ■ S-Video out ■ Serial port The HP Notebook Expansion Base uses electrical fans for disassembly steps. These conditions are affected by a temperature sensor and are controlled by high external temperatures, system power consumption, power management/battery conservation configurations, and software applications. The fans are designed to identify replacement parts, and Chapter 5, "Removal and...
... ■ S-Video out ■ Serial port The HP Notebook Expansion Base uses electrical fans for disassembly steps. These conditions are affected by a temperature sensor and are controlled by high external temperatures, system power consumption, power management/battery conservation configurations, and software applications. The fans are designed to identify replacement parts, and Chapter 5, "Removal and...
Expansion Base - Maintenance and Service Guide
Page 16
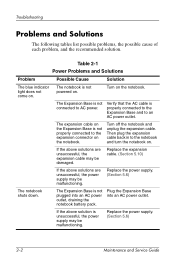
...not connected to AC power. The expansion cable on the notebook. Replace the power supply. (Section 5.6) The notebook shuts down. Replace the power supply. (Section 5.6) 2-2 Maintenance and Service Guide Turn off the notebook and unplug the expansion cable. Replace the expansion cable. (Section 5.10) If the above ...blue indicator light does not come on . The notebook is properly connected to the Expansion Base and to the notebook and turn the notebook on . Plug the Expansion Base into an AC power outlet, draining the notebook battery pack. Verify that the AC cable is not...
...not connected to AC power. The expansion cable on the notebook. Replace the power supply. (Section 5.6) The notebook shuts down. Replace the power supply. (Section 5.6) 2-2 Maintenance and Service Guide Turn off the notebook and unplug the expansion cable. Replace the expansion cable. (Section 5.10) If the above ...blue indicator light does not come on . The notebook is properly connected to the Expansion Base and to the notebook and turn the notebook on . Plug the Expansion Base into an AC power outlet, draining the notebook battery pack. Verify that the AC cable is not...

HP Notebook Series - Troubleshooting
Page 8
... be turned on a different circuit. On some models the power indicator light is the battery light. On other than an electrical outlet, connect the notebook to external power but not when running on a battery pack, recharge or replace the battery pack. ■ Make sure the power cord and AC adapter cable connections are secure. ■...
... be turned on a different circuit. On some models the power indicator light is the battery light. On other than an electrical outlet, connect the notebook to external power but not when running on a battery pack, recharge or replace the battery pack. ■ Make sure the power cord and AC adapter cable connections are secure. ■...

HP Notebook Series - Troubleshooting
Page 19
... while unattended, the system may be incompatible with your work, be sure the vents are clear of obstructions. Connect the notebook to external power, then recharge or replace the battery pack. ■ If the notebook turns off or initiates Standby and feels extremely warm, it to cool down. Then, whenever you have exceeded the...
... while unattended, the system may be incompatible with your work, be sure the vents are clear of obstructions. Connect the notebook to external power, then recharge or replace the battery pack. ■ If the notebook turns off or initiates Standby and feels extremely warm, it to cool down. Then, whenever you have exceeded the...
HP Notebook Series - Troubleshooting
Page 20
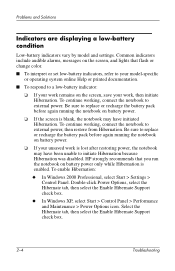
... sure to replace or recharge the battery pack before again running the notebook on the screen, save your work , then initiate Hibernation. Double-click Power Options, select the Hibernate tab, then select the Enable Hibernate Support check box. ◆ In Windows XP, select Start > Control Panel > Performance and Maintenance > Power Options icon. HP strongly...
... sure to replace or recharge the battery pack before again running the notebook on the screen, save your work , then initiate Hibernation. Double-click Power Options, select the Hibernate tab, then select the Enable Hibernate Support check box. ◆ In Windows XP, select Start > Control Panel > Performance and Maintenance > Power Options icon. HP strongly...

HP Notebook Series - Troubleshooting
Page 21
... warm after charging No action is correctly inserted, and, if required on your model-specific documentation. ❏ For battery pack warranty information, refer to the warranty documentation included with the notebook or a replacement adapter provided by HP. ❏ If the adapter is plugged into a power strip, unplug it from the power strip and plug...
... warm after charging No action is correctly inserted, and, if required on your model-specific documentation. ❏ For battery pack warranty information, refer to the warranty documentation included with the notebook or a replacement adapter provided by HP. ❏ If the adapter is plugged into a power strip, unplug it from the power strip and plug...

HP Notebook Series - Troubleshooting
Page 22
... usage and maintenance procedures. ❏ For information about prolonging the life of your battery pack, refer to the warranty documentation included with your model-specific documentation. ■ Replace the battery pack. If the time remaining display seems inaccurate even when the level of power...power at the current level. The time remaining display indicates the approximate running time remaining on the battery pack if the battery pack continues to your notebook or optional battery pack. 2-6 Troubleshooting It may be defective or have reached the end of its useful life. ...
... usage and maintenance procedures. ❏ For information about prolonging the life of your battery pack, refer to the warranty documentation included with your model-specific documentation. ■ Replace the battery pack. If the time remaining display seems inaccurate even when the level of power...power at the current level. The time remaining display indicates the approximate running time remaining on the battery pack if the battery pack continues to your notebook or optional battery pack. 2-6 Troubleshooting It may be defective or have reached the end of its useful life. ...


