Maintenance and Service Guide
Page 1
This document is intended for HP authorized service providers only. HP Pavilion x2 Detachable PC (model numbers 12-b0XX and 12-b100 through 12b199) Maintenance and Service Guide IMPORTANT!
This document is intended for HP authorized service providers only. HP Pavilion x2 Detachable PC (model numbers 12-b0XX and 12-b100 through 12b199) Maintenance and Service Guide IMPORTANT!
Maintenance and Service Guide
Page 9
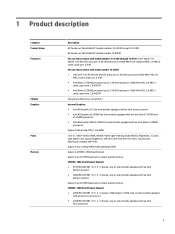
... (WLED), BrightView, 3:2 ultra wide aspect ratio, typical brightness: 340 nits; 1 Product description Category Product Name Processor Chipset Graphics Panel Memory Description HP Pavilion x2 Detachable PC (model numbers 12-b100 through 12-b199) HP Pavilion x2 Detachable PC (model number 12-b0XX) For use only on slates with model numbers 12-b100 through 12-b199: Intel® Atom...
... (WLED), BrightView, 3:2 ultra wide aspect ratio, typical brightness: 340 nits; 1 Product description Category Product Name Processor Chipset Graphics Panel Memory Description HP Pavilion x2 Detachable PC (model numbers 12-b100 through 12-b199) HP Pavilion x2 Detachable PC (model number 12-b0XX) For use only on slates with model numbers 12-b100 through 12-b199: Intel® Atom...
Maintenance and Service Guide
Page 10
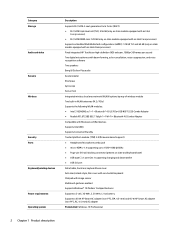
...MultiMediaCard configurations (eMMC): 128 GB TLC and 64 GB (only on slate models equipped with an Intel Atom processor) Fixed integrated HP TrueVision high-definition (HD) webcam, 1080p×30 frames per second Two digital microphones with beam-forming, echo-cancellation, noise-...(present on slate and keyboard base) ● USB type C 3.1 port Gen 1 supporting charging and data transfer ● USB 2.0 port Detachable, hardcase, keyboard base cover Full-sized, island-style, thin cover with non-backlit keyboard Clickpad with image sensor Multitouch gestures enabled Supports Windows®...
...MultiMediaCard configurations (eMMC): 128 GB TLC and 64 GB (only on slate models equipped with an Intel Atom processor) Fixed integrated HP TrueVision high-definition (HD) webcam, 1080p×30 frames per second Two digital microphones with beam-forming, echo-cancellation, noise-...(present on slate and keyboard base) ● USB type C 3.1 port Gen 1 supporting charging and data transfer ● USB 2.0 port Detachable, hardcase, keyboard base cover Full-sized, island-style, thin cover with non-backlit keyboard Clickpad with image sensor Multitouch gestures enabled Supports Windows®...

Maintenance and Service Guide
Page 36
4. Remove the webcam/microphone module. Reverse this procedure to the display back cover with double-sided adhesive.) 5. Detach the webcam/microphone module (4) from the display back cover. (The webcam/microphone module is necessary to replace the webcam/microphone module cable, disconnect the cable from the webcam/ microphone module. If it is attached to install the webcam/microphone module. 28 Chapter 5 Slate removal and replacement procedures
4. Remove the webcam/microphone module. Reverse this procedure to the display back cover with double-sided adhesive.) 5. Detach the webcam/microphone module (4) from the display back cover. (The webcam/microphone module is necessary to replace the webcam/microphone module cable, disconnect the cable from the webcam/ microphone module. If it is attached to install the webcam/microphone module. 28 Chapter 5 Slate removal and replacement procedures

Maintenance and Service Guide
Page 37
... the slate. Disconnect all external devices connected to install the RTC battery. Disconnect the RTC battery cable (1) from the retention clips (2) built into the battery. 3. Detach the RTC battery (3) from the display back cover. (The RTC battery is off or in Hibernation, turn the slate on page 22). RTC battery Description...
... the slate. Disconnect all external devices connected to install the RTC battery. Disconnect the RTC battery cable (1) from the retention clips (2) built into the battery. 3. Detach the RTC battery (3) from the display back cover. (The RTC battery is off or in Hibernation, turn the slate on page 22). RTC battery Description...

Maintenance and Service Guide
Page 48
... illustration.) Reverse this procedure to the display back cover with double-sided adhesive at the locations shown in the following illustration.) 4. e. Detach the power button board cable (1) from the display back cover. (The volume control board cable is attached to the display back cover ...with double-sided adhesive at the locations shown in the following illustration.) 3. System board (see Solid-state drive on page 36) h. Detach the volume control board cable (2) from the display back cover. (The power button board cable is attached to the display back cover with...
... illustration.) Reverse this procedure to the display back cover with double-sided adhesive at the locations shown in the following illustration.) 4. e. Detach the power button board cable (1) from the display back cover. (The volume control board cable is attached to the display back cover ...with double-sided adhesive at the locations shown in the following illustration.) 3. System board (see Solid-state drive on page 36) h. Detach the volume control board cable (2) from the display back cover. (The power button board cable is attached to the display back cover with...

Maintenance and Service Guide
Page 50
... outlet and then unplugging the AC adapter from the keyboard/base. 5. Disconnect all external devices connected to the display back cover with double-sided adhesive.) 2. Detach the wireless antenna transceivers (1) from the retention clips (2) built into the display back cover. 3. WLAN module (see System board on page 36) Remove the wireless...
... outlet and then unplugging the AC adapter from the keyboard/base. 5. Disconnect all external devices connected to the display back cover with double-sided adhesive.) 2. Detach the wireless antenna transceivers (1) from the retention clips (2) built into the display back cover. 3. WLAN module (see System board on page 36) Remove the wireless...

Maintenance and Service Guide
Page 55
... Release the ZIF connector (1) to which the keyboard cable is attached, and then disconnect the keyboard cable from the docking board. 4. Detach the keyboard cable (4) from the keyboard/top cover. (The keyboard cable is attached, and then disconnect the TouchPad board cable from the... cover with the TouchPad board spare part kit, spare part number 841561-001) Before removing the TouchPad board, follow these steps: 1. Detach the TouchPad board cable (2) from the docking board. 2. Keyboard/base component replacement procedures 47 Disconnect all external devices from the slate. ...
... Release the ZIF connector (1) to which the keyboard cable is attached, and then disconnect the keyboard cable from the docking board. 4. Detach the keyboard cable (4) from the keyboard/top cover. (The keyboard cable is attached, and then disconnect the TouchPad board cable from the... cover with the TouchPad board spare part kit, spare part number 841561-001) Before removing the TouchPad board, follow these steps: 1. Detach the TouchPad board cable (2) from the docking board. 2. Keyboard/base component replacement procedures 47 Disconnect all external devices from the slate. ...

Maintenance and Service Guide
Page 58
... procedures Release the keyboard/base docking cables (3) from the slate. 4. Disconnect the power from the slate by unplugging the power cord from the docking board. 2. Detach the keyboard/base docking cables (2) from the keyboard/top cover. (The keyboard/base docking cables are unsure whether the slate is off the slate. Turn...
... procedures Release the keyboard/base docking cables (3) from the slate. 4. Disconnect the power from the slate by unplugging the power cord from the docking board. 2. Detach the keyboard/base docking cables (2) from the keyboard/top cover. (The keyboard/base docking cables are unsure whether the slate is off the slate. Turn...

Maintenance and Service Guide
Page 67
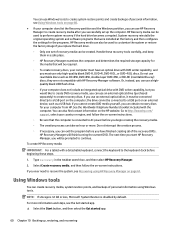
...create backups of the Recovery partition and the Windows partition. See the Worldwide Telephone Numbers booklet included with a detachable keyboard, connect the keyboard to create HP Recovery media after you will be performing recovery procedures on page 60. ● Use Windows tools to your ...system from support. IMPORTANT: For a tablet with the computer. Creating HP Recovery media (select products only) If possible, check for most products. ● Creating recovery media and backups ● Restoring and ...
...create backups of the Recovery partition and the Windows partition. See the Worldwide Telephone Numbers booklet included with a detachable keyboard, connect the keyboard to create HP Recovery media after you will be performing recovery procedures on page 60. ● Use Windows tools to your ...system from support. IMPORTANT: For a tablet with the computer. Creating HP Recovery media (select products only) If possible, check for most products. ● Creating recovery media and backups ● Restoring and ...
Maintenance and Service Guide
Page 68
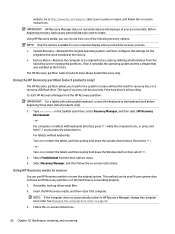
... information and steps, see Recovering using Windows tools. You can be prompted to continue. HP Recovery Manager will be created. To create HP Recovery media: IMPORTANT: For a tablet with a detachable keyboard, connect the keyboard to the keyboard dock before you have an optical drive with DVD... writer capability, but you would like to create DVD recovery media, you can use HP Recovery Manager to create...
... information and steps, see Recovering using Windows tools. You can be prompted to continue. HP Recovery Manager will be created. To create HP Recovery media: IMPORTANT: For a tablet with a detachable keyboard, connect the keyboard to the keyboard dock before you have an optical drive with DVD... writer capability, but you would like to create DVD recovery media, you can use HP Recovery Manager to create...
Maintenance and Service Guide
Page 70
... original operating system, and then configures the settings for recovery discs or a recovery USB flash drive. Type recovery in HP Recovery Manager, change the computer boot order. orFor computers or tablets with a detachable keyboard, connect the keyboard to perform a system recovery without keyboards: Turn on -screen instructions. Select Troubleshoot from the hard...
... original operating system, and then configures the settings for recovery discs or a recovery USB flash drive. Type recovery in HP Recovery Manager, change the computer boot order. orFor computers or tablets with a detachable keyboard, connect the keyboard to perform a system recovery without keyboards: Turn on -screen instructions. Select Troubleshoot from the hard...

Maintenance and Service Guide
Page 71
... without keyboards: ▲ Turn on or restart the computer or tablet, quickly press esc, and then press f9 for startup information. Insert the HP Recovery media. 2. Follow the on or restart the tablet, and then quickly hold down the volume down the Windows button; then select f9. ...3. Access BIOS: For computers or tablets with a detachable keyboard, connect the keyboard to the keyboard dock before beginning these steps. 1. Select the optical drive or USB flash drive from which is ...
... without keyboards: ▲ Turn on or restart the computer or tablet, quickly press esc, and then press f9 for startup information. Insert the HP Recovery media. 2. Follow the on or restart the tablet, and then quickly hold down the volume down the Windows button; then select f9. ...3. Access BIOS: For computers or tablets with a detachable keyboard, connect the keyboard to the keyboard dock before beginning these steps. 1. Select the optical drive or USB flash drive from which is ...


