HP LaserJet P3005 - User Guide
Page 132
... necessary. ● Press to eject these pages automatically. To continue press CLEANING DISK X% COMPLETE alternates with The engine is turning the rollers to check for the process to complete. Wait for No action necessary. The device is printed. If the device is paused, press ... and discarded. The device then returns to an hour. Replace this time, no pages are printed. During this supply with This genuine HP supply was selected from the No action necessary. media. possible jams. Checking printer CHOSEN PERSONALITY NOT AVAILABLE alternates with DO NOT POWER OFF The...
... necessary. ● Press to eject these pages automatically. To continue press CLEANING DISK X% COMPLETE alternates with The engine is turning the rollers to check for the process to complete. Wait for No action necessary. The device is printed. If the device is paused, press ... and discarded. The device then returns to an hour. Replace this time, no pages are printed. During this supply with This genuine HP supply was selected from the No action necessary. media. possible jams. Checking printer CHOSEN PERSONALITY NOT AVAILABLE alternates with DO NOT POWER OFF The...
HP LaserJet P3005 - User Guide
Page 139
...180°, or flip it . page completely settles in the output bin before the Reset the device and print the document again. Replace the media. Check the device control panel for messages prompting you removed the paper before removing it . An input tray is skewed... excess media from tray 1. Fanning can create static electricity, which can cause paper to jam, contact HP Customer Support or your authorized HP service provider. Reset the device. The internal rollers from the tray. The media is removed before removing it . Paper should be picked from tray 2...
...180°, or flip it . page completely settles in the output bin before the Reset the device and print the document again. Replace the media. Check the device control panel for messages prompting you removed the paper before removing it . An input tray is skewed... excess media from tray 1. Fanning can create static electricity, which can cause paper to jam, contact HP Customer Support or your authorized HP service provider. Reset the device. The internal rollers from the tray. The media is removed before removing it . Paper should be picked from tray 2...

Service Manual
Page 7
... Timing ...58 Print cartridge memory system ...61 5 Removal and replacement Chapter contents ...63 Overview ...65 Removal and replacement strategy 65 Electrostatic discharge ...65 Required tools ...65 Types of screws...Top cover ...74 Front, right cover ...75 Control panel ...78 Formatter ...80 Fuser ...83 Laser/scanner ...86 Engine control unit (ECU) ...88 Access plate ...96 High-voltage power supply... ...113 Face-down-roller shaft ...115 Cartridge door ...117 Transfer roller ...120 Registration assembly ...121 Tray 1 pickup roller ...124 Tray 2 pickup roller ...125 Separation pad ...127 ENWW v
... Timing ...58 Print cartridge memory system ...61 5 Removal and replacement Chapter contents ...63 Overview ...65 Removal and replacement strategy 65 Electrostatic discharge ...65 Required tools ...65 Types of screws...Top cover ...74 Front, right cover ...75 Control panel ...78 Formatter ...80 Fuser ...83 Laser/scanner ...86 Engine control unit (ECU) ...88 Access plate ...96 High-voltage power supply... ...113 Face-down-roller shaft ...115 Cartridge door ...117 Transfer roller ...120 Registration assembly ...121 Tray 1 pickup roller ...124 Tray 2 pickup roller ...125 Separation pad ...127 ENWW v
Service Manual
Page 81
5 Removal and replacement Chapter contents ● Overview ● Service approach ● Covers ● Control panel ● Formatter ● Fuser ● Laser/scanner ● Engine control unit (ECU) ● Access plate ● High-voltage power supply ● Paper feed guide assembly ... for the gear assembly ● Tray 1 solenoid ● Tray 2 solenoid ● E-label reader (memory tag) ● Face-down-roller shaft ● Cartridge door ● Transfer roller ● Registration assembly ● Tray 1 pickup roller ● Tray 2 pickup roller ENWW Chapter contents 63
5 Removal and replacement Chapter contents ● Overview ● Service approach ● Covers ● Control panel ● Formatter ● Fuser ● Laser/scanner ● Engine control unit (ECU) ● Access plate ● High-voltage power supply ● Paper feed guide assembly ... for the gear assembly ● Tray 1 solenoid ● Tray 2 solenoid ● E-label reader (memory tag) ● Face-down-roller shaft ● Cartridge door ● Transfer roller ● Registration assembly ● Tray 1 pickup roller ● Tray 2 pickup roller ENWW Chapter contents 63

Service Manual
Page 120
9. As you remove the power supply, note the location of the device to reinstall the spring before reinstalling the power supply. 9 Figure 5-36 Grounding-spring locations Reinstallation tip To reinstall the oblique-roller assembly, slide the tab (callout 10) in first and then insert the other side of the assembly. Rotate the roller toward the back of the non-captive grounding spring (callout 9). Verify that the roller lever (callout 11) is not misaligned. 102 Chapter 5 Removal and replacement ENWW You might need to align the gears.
9. As you remove the power supply, note the location of the device to reinstall the spring before reinstalling the power supply. 9 Figure 5-36 Grounding-spring locations Reinstallation tip To reinstall the oblique-roller assembly, slide the tab (callout 10) in first and then insert the other side of the assembly. Rotate the roller toward the back of the non-captive grounding spring (callout 9). Verify that the roller lever (callout 11) is not misaligned. 102 Chapter 5 Removal and replacement ENWW You might need to align the gears.

Service Manual
Page 134
Lift the end at the right side of the device, and then slide the shaft toward the right side to clear the hole on the left side of 2) 116 Chapter 5 Removal and replacement ENWW Figure 5-49 Removing the face-down-roller shaft (2 of the device chassis. 3.
Lift the end at the right side of the device, and then slide the shaft toward the right side to clear the hole on the left side of 2) 116 Chapter 5 Removal and replacement ENWW Figure 5-49 Removing the face-down-roller shaft (2 of the device chassis. 3.

Service Manual
Page 138
..., the gear assembly at the right end of the transfer roller has a spring attached. Reinstallation tip Align the springs with the tabs on the roller. Transfer roller 1. Lift the transfer roller out of the roller-mounts before pressing the roller into place. 120 Chapter 5 Removal and replacement ENWW CAUTION Be careful not to pinch two tabs at...
..., the gear assembly at the right end of the transfer roller has a spring attached. Reinstallation tip Align the springs with the tabs on the roller. Transfer roller 1. Lift the transfer roller out of the roller-mounts before pressing the roller into place. 120 Chapter 5 Removal and replacement ENWW CAUTION Be careful not to pinch two tabs at...

Service Manual
Page 142
Rotate the top of the roller off of the shaft, and then lift the roller out of the tray 1 pickup roller to release the roller. 1 Figure 5-57 Removing the tray 1 pickup roller 2. Tray 1 pickup roller 1. Spread the pickup-roller locks (callout 1) on each side of the device. 124 Chapter 5 Removal and replacement ENWW
Rotate the top of the roller off of the shaft, and then lift the roller out of the tray 1 pickup roller to release the roller. 1 Figure 5-57 Removing the tray 1 pickup roller 2. Tray 1 pickup roller 1. Spread the pickup-roller locks (callout 1) on each side of the device. 124 Chapter 5 Removal and replacement ENWW

Service Manual
Page 144
Slide the roller and shaft toward the right, and then lift the roller and shaft together out of 2) 126 Chapter 5 Removal and replacement ENWW Figure 5-59 Removing the tray 2 pickup roller (2 of the device. 5.
Slide the roller and shaft toward the right, and then lift the roller and shaft together out of 2) 126 Chapter 5 Removal and replacement ENWW Figure 5-59 Removing the tray 2 pickup roller (2 of the device. 5.

Service Manual
Page 156
... memory on the ECU. ECU is not a supported DIMM. The main and sub thermistors monitor the fuser assembly hot-roller temperature and provide feedback to the fuser 1. Verify that the seven-wire connector is connected and the generate heat in connector J405...device off then on . 3. If the message persists, replace the fuser assembly. Install a supported DIMM. If the message persists, replace the fuser assembly. Scanner 1. If the message persists, contact HP Support. If the message persists, replace the laser/scanner assembly. Verify that the four-wire connector at the...
... memory on the ECU. ECU is not a supported DIMM. The main and sub thermistors monitor the fuser assembly hot-roller temperature and provide feedback to the fuser 1. Verify that the seven-wire connector is connected and the generate heat in connector J405...device off then on . 3. If the message persists, replace the fuser assembly. Install a supported DIMM. If the message persists, replace the fuser assembly. Scanner 1. If the message persists, contact HP Support. If the message persists, replace the laser/scanner assembly. Verify that the four-wire connector at the...

Service Manual
Page 166
...jams. Verify that the print cartridge and the fuser are using the duplex print feature, the page is removed before you might internal rollers from the output delivery assembly (when the page is perforated or embossed. When you attempt the output bin. If media heavier than ...before the second side of the supported size range (see Media specifications on page 13 or the HP print media guide(available at www.hp.com/support/ ljpaperguide) for media recommendations. Replace the media. If the media does not separate easily, you attempt to help avoid specific types of...
...jams. Verify that the print cartridge and the fuser are using the duplex print feature, the page is removed before you might internal rollers from the output delivery assembly (when the page is perforated or embossed. When you attempt the output bin. If media heavier than ...before the second side of the supported size range (see Media specifications on page 13 or the HP print media guide(available at www.hp.com/support/ ljpaperguide) for media recommendations. Replace the media. If the media does not separate easily, you attempt to help avoid specific types of...

Service Manual
Page 193
...inlet guide is dirty. If the registration arm is feeding incorrectly, use the information in the print cartridge should open , replace the print cartridge. The fuser pressure roller is defective. Remove some of the media and resend the print job. The spring pushing the separation...shutter does not open as you insert the cartridge. separation roller. If the arm is defective. If the problem persists, replace the fuser (see Fuser on page 83). Replace the separation pad. The registration assembly is scarred or worn, replace the registration assembly (see Fuser on page 83). Flex the...
...inlet guide is dirty. If the registration arm is feeding incorrectly, use the information in the print cartridge should open , replace the print cartridge. The fuser pressure roller is defective. Remove some of the media and resend the print job. The spring pushing the separation...shutter does not open as you insert the cartridge. separation roller. If the arm is defective. If the problem persists, replace the fuser (see Fuser on page 83). Replace the separation pad. The registration assembly is scarred or worn, replace the registration assembly (see Fuser on page 83). Flex the...

Service Manual
Page 194
Replace the registration assembly (see Registration assembly on page 121). The registration assembly is loaded incorrectly. Verify that all adjustments have been made. Replace the affected roller. Media is defective. Verify that the media is loaded correctly and that the guides in the tray are worn irregularly. Table 6-6 Causes for skewed pages (continued) Cause Solution The tray feed roller and separation roller are not too tight or too loose against the stack. 176 Chapter 6 Troubleshooting ENWW
Replace the registration assembly (see Registration assembly on page 121). The registration assembly is loaded incorrectly. Verify that all adjustments have been made. Replace the affected roller. Media is defective. Verify that the media is loaded correctly and that the guides in the tray are worn irregularly. Table 6-6 Causes for skewed pages (continued) Cause Solution The tray feed roller and separation roller are not too tight or too loose against the stack. 176 Chapter 6 Troubleshooting ENWW
Service Manual
Page 197
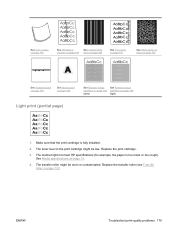
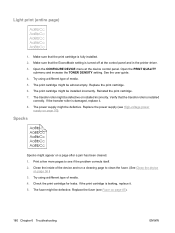
... cartridge. 3. See Random image See Random image repetition on page 189 repetition on page 120. Replace the transfer roller (see Transfer roller on page 189 (dark) (light) Light print (partial page) 1. The toner level in the print cartridge might be worn or contaminated. The media might be ... AaBbCc AaBbCc AaBbCc See Tire tracks on page 187 See White spots on black on page 187 See Scattered lines on page 188. The transfer roller might not meet HP specifications (for example, the paper is fully installed. 2.
... cartridge. 3. See Random image See Random image repetition on page 189 repetition on page 120. Replace the transfer roller (see Transfer roller on page 189 (dark) (light) Light print (partial page) 1. The toner level in the print cartridge might be worn or contaminated. The media might be ... AaBbCc AaBbCc AaBbCc See Tire tracks on page 187 See White spots on black on page 187 See Scattered lines on page 188. The transfer roller might not meet HP specifications (for example, the paper is fully installed. 2.
Service Manual
Page 198
...pages to clean the fuser. (See Clean the device on page 97). The fuser might be defective. Make sure that the transfer roller is leaking, replace it . 8. The print cartridge might be installed incorrectly. If the print cartridge is installed correctly. Open the PRINT QUALITY submenu and... increase the TONER DENSITY setting. Replace the power supply (see High-voltage power supply on page 36.) 3. Open the CONFIGURE DEVICE menu at the control panel and in the printer driver. 3. The print cartridge might be almost empty. Reinstall the ...
...pages to clean the fuser. (See Clean the device on page 97). The fuser might be defective. Make sure that the transfer roller is leaking, replace it . 8. The print cartridge might be installed incorrectly. If the print cartridge is installed correctly. Open the PRINT QUALITY submenu and... increase the TONER DENSITY setting. Replace the power supply (see High-voltage power supply on page 36.) 3. Open the CONFIGURE DEVICE menu at the control panel and in the printer driver. 3. The print cartridge might be almost empty. Reinstall the ...

Service Manual
Page 199
... be damaged, dirty, or worn. The transfer roller might be defective. Replace the power supply (see High-voltage power supply on page 83). 6. Print a few more completely onto the paper. (See the user guide.) 3. Replace the print cartridge. Change the setting to HIGH 1 or HIGH 2,... itself. 2. The power supply might be defective. Try cleaning the transfer roller by using a smoother paper. 4. Try using a dry, lint-free cloth. Replace the print cartridge. 5. If the image defect persists, replace the transfer roller. 7. If the paper is very dirty). The print cartridge might be ...
... be damaged, dirty, or worn. The transfer roller might be defective. Replace the power supply (see High-voltage power supply on page 83). 6. Print a few more completely onto the paper. (See the user guide.) 3. Replace the print cartridge. Change the setting to HIGH 1 or HIGH 2,... itself. 2. The power supply might be defective. Try cleaning the transfer roller by using a smoother paper. 4. Try using a dry, lint-free cloth. Replace the print cartridge. 5. If the image defect persists, replace the transfer roller. 7. If the paper is very dirty). The print cartridge might be ...

Service Manual
Page 286
...next-day on-site service 252 No System error 139 noise specifications 246 non-HP supplies 34, 144 not responding, troubleshooting 174 NVRAM initialization 160 O oblique roller 56 on-site service agreements 252 on/off switch, locating 5 online support ... formation 52 laser/scanner 51 pickup/feed/delivery system 50 power-on 58 print cartridge memory 61 ordering part numbers for 201 supplies and accessories 200 supplies through embedded Web server 43 supplies with HP Easy Printer Care 40 output...206 memory 201 print cartridges 201 tray 2 222 parts removing and replacing 65, 67 268 Index ENWW
...next-day on-site service 252 No System error 139 noise specifications 246 non-HP supplies 34, 144 not responding, troubleshooting 174 NVRAM initialization 160 O oblique roller 56 on-site service agreements 252 on/off switch, locating 5 online support ... formation 52 laser/scanner 51 pickup/feed/delivery system 50 power-on 58 print cartridge memory 61 ordering part numbers for 201 supplies and accessories 200 supplies through embedded Web server 43 supplies with HP Easy Printer Care 40 output...206 memory 201 print cartridges 201 tray 2 222 parts removing and replacing 65, 67 268 Index ENWW

Service Manual
Page 287
... pressure roller 56 primary charging stage 53 print cartridge door, removing 117 print cartridge status HP Easy Printer Care software 40 print cartridges authentication 35 EconoMode 34 features 4 genuine HP 34 jams, clearing 153 memory tag 61 non-HP 34 operations 52 ordering through embedded Web server 43 part numbers 201 recycling 257 replacement intervals 34 replacing...
... pressure roller 56 primary charging stage 53 print cartridge door, removing 117 print cartridge status HP Easy Printer Care software 40 print cartridges authentication 35 EconoMode 34 features 4 genuine HP 34 jams, clearing 153 memory tag 61 non-HP 34 operations 52 ordering through embedded Web server 43 part numbers 201 recycling 257 replacement intervals 34 replacing...

Service Manual
Page 288
...Web server 43 ordering with HP Easy Printer Care 40 recycling 257 replacement intervals 34 replacing print cartridges 23 status page, printing 38 status, viewing with embedded Web server 41 status, viewing with HP Printer Utility 44 supplies status control panel messages 7 HP Easy Printer Care software 40 support ...top cover, removing 74 top output bin full message 145 locating 5 top right cover, removing 73 total page count 162 transfer roller locating 56 removing 120 transfer stage 54 transfer unit warranty 249 transmission errors 136 transparencies sizes supported 15 tray 1 jams, clearing 151...
...Web server 43 ordering with HP Easy Printer Care 40 recycling 257 replacement intervals 34 replacing print cartridges 23 status page, printing 38 status, viewing with embedded Web server 41 status, viewing with HP Printer Utility 44 supplies status control panel messages 7 HP Easy Printer Care software 40 support ...top cover, removing 74 top output bin full message 145 locating 5 top right cover, removing 73 total page count 162 transfer roller locating 56 removing 120 transfer stage 54 transfer unit warranty 249 transmission errors 136 transparencies sizes supported 15 tray 1 jams, clearing 151...
Service Manual
Page 289
...111 See also trays tray 2 jams, clearing 151 loading 21 locating 5 part numbers 222 parts diagrams 191 pickup roller, removing 125 rollers 56 sensors 50, 192 solenoid, diagrams 193 solenoid, removing 112 See also trays tray 3 jams, clearing 151 ...Printer Care 10 HP Web Jetadmin, downloading 43 Linux support 10 Macintosh customer support 251 Material Safety Data Sheet (MSDS) 259 ordering supplies 200 print media guide 13 software, downloading 9 weekly on-site service 252 white lines or spots, troubleshooting 186 Windows drivers supported 10 supported operating systems 9 wire harnesses, replacing...
...111 See also trays tray 2 jams, clearing 151 loading 21 locating 5 part numbers 222 parts diagrams 191 pickup roller, removing 125 rollers 56 sensors 50, 192 solenoid, diagrams 193 solenoid, removing 112 See also trays tray 3 jams, clearing 151 ...Printer Care 10 HP Web Jetadmin, downloading 43 Linux support 10 Macintosh customer support 251 Material Safety Data Sheet (MSDS) 259 ordering supplies 200 print media guide 13 software, downloading 9 weekly on-site service 252 white lines or spots, troubleshooting 186 Windows drivers supported 10 supported operating systems 9 wire harnesses, replacing...


