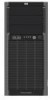
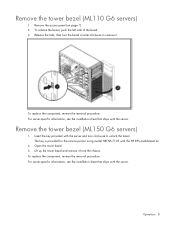
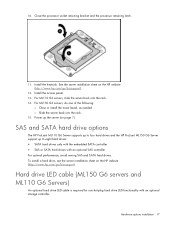
HP ProLiant ML150 G6 Server Maintenance and Service Guide
Page 16
... 5 SPS-BAFFLE 519741-001 Mandatory1 6 SPS-PANEL, SIDE 519729-001 Mandatory1 1Mandatory-Parts for contacting HP is optional. Illustrated parts catalog 16 These parts are also designed for the HP ProLiant ML150 G6 server. If, however, you , there may or may not be charged for the travel and... labor costs of warranty service designated for your product. 3No-Some HP parts are not designed for which customer self repair...
HP ProLiant ML150 G6 Server Maintenance and Service Guide
Page 24
... of the individual boards and subassemblies, no one should attempt to repair this chapter to the "Electrostatic Discharge Information" section for the HP ProLiant ML150 G6 server. Refer to illustrate procedural steps are labeled numerically (i.e., 1, 2...). Non-hot-plug devices Non-hot-pluggable devices require that all ... the part is a hot-plug or non-hot-plug type. Hardware configuration information WARNING: Only authorized technicians trained by HP should attempt to make repairs at the component level or to make modifications to verify that the server be powered down before...
HP ProLiant ML150 G6 Server Maintenance and Service Guide
Page 42
... that both processors are the same type (series). However, if processor 1 fails, the system automatically boots from the processor installed in processor socket 1. Processor The HP ProLiant ML150 G6 Server supports single (1P)- With two processors installed, the server supports boot functions through the processor installed in processor socket 2 and provides a processor failure message...
HP ProLiant ML150 G6 Server Maintenance and Service Guide
Page 47
...-buffered DDR3 ECC DIMM. • Supported DIMM capacities: 1GB, 2GB, 4GB DDR3 registered DIMM and 1GB, 2GB un- Removal and replacement procedures 47 Memory The HP ProLiant ML150 G6 server provides 12 DIMM slots that support up to 48 GB of system memory. buffered DIMM.
HP ProLiant ML150 G6 Server Maintenance and Service Guide
Page 65
BIOS Software The ProLiant ML150 G6 server uses BIOS to : • Perform configuration from the BIOS Setup Utility Using the Setup Utility, you can enable various features such as serial console ...
HP ProLiant ML150 G6 Server Maintenance and Service Guide
Page 83
... directory. 2. On executing the downloaded file, the user is prompted to enter the drive letter to finish the flashing of the USB disk. Reboot the ML150 G6 Server with the USB disk. Diagnostic Tools and Setup Utilities 83 BIOS Updating To update the system BIOS, a BIOS Update USB disk must be overwritten...
HP ProLiant ML150 G6 Server Maintenance and Service Guide
Page 88
... describing the key components (including connectors), switches, and LED indicators located on the front and rear panels, the system board, and hard drives of the HP ProLiant ML150 G6 Server. Front and Rear Panel Components, Switches, and Indicators Figure 5-1 Front and Rear Panel Components, Switches, and Indicators Table 5-1 Front and Rear Panel Components Item...
HP ProLiant ML150 G6 Server Maintenance and Service Guide
Page 94
...-hot-plug or hot-plug HDD cage supporting up to four SATA/SAS hard drives Physical and Operating Specifications 94 Specifications are provided for the HP ProLiant ML150 G6 server.
HP ProLiant ML150 G6 Server Maintenance and Service Guide
Page 99
... systems configured with processors of the same type. Registered DDR3 1066/1333 DIMM with ECC and un-buffered DDR3 1333 DIMM with ECC Processor The HP ProLiant ML150 G6 server provides two Intel LGA1366 processor sockets that support Intel Nehalem Dual-Core E5502 and Intel Nehalem Quad-Core E5504/E5506/E5520/E5530/E5540 processors...
5U Tower G6 Server Hard Disk Drive Cage option Installation Instructions
Page 1
... Server Product. Connect the I2C cable from the system board or the SATA/SAS card to the documentation referenced on the HP Server product CD. HP shall not be liable for installation, refer to the backplane (Figure 7). 13. Installation guidelines This installation is to the ...manner. 2. Connect the power cables to be construed as non-hot-plug (left) and hot-plug (right) systems NOTE: 1. 5U Tower G6 Server Hard Disk Drive Cage option Installation Instructions Legal notices © Copyright 2009 Hewlett-Packard Development Company, L.P. The information contained herein is installed...
5U Tower G6 Server Redundant Fan option Installation Instructions
Page 1
... thumbscrews and remove the access panel. 7. The information contained herein is subject to hood label information. 5U Tower G6 Server Redundant Fan option Installation Instructions Overview This document contains instructions for installing the optional Redundant Fan in the express ... on system board. CAUTION: Electrostatic discharge (ESD) can damage electronic components. Be sure you are set forth in the HP 5U Tower G6 Server. Kit contents • Redundant Fan including holder (2) • Redundant Fan option document Important safety information Read the installation...
5U Tower G6 Server Redundant Power Supply Enablement Option Installation Instructions
Page 1
...it from the system chassis. 5. If necessary, unlock the chassis. 6. 5U Tower G6 Server Redundant Power Supply Enablement Option Installation Instructions Overview This document contains instructions for HP products and services are set forth in the express warranty statements accompanying such products and ... power supply and then push toward processor 1 and carefully remove it clears the support ledge. 12. Place the server on the HP server product CD. Remove the eight mounting screws that might impact thermal solution. 15. Figure 5 Installing the RPS cage (cables not...
HP ProLiant ML 150 G6 Processor Installation Card
Page 1
... Development Company, L.P. Disconnect the power cord from CPU socket 12. Figure 3 Removing the air baffle 8. Place the server on the HP ProLiant ML150 G6 Server Easy set-up . 9. Lift the load lever to a 135° angle, and lift load plate to fully seat the processor... data. 2. Remove the air baffle by qualified personnel who are properly grounded (earthed) before beginning the installation procedure. HP ProLiant ML150 G6 Server Processor Option kit Installation Instructions Overview This document contains instructions for installing the optional Processor Option Kit in the express ...
HP ProLiant ML150 G6 server Installation Sheet
Page 1
... server with the supplied key. Note the server BIOS version. Connect the keyboard, mouse, and monitor 2. HP ProLiant ML150 G6 Server Installation Sheet Part number: 501527-001 March 2009 First Edition Configuring the server Refer to the HP ProLiant ML150 G6 Server Easy set-up the server. If necessary, update the BIOS (refer to halt screen movement. Figure...
HP ProLiant ML100 Series Server User Guide
Page 1
HP ProLiant ML100 Series Server User Guide For HP ProLiant ML110 G6 Servers and HP ProLiant ML150 G6 Servers Part Number 501528-004 February 2010 (Fourth Edition)
HP ProLiant ML100 Series Server User Guide
Page 3
... Installing a storage controller...32 Battery-backed write cache battery pack option 32 Installing the FBWC module and capacitor pack 35 HP Trusted Platform Module option ...36 Installing the Trusted Platform Module board 37 Contents Operations...7 Power up the server ...7 Power... down the server ...7 Remove the access panel ...7 Remove the tower bezel (ML110 G6 servers 8 Remove the tower bezel (ML150 G6 servers 8 Setup...9 Optional installation services ...9 Rack planning resources ...9 Optimum environment...9 Space and airflow requirements ...10 Temperature ...
HP ProLiant ML100 Series Server User Guide
Page 8
... the key provided with the server. Release the tabs, then turn clockwise to remove it from the chassis. Remove the tower bezel (ML150 G6 servers) 1. Remove the tower bezel (ML110 G6 servers) 1. To release the bezel, push the left side of the bezel. 3. The key is provided for the service person using model... page 7). 2. To replace the component, reverse the removal procedure. Open the tower bezel. 3. For server-specific information, see the installation sheet that ships with the HP RPS enablement kit. 2. To replace the component, reverse the removal procedure.
HP ProLiant ML100 Series Server User Guide
Page 14
... all the hardware options and identify similar steps to electrical components, properly ground the server before touching them. For the ML110 G6 server, extend the server from the rack. 4. For the ML150 G6 server, do not mix processors of different speeds or cache sizes. Open the processor retaining latch and the processor socket... procedure. Hardware options installation 14 Hardware options installation Introduction If more than one of the following: o Unlock and remove the bezel ("Remove the tower bezel (ML150 G6 servers)" on page 8).
HP ProLiant ML100 Series Server User Guide
Page 17
...See the server installation sheet on the HP website (http://www.hp.com/go /bizsupport). To install a hard drive, see the server installation sheet on page 7). o Slide the server back into the rack. 14. Hard drive LED cable (ML150 G6 servers and ML110 G6 Servers) An optional hard drive LED... latch. 11. SAS and SATA hard drive options The HP ProLiant ML110 G6 Server supports up to four hard drives and the HP ProLiant ML150 G6 Server support up the server (on the HP website (http://www.hp.com/go /bizsupport). 12. For ML110 G6 servers, slide the server back into the rack. 15....
HP ProLiant ML100 Series Server User Guide
Page 18
... (on page 7). Power down the server (on page 7). 2. Do one of the following : o Unlock and remove the bezel ("Remove the tower bezel (ML150 G6 servers)" on page 8). 5. o Extend the server from the rack. 3. Install the access panel. 9. o Slide the server back into a specific server, ...see the installation sheet that ships with the server or the HP website (http://www.hp.com/go/bizsupport). To install the component: 1. Extend the server from the rack. 3. Remove the tower bezel ("Remove the tower bezel...