User Guide
Page 5
...) menu ...19 Assigning the function buttons ...20 Camera ...21 Using Auto-Sleep Mode ...22 Adjusting Low Blue Light Mode ...22 3 Support and troubleshooting ...23 Solving common problems ...23 Using the auto-adjustment function (analog input 24 Optimizing image performance (analog input 25 Button lockouts ...26 Contacting support ...26 Preparing to call technical...
...) menu ...19 Assigning the function buttons ...20 Camera ...21 Using Auto-Sleep Mode ...22 Adjusting Low Blue Light Mode ...22 3 Support and troubleshooting ...23 Solving common problems ...23 Using the auto-adjustment function (analog input 24 Optimizing image performance (analog input 25 Button lockouts ...26 Contacting support ...26 Preparing to call technical...
User Guide
Page 6
Locating the serial number and product number 27 4 Maintaining the monitor ...28 Maintenance guidelines ...28 Cleaning the monitor ...28 Shipping the monitor ...28 Appendix A Technical specifications ...29 60.5 cm/23.8-inch model ...29 68.5 cm/27-inch model ...30 Preset display resolutions ...30 60.5 cm/23.8-inch and 68.5 cm/27-inch models 30 60.5 cm/23.8-inch and 68.5 cm/27-inch models 31 Entering user modes ...31 Energy saver feature ...31 Appendix B Accessibility ...32 Supported assistive technologies ...32 Contacting support ...32 vi
Locating the serial number and product number 27 4 Maintaining the monitor ...28 Maintenance guidelines ...28 Cleaning the monitor ...28 Shipping the monitor ...28 Appendix A Technical specifications ...29 60.5 cm/23.8-inch model ...29 68.5 cm/27-inch model ...30 Preset display resolutions ...30 60.5 cm/23.8-inch and 68.5 cm/27-inch models 30 60.5 cm/23.8-inch and 68.5 cm/27-inch models 31 Entering user modes ...31 Energy saver feature ...31 Appendix B Accessibility ...32 Supported assistive technologies ...32 Contacting support ...32 vi
User Guide
Page 8
...to USB devices) ● USB BM to AM cable provided to connect the monitor's USB hub to the USB connector on the computer (23.8-inch model only) ● USB CM to AM cable provided to connect the monitor's USB hub to the USB connector on the computer (...rear of monitor for optional security cable ● On-screen display (OSD) adjustments in several languages for easy setup and screen optimization ● HP Display Assistant software for adjusting monitor settings and enabling the theft deterrence features ● Cyberlink YouCam software ● HDCP (High-bandwidth Digital Content ...
...to USB devices) ● USB BM to AM cable provided to connect the monitor's USB hub to the USB connector on the computer (23.8-inch model only) ● USB CM to AM cable provided to connect the monitor's USB hub to the USB connector on the computer (...rear of monitor for optional security cable ● On-screen display (OSD) adjustments in several languages for easy setup and screen optimization ● HP Display Assistant software for adjusting monitor settings and enabling the theft deterrence features ● Cyberlink YouCam software ● HDCP (High-bandwidth Digital Content ...

User Guide
Page 9
... HDMI cable to the source device. Connects the VGA cable to the source device. Connects the audio cable to the monitor. Rear and side components 23.8-inch model Component 1 USB ports (2) 2 Audio-out (headphone) jack 3 Power connector 4 DisplayPort port 5 HDMI port 6 VGA port 7 Audio line in port 8 USB 3.0 upstream port Function...
... HDMI cable to the source device. Connects the VGA cable to the source device. Connects the audio cable to the monitor. Rear and side components 23.8-inch model Component 1 USB ports (2) 2 Audio-out (headphone) jack 3 Power connector 4 DisplayPort port 5 HDMI port 6 VGA port 7 Audio line in port 8 USB 3.0 upstream port Function...

User Guide
Page 11
Front bezel controls 23.8-inch and 27-inch models Component 1 Camera microphones 2 Camera light 3 Camera lens 4 Speakers 5 +/- (Plus/Minus) button 6 Answer/Call button 7 Mute microphone button 8 Mute speaker button 9 ...
Front bezel controls 23.8-inch and 27-inch models Component 1 Camera microphones 2 Camera light 3 Camera lens 4 Speakers 5 +/- (Plus/Minus) button 6 Answer/Call button 7 Mute microphone button 8 Mute speaker button 9 ...
User Guide
Page 12
NOTE: To view an OSD menu simulator, visit the HP Customer Self Repair Services Media Library at http://www.hp.com/go/sml. If this occurs, the screen will not recover to turn the monitor on or off. Press the button to its normal condition. 1. ...Pressure on a flat surface covered by a clean, dry cloth. 2. Lower the bottom of the mounting plate on page 20 for more information. 23.8-inch...
NOTE: To view an OSD menu simulator, visit the HP Customer Self Repair Services Media Library at http://www.hp.com/go/sml. If this occurs, the screen will not recover to turn the monitor on or off. Press the button to its normal condition. 1. ...Pressure on a flat surface covered by a clean, dry cloth. 2. Lower the bottom of the mounting plate on page 20 for more information. 23.8-inch...

User Guide
Page 16
To enable sound from the monitor's speakers, connect one end of the monitor. Then connect the cable's Type A-connector to the audio-out jack on the source device. (23.8-inch model only) 7. 6. Connect the Type-B connector of the USB upstream cable to the USB upstream port on the rear of an audio cable (not included with the monitor) to the audio-in jack on the monitor and the other end to the USB downstream port on the source device. 10 Chapter 1 Getting Started
To enable sound from the monitor's speakers, connect one end of the monitor. Then connect the cable's Type A-connector to the audio-out jack on the source device. (23.8-inch model only) 7. 6. Connect the Type-B connector of the USB upstream cable to the USB upstream port on the rear of an audio cable (not included with the monitor) to the audio-in jack on the monitor and the other end to the USB downstream port on the source device. 10 Chapter 1 Getting Started
User Guide
Page 29
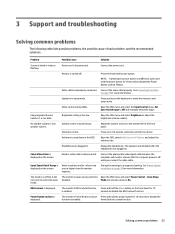
... menu and select the Input Control menu. Brightness setting is in the OSD. See Preset display resolutions on page 7 for more information. Solving common problems 23 Volume control is muted. Volume is turned down in sleep mode. Open the OSD, select Audio Control > Volume, and adjust the volume scale. Headphones are...
... menu and select the Input Control menu. Brightness setting is in the OSD. See Preset display resolutions on page 7 for more information. Solving common problems 23 Volume control is muted. Volume is turned down in sleep mode. Open the OSD, select Audio Control > Volume, and adjust the volume scale. Headphones are...
User Guide
Page 35
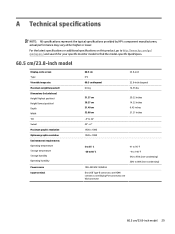
... or lower. For the latest specifications or additional specifications on this product, go to http://www.hp.com/go/ quickspecs/ and search for your specific monitor model to find the model-specific QuickSpecs. 60.5 cm/23.8-inch model Display, wide-screen Type Viewable image size Maximum weight (unpacked) Dimensions (include base) Height... 51.37 cm 36.37 cm 21.40 cm 53.88 cm -5° to 22° 45° ± 2° 1920 x 1080 1920 x 1080 23.8-inch 23.8-inch diagonal 14.55 lbs 20.22 inches 14.32 inches 8.43 inches 21.21 inches 5 to 35° C -20 to 60° C 100-240...
... or lower. For the latest specifications or additional specifications on this product, go to http://www.hp.com/go/ quickspecs/ and search for your specific monitor model to find the model-specific QuickSpecs. 60.5 cm/23.8-inch model Display, wide-screen Type Viewable image size Maximum weight (unpacked) Dimensions (include base) Height... 51.37 cm 36.37 cm 21.40 cm 53.88 cm -5° to 22° 45° ± 2° 1920 x 1080 1920 x 1080 23.8-inch 23.8-inch diagonal 14.55 lbs 20.22 inches 14.32 inches 8.43 inches 21.21 inches 5 to 35° C -20 to 60° C 100-240...

User Guide
Page 36
... are set as factory defaults. The monitor automatically recognizes these preset modes and they will appear properly sized and centered on the screen. 60.5 cm/23.8-inch and 68.5 cm/27-inch models Preset 1 2 3 4 5 6 Pixel Format 640 × 480 720 × 400 800 × 600 1024 × 768 1280 × 720...
... are set as factory defaults. The monitor automatically recognizes these preset modes and they will appear properly sized and centered on the screen. 60.5 cm/23.8-inch and 68.5 cm/27-inch models Preset 1 2 3 4 5 6 Pixel Format 640 × 480 720 × 400 800 × 600 1024 × 768 1280 × 720...

User Guide
Page 37
... 1920 × 1080 63.981 55.935 60.000 65.290 67.500 60.020 59.887 60.000 59.954 60.000 60.5 cm/23.8-inch and 68.5 cm/27-inch models Preset 1 2 3 4 5 6 Timing name 480p 576p 720p50 720p60 1080p60 1080p50 Pixel format 720 × 480 720 × 576 1280...
... 1920 × 1080 63.981 55.935 60.000 65.290 67.500 60.020 59.887 60.000 59.954 60.000 60.5 cm/23.8-inch and 68.5 cm/27-inch models Preset 1 2 3 4 5 6 Timing name 480p 576p 720p50 720p60 1080p60 1080p50 Pixel format 720 × 480 720 × 576 1280...
