

User Guide
Page 3
...: Indicates a hazardous situation that, if not avoided, could result in damage to hardware or software. About this guide This guide provides information about monitor features, setting up the monitor, and technical specifications. Warns the user that , if not avoided, could result in loss of the main text. NOTE: Contains additional information to...
...: Indicates a hazardous situation that, if not avoided, could result in damage to hardware or software. About this guide This guide provides information about monitor features, setting up the monitor, and technical specifications. Warns the user that , if not avoided, could result in loss of the main text. NOTE: Contains additional information to...
User Guide
Page 5
... components ...2 Features ...2 Rear and side components ...3 Front components ...4 Setting up the monitor ...5 Installing the monitor stand ...5 Mounting the monitor ...5 Removing the monitor stand 6 Attaching the VESA mounting bracket 7 Connecting the cables ...8 Connecting USB devices ...12 Adjusting the monitor ...13 Turning on the monitor ...15 HP watermark and image retention policy 15 Installing a security cable ...16 Docking an...
... components ...2 Features ...2 Rear and side components ...3 Front components ...4 Setting up the monitor ...5 Installing the monitor stand ...5 Mounting the monitor ...5 Removing the monitor stand 6 Attaching the VESA mounting bracket 7 Connecting the cables ...8 Connecting USB devices ...12 Adjusting the monitor ...13 Turning on the monitor ...15 HP watermark and image retention policy 15 Installing a security cable ...16 Docking an...

User Guide
Page 6
... Appendix A Technical specifications ...32 68.5 cm (27 in) monitor ...32 60.5 cm (23.8 in) monitor ...33 Preset display resolutions ...34 Entering user modes ...35 Energy saver feature ...35 Appendix B Accessibility ...37 HP and accessibility ...37 Finding the technology tools you need 37 The HP commitment ...37 International Association of Accessibility Professionals (IAAP 37 Finding...
... Appendix A Technical specifications ...32 68.5 cm (27 in) monitor ...32 60.5 cm (23.8 in) monitor ...33 Preset display resolutions ...34 Entering user modes ...35 Energy saver feature ...35 Appendix B Accessibility ...37 HP and accessibility ...37 Finding the technology tools you need 37 The HP commitment ...37 International Association of Accessibility Professionals (IAAP 37 Finding...
User Guide
Page 7
...monitor. IMPORTANT: For the protection of serious injury, read the Safety & Comfort Guide provided with the monitor...for the computer and its peripheral devices (such as a monitor, printer, scanner) to route all times. ●... appropriate and correctly sized furniture designed to the monitor so that you use another cord, use with...Consider placing the monitor in your monitor. Care should be included with the monitor. The Safety &...power cords or cables. Monitors that are inappropriately situated ... To reduce the risk of the monitor and the computer, connect all power...
...monitor. IMPORTANT: For the protection of serious injury, read the Safety & Comfort Guide provided with the monitor...for the computer and its peripheral devices (such as a monitor, printer, scanner) to route all times. ●... appropriate and correctly sized furniture designed to the monitor so that you use another cord, use with...Consider placing the monitor in your monitor. Care should be included with the monitor. The Safety &...power cords or cables. Monitors that are inappropriately situated ... To reduce the risk of the monitor and the computer, connect all power...
User Guide
Page 8
...and two side ports) ● RJ-45 (network) jack ● Security cable slot on rear of monitor for optional security cable ● HP Display Assistant software for adjusting monitor settings and enabling theft deterrence features ● HDCP (High-bandwidth Digital Content Protection) used on all digital ...● Power Saver mode to meet requirements for your product, go to http://www.hp.com/support and follow the instructions to portrait orientation ● Removable stand (optional) for flexible monitor head mounting solutions ● USB Type-C and USB Type-A docking for legacy and ...
...and two side ports) ● RJ-45 (network) jack ● Security cable slot on rear of monitor for optional security cable ● HP Display Assistant software for adjusting monitor settings and enabling theft deterrence features ● HDCP (High-bandwidth Digital Content Protection) used on all digital ...● Power Saver mode to meet requirements for your product, go to http://www.hp.com/support and follow the instructions to portrait orientation ● Removable stand (optional) for flexible monitor head mounting solutions ● USB Type-C and USB Type-A docking for legacy and ...

User Guide
Page 9
...Connects an optional security cable. (4) HDMI port Connects an HDMI cable to a source device. (5) DisplayPort OUT connector Connects a DisplayPort cable to a secondary monitor for video, data, and power delivery (up to a source device. (10) RJ-45 (network) jack Connects a network cable. (11) USB ...Type-A ports (2) Connect USB devices. (12) USB port with HP Sleep and Charge Connects USB devices. Charges most products such as a single connection for daisychaining. (6) VGA port Connects a VGA cable to a source ...
...Connects an optional security cable. (4) HDMI port Connects an HDMI cable to a source device. (5) DisplayPort OUT connector Connects a DisplayPort cable to a secondary monitor for video, data, and power delivery (up to a source device. (10) RJ-45 (network) jack Connects a network cable. (11) USB ...Type-A ports (2) Connect USB devices. (12) USB port with HP Sleep and Charge Connects USB devices. Charges most products such as a single connection for daisychaining. (6) VGA port Connects a VGA cable to a source ...

User Guide
Page 10
... volume before using headphones, earbuds, or a headset. For additional safety information, see Using the function buttons on page 21. (6) Power button (with power Turns the monitor on page 21 for more information. 4 Chapter 1 Getting started Table 1-1 Rear and side components and their functions. An indicator is open the OSD menu, select...
... volume before using headphones, earbuds, or a headset. For additional safety information, see Using the function buttons on page 21. (6) Power button (with power Turns the monitor on page 21 for more information. 4 Chapter 1 Getting started Table 1-1 Rear and side components and their functions. An indicator is open the OSD menu, select...
User Guide
Page 11
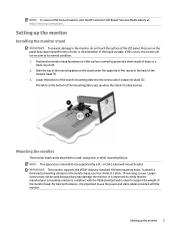
... video cables provided with the VESA standard and is compliant with the monitor. NOTE: To view an OSD menu simulator, visit the HP Customer Self Repair Services Media Library at http://www.hp.com/go/sml. Setting up the monitor 5 Pressure on the stand under the upper lip of the recess ...in place. Mounting the monitor The monitor head can be used because they may cause nonuniformity...
... video cables provided with the VESA standard and is compliant with the monitor. NOTE: To view an OSD menu simulator, visit the HP Customer Self Repair Services Media Library at http://www.hp.com/go/sml. Setting up the monitor 5 Pressure on the stand under the upper lip of the recess ...in place. Mounting the monitor The monitor head can be used because they may cause nonuniformity...

User Guide
Page 12
Slide the stand out of foam or a clean, dry cloth. 3. Removing the monitor stand IMPORTANT: Before beginning to disassemble the monitor, be sure that the monitor is turned off and all cables from the monitor. 2. Push up until the mounting plate clears the recess in the monitor head (2). 5. Disconnect and remove all cables are disconnected. 1. Swing the bottom of the stand up on a flat surface covered by protective sheet made of the recess. 6 Chapter 1 Getting started Position the monitor facedown on the latch near the bottom center of the stand's mounting plate (1). 4.
Slide the stand out of foam or a clean, dry cloth. 3. Removing the monitor stand IMPORTANT: Before beginning to disassemble the monitor, be sure that the monitor is turned off and all cables from the monitor. 2. Push up until the mounting plate clears the recess in the monitor head (2). 5. Disconnect and remove all cables are disconnected. 1. Swing the bottom of the stand up on a flat surface covered by protective sheet made of the recess. 6 Chapter 1 Getting started Position the monitor facedown on the latch near the bottom center of the stand's mounting plate (1). 4.

User Guide
Page 13
Setting up the monitor 7 To attach the monitor head to a swing arm or other mounting device, insert four mounting screws through the holes on the mounting device and into the VESA screw holes on the rear of the monitor head. 2. Remove the four screws from the VESA holes located on the monitor head. Attaching the VESA mounting bracket 1.
Setting up the monitor 7 To attach the monitor head to a swing arm or other mounting device, insert four mounting screws through the holes on the mounting device and into the VESA screw holes on the rear of the monitor head. 2. Remove the four screws from the VESA holes located on the monitor head. Attaching the VESA mounting bracket 1.

User Guide
Page 14
... section are included with select cables. Connect a video cable. NOTE: The monitor automatically determines which inputs have valid video signals. Before connecting the cables, route the cables through the cable routing hole in the center of the monitor and the other end to the VGA port on the rear of the... stand. 3. Connecting the cables NOTE: The monitor ships with the monitor. 1. The inputs can be selected by pressing the Menu button to access the on-screen display (OSD) menu and then selecting Input Control. ● Connect...
... section are included with select cables. Connect a video cable. NOTE: The monitor automatically determines which inputs have valid video signals. Before connecting the cables, route the cables through the cable routing hole in the center of the monitor and the other end to the VGA port on the rear of the... stand. 3. Connecting the cables NOTE: The monitor ships with the monitor. 1. The inputs can be selected by pressing the Menu button to access the on-screen display (OSD) menu and then selecting Input Control. ● Connect...
User Guide
Page 15
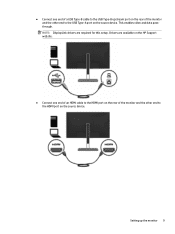
NOTE: DisplayLink drivers are available on the HP Support website. ● Connect one end of a USB Type-B cable to the USB Type-B upstream port on the rear of the monitor and the other end to the HDMI port on the source device. Setting up the monitor 9 This enables video and data passthrough. Drivers are required for this setup. ● Connect one end of an HDMI cable to the HDMI port on the rear of the monitor and the other end to the USB Type-A port on the source device.
NOTE: DisplayLink drivers are available on the HP Support website. ● Connect one end of a USB Type-B cable to the USB Type-B upstream port on the rear of the monitor and the other end to the HDMI port on the source device. Setting up the monitor 9 This enables video and data passthrough. Drivers are required for this setup. ● Connect one end of an HDMI cable to the HDMI port on the rear of the monitor and the other end to the USB Type-A port on the source device.

User Guide
Page 16
...a VGA cable is connected. 10 Chapter 1 Getting started NOTE: The audio-in jack on the monitor and the other end to the USB Type-C port on the source device. (Use only the HP-approved USB Type-C cable provided with USB Type-C, Thunderbolt-enabled ports. 4. The host device must ...also be able to support DisplayPort Alt Mode (video, charging, and USB 3.1) over the USB Type-C connector. The host device must be compatible with the monitor.) NOTE: The monitor's USB Type-C...
...a VGA cable is connected. 10 Chapter 1 Getting started NOTE: The audio-in jack on the monitor and the other end to the USB Type-C port on the source device. (Use only the HP-approved USB Type-C cable provided with USB Type-C, Thunderbolt-enabled ports. 4. The host device must ...also be able to support DisplayPort Alt Mode (video, charging, and USB 3.1) over the USB Type-C connector. The host device must be compatible with the monitor.) NOTE: The monitor's USB Type-C...

User Guide
Page 17
... on power cords or cables. When unplugging the power cord from the AC outlet. WARNING! Arrange them . Connect one may accidentally step on the monitor and the other end to a grounded AC outlet (2), and then connect the AC adapter to the equipment: Do not disable the power cord grounding ...plug. For your safety, do not place anything on the monitor (3). NOTE: To enable the network function, be sure that is easily accessible at all times. Disconnect power from the equipment by unplugging the ...
... on power cords or cables. When unplugging the power cord from the AC outlet. WARNING! Arrange them . Connect one may accidentally step on the monitor and the other end to a grounded AC outlet (2), and then connect the AC adapter to the equipment: Do not disable the power cord grounding ...plug. For your safety, do not place anything on the monitor (3). NOTE: To enable the network function, be sure that is easily accessible at all times. Disconnect power from the equipment by unplugging the ...

User Guide
Page 18
Connecting two host computers to the monitor may result in system shutdown, loss of the monitor to turn off and restart the monitor. There are two USB Type-A downstream ports on the rear of the monitor and two USB Type-A downstream ports on the side of the monitor provides one USB Type-B and one...rear of power, and the need to enable the USB Type-A downstream ports on the monitor and the other end to -DC cable) for the monitor's USB Type-A downstream ports. Connecting USB devices The rear of the monitor. When using USB Type-B for power pass through. 7. Connect the DC cable to ...
Connecting two host computers to the monitor may result in system shutdown, loss of the monitor to turn off and restart the monitor. There are two USB Type-A downstream ports on the rear of the monitor and two USB Type-A downstream ports on the side of the monitor provides one USB Type-B and one...rear of power, and the need to enable the USB Type-A downstream ports on the monitor and the other end to -DC cable) for the monitor's USB Type-A downstream ports. Connecting USB devices The rear of the monitor. When using USB Type-B for power pass through. 7. Connect the DC cable to ...

User Guide
Page 19
Setting up the monitor 13 Swivel the monitor head to a comfortable eye level. 2. Adjusting the monitor 1. Tilt the monitor head forward or backward to set it to the left or right for the best viewing angle.
Setting up the monitor 13 Swivel the monitor head to a comfortable eye level. 2. Adjusting the monitor 1. Tilt the monitor head forward or backward to set it to the left or right for the best viewing angle.

User Guide
Page 20
...comfortable position for users with the base and potentially cause damage to open the OSD, select Menu Control from http://www.hp.com/support. b. IMPORTANT: If the monitor is positioned low and reclined may be repositioned as you can also be no higher than eye level. To rotate the...of the OSD menu can use the HP Display Assistant software by downloading it and installing on your working posture throughout the work day. 4. Adjust the monitor to full height position and tilt the monitor head back to full tilt position (1). The monitor's top bezel edge should be more ...
...comfortable position for users with the base and potentially cause damage to open the OSD, select Menu Control from http://www.hp.com/support. b. IMPORTANT: If the monitor is positioned low and reclined may be repositioned as you can also be no higher than eye level. To rotate the...of the OSD menu can use the HP Display Assistant software by downloading it and installing on your working posture throughout the work day. 4. Adjust the monitor to full height position and tilt the monitor head back to full tilt position (1). The monitor's top bezel edge should be more ...
User Guide
Page 21
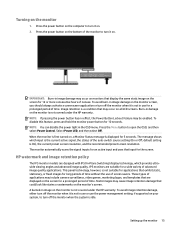
...; Select Power LED, and then select Off. The message shows which provides ultrawide viewing angles and advanced image quality. HP watermark and image retention policy The IPS monitor models are designed with IPS (In-Plane Switching) display technology, which input is a condition that could look like stains... or watermarks on . 2. Press the power button on the monitor is not covered under the HP warranty. To avoid burn-in image on the bottom of the monitor to turn it is On), the current preset screen resolution, and the recommended preset screen ...
...; Select Power LED, and then select Off. The message shows which provides ultrawide viewing angles and advanced image quality. HP watermark and image retention policy The IPS monitor models are designed with IPS (In-Plane Switching) display technology, which input is a condition that could look like stains... or watermarks on . 2. Press the power button on the monitor is not covered under the HP warranty. To avoid burn-in image on the bottom of the monitor to turn it is On), the current preset screen resolution, and the recommended preset screen ...
User Guide
Page 22
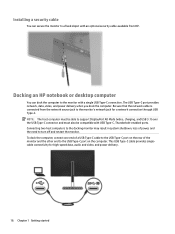
Be sure that the network cable is connected from HP. NOTE: The host computer must be able to support DisplayPort Alt Mode (video, charging, and USB 3.1) over the USB Type-C connector and must also be ... the computer to the monitor with a single USB Type-C connection. Docking an HP notebook or desktop computer You can secure the monitor to turn off and restart the monitor. Connecting two host computers to the docking monitor may result in system shutdown, loss of the monitor and the other end to the monitor's network jack for high...
Be sure that the network cable is connected from HP. NOTE: The host computer must be able to support DisplayPort Alt Mode (video, charging, and USB 3.1) over the USB Type-C connector and must also be ... the computer to the monitor with a single USB Type-C connection. Docking an HP notebook or desktop computer You can secure the monitor to turn off and restart the monitor. Connecting two host computers to the docking monitor may result in system shutdown, loss of the monitor and the other end to the monitor's network jack for high...
User Guide
Page 23
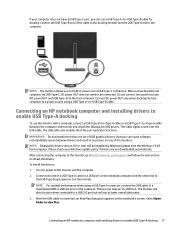
... the USB cable is sent over a USB Type-C connection. NOTE: The monitor delivers up to the monitor and the computer. 2. Connecting an HP notebook computer and installing drivers to obtain the drivers. After connecting the computer to the monitor, go to http://www.hp.com/support and follow the instructions to enable USB Type-A docking...
... the USB cable is sent over a USB Type-C connection. NOTE: The monitor delivers up to the monitor and the computer. 2. Connecting an HP notebook computer and installing drivers to obtain the drivers. After connecting the computer to the monitor, go to http://www.hp.com/support and follow the instructions to enable USB Type-A docking...


