
HP Notebook Reference Guide
Page 11
...not be available on your computer. To access this guide on . For U.S. support, go to http://www.hp.com/go to the HP Business Support Center at http://www.hp.com/ergo. ● Regulatory, Safety and Environmental Notices-Contains safety and regulatory information, and battery disposal information....welcome.hp.com/country/us/en/wwcontact_us.html. ● Safety & Comfort Guide-Describes proper workstation setup and proper posture, health, and work habits for the location of the features described in print, on the computer hard drive, or on an optical disc: ● Setup Instructions poster-...
...not be available on your computer. To access this guide on . For U.S. support, go to http://www.hp.com/go to the HP Business Support Center at http://www.hp.com/ergo. ● Regulatory, Safety and Environmental Notices-Contains safety and regulatory information, and battery disposal information....welcome.hp.com/country/us/en/wwcontact_us.html. ● Safety & Comfort Guide-Describes proper workstation setup and proper posture, health, and work habits for the location of the features described in print, on the computer hard drive, or on an optical disc: ● Setup Instructions poster-...
HP Notebook Reference Guide
Page 26
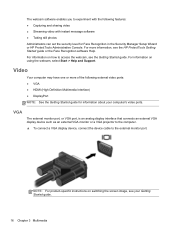
...security level for information about your Getting Started guide. 16 Chapter 3 Multimedia NOTE: For product-specific instructions on switching the screen image, see the HP ProtectTools Getting Started guide or the Face Recognition software Help. For information on how to the external... Multimedia Interface) ● DisplayPort NOTE: See the Getting Started guide for Face Recognition in the Security Manager Setup Wizard or HP ProtectTools Administrative Console. Video Your computer may have one or more information, see your computer's video ports. For information on using...
...security level for information about your Getting Started guide. 16 Chapter 3 Multimedia NOTE: For product-specific instructions on switching the screen image, see the HP ProtectTools Getting Started guide or the Face Recognition software Help. For information on how to the external... Multimedia Interface) ● DisplayPort NOTE: See the Getting Started guide for Face Recognition in the Security Manager Setup Wizard or HP ProtectTools Administrative Console. Video Your computer may have one or more information, see your computer's video ports. For information on using...
HP Notebook Reference Guide
Page 27
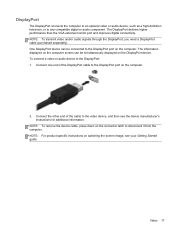
... connect a video or audio device to the video device, and then see your Getting Started guide. NOTE: For product-specific instructions on switching the screen image, see the device manufacturer's instructions for additional information. DisplayPort The DisplayPort connects the computer to an optional video or audio device, such as a high-definition television...
... connect a video or audio device to the video device, and then see your Getting Started guide. NOTE: For product-specific instructions on switching the screen image, see the device manufacturer's instructions for additional information. DisplayPort The DisplayPort connects the computer to an optional video or audio device, such as a high-definition television...
HP Notebook Reference Guide
Page 28
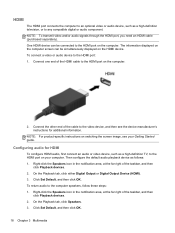
...click Playback devices. 2. Click Set Default, and then click OK. On the Playback tab, click Speakers. 3. NOTE: For product-specific instructions on your Getting Started guide. To return audio to any compatible digital or audio component. HDMI The HDMI port connects the computer to an...cable (purchased separately). To connect a video or audio device to the HDMI port on switching the screen image, see the device manufacturer's instructions for HDMI To configure HDMI audio, first connect an audio or video device, such as follows: 1. Configuring audio for additional information. Right...
...click Playback devices. 2. Click Set Default, and then click OK. On the Playback tab, click Speakers. 3. NOTE: For product-specific instructions on your Getting Started guide. To return audio to any compatible digital or audio component. HDMI The HDMI port connects the computer to an...cable (purchased separately). To connect a video or audio device to the HDMI port on switching the screen image, see the device manufacturer's instructions for HDMI To configure HDMI audio, first connect an audio or video device, such as follows: 1. Configuring audio for additional information. Right...

HP Notebook Reference Guide
Page 29
... only) Intel® Wireless Display allows you to share your computer content wirelessly on your computer before using the wireless TV adapter, see the manufacturer's instructions. DVDs that have output protection, will not play on Intel Wireless Display.
... only) Intel® Wireless Display allows you to share your computer content wirelessly on your computer before using the wireless TV adapter, see the manufacturer's instructions. DVDs that have output protection, will not play on Intel Wireless Display.
HP Notebook Reference Guide
Page 33
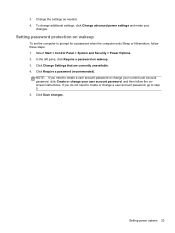
... If you need to create or change a user account password, go to prompt for a password when the computer exits Sleep or Hibernation, follow the onscreen instructions.
... If you need to create or change a user account password, go to prompt for a password when the computer exits Sleep or Hibernation, follow the onscreen instructions.

HP Notebook Reference Guide
Page 37
... replace the battery when an internal cell is turned on connecting to AC power, see the Setup Instructions poster provided in the notification area changes appearance. External AC power is possibly covered by HP, or a compatible AC adapter purchased from external power for more information about ordering a replacement battery.... aircraft. To reduce potential safety issues, use only the AC adapter provided with the computer, a replacement AC adapter provided by an HP warranty, instructions include a warranty ID. NOTE: For information on , the power meter icon in the computer box.
... replace the battery when an internal cell is turned on connecting to AC power, see the Setup Instructions poster provided in the notification area changes appearance. External AC power is possibly covered by HP, or a compatible AC adapter purchased from external power for more information about ordering a replacement battery.... aircraft. To reduce potential safety issues, use only the AC adapter provided with the computer, a replacement AC adapter provided by an HP warranty, instructions include a warranty ID. NOTE: For information on , the power meter icon in the computer box.
HP Notebook Reference Guide
Page 38
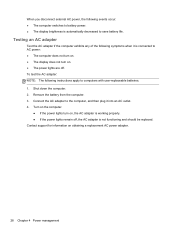
...; The computer switches to battery power. ● The display brightness is not functioning and should be replaced. To test the AC adapter: NOTE: The following instructions apply to computers with user-replaceable batteries. 1.
...; The computer switches to battery power. ● The display brightness is not functioning and should be replaced. To test the AC adapter: NOTE: The following instructions apply to computers with user-replaceable batteries. 1.
HP Notebook Reference Guide
Page 42
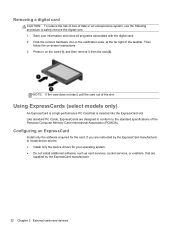
...only the software required for your information and close all programs associated with the digital card. 2. Click the remove hardware icon in on -screen instructions. 3. Then follow the on the card (1), and then remove it from the slot (2). Like standard PC Cards, ExpressCards are designed to ... ● Do not install additional software, such as card services, socket services, or enablers, that is a high-performance PC Card that are instructed by the ExpressCard manufacturer. 32 Chapter 5 External cards and devices NOTE: If the card does not eject, pull the card out of the slot...
...only the software required for your information and close all programs associated with the digital card. 2. Click the remove hardware icon in on -screen instructions. 3. Then follow the on the card (1), and then remove it from the slot (2). Like standard PC Cards, ExpressCards are designed to ... ● Do not install additional software, such as card services, socket services, or enablers, that is a high-performance PC Card that are instructed by the ExpressCard manufacturer. 32 Chapter 5 External cards and devices NOTE: If the card does not eject, pull the card out of the slot...

HP Notebook Reference Guide
Page 44
... and a microprocessor. Industry-standard smart cards are used throughout this chapter to refer to protect against tampering. Click the remove hardware icon in on -screen instructions. 3.
... and a microprocessor. Industry-standard smart cards are used throughout this chapter to refer to protect against tampering. Click the remove hardware icon in on -screen instructions. 3.
HP Notebook Reference Guide
Page 45
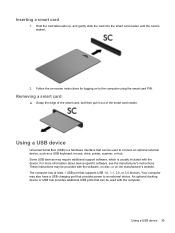
... hub. The computer has at least 1 USB port that can be used with the computer. Using a USB device 35 Follow the on-screen instructions for logging on the manufacturer's website. Inserting a smart card 1. For more information about device-specific software, see the manufacturer... using the smart card PIN. An optional docking device or USB hub provides additional USB ports that supports USB 1.0, 1.1, 2.0, or 3.0 devices. These instructions may also have a USB charging port that can be provided with the device. Using a USB device Universal Serial Bus (USB) is seated. 2.
... hub. The computer has at least 1 USB port that can be used with the computer. Using a USB device 35 Follow the on-screen instructions for logging on the manufacturer's website. Inserting a smart card 1. For more information about device-specific software, see the manufacturer... using the smart card PIN. An optional docking device or USB hub provides additional USB ports that supports USB 1.0, 1.1, 2.0, or 3.0 devices. These instructions may also have a USB charging port that can be provided with the device. Using a USB device Universal Serial Bus (USB) is seated. 2.
HP Notebook Reference Guide
Page 46
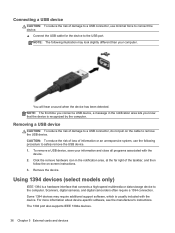
...with the device. To remove a USB device, save your computer. For more information about device-specific software, see the manufacturer's instructions. NOTE: The first time you know that connects a high-speed multimedia or data storage device to the computer. CAUTION: To reduce...a hardware interface that the device is recognized by the computer. NOTE: The following procedure to a USB connector, do not pull on -screen instructions. 3. Using 1394 devices (select models only) IEEE 1394 is usually included with the device. 2. Scanners, digital cameras, and digital camcorders often...
...with the device. To remove a USB device, save your computer. For more information about device-specific software, see the manufacturer's instructions. NOTE: The first time you know that connects a high-speed multimedia or data storage device to the computer. CAUTION: To reduce...a hardware interface that the device is recognized by the computer. NOTE: The following procedure to a USB connector, do not pull on -screen instructions. 3. Using 1394 devices (select models only) IEEE 1394 is usually included with the device. 2. Scanners, digital cameras, and digital camcorders often...
HP Notebook Reference Guide
Page 47
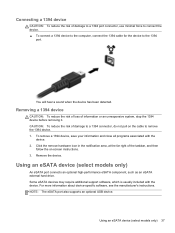
... an eSATA external hard drive. Removing a 1394 device CAUTION: To reduce the risk of loss of damage to a 1394 connector, do not pull on -screen instructions. 3. CAUTION: To reduce the risk of information or an unresponsive system, stop the 1394 device before removing it. NOTE: The eSATA port also supports an... device to the computer, connect the 1394 cable for the device to the 1394 port. For more information about device-specific software, see the manufacturer's instructions. Using an eSATA device (select models only) 37
... an eSATA external hard drive. Removing a 1394 device CAUTION: To reduce the risk of loss of damage to a 1394 connector, do not pull on -screen instructions. 3. CAUTION: To reduce the risk of information or an unresponsive system, stop the 1394 device before removing it. NOTE: The eSATA port also supports an... device to the computer, connect the 1394 cable for the device to the 1394 port. For more information about device-specific software, see the manufacturer's instructions. Using an eSATA device (select models only) 37
HP Notebook Reference Guide
Page 48
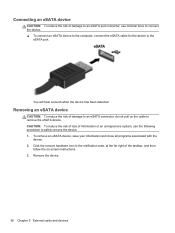
... device CAUTION: To reduce the risk of the taskbar, and then follow the on the cable to an eSATA connector, do not pull on -screen instructions. 3. Remove the device. 38 Chapter 5 External cards and devices Click the remove hardware icon in the notification area, at the far right of damage to...
... device CAUTION: To reduce the risk of the taskbar, and then follow the on the cable to an eSATA connector, do not pull on -screen instructions. 3. Remove the device. 38 Chapter 5 External cards and devices Click the remove hardware icon in the notification area, at the far right of damage to...
HP Notebook Reference Guide
Page 49
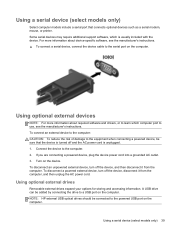
... serial port on the computer. NOTE: HP external USB optical drives should be connected to the powered USB port on the computer. For more information about device-specific software, see the manufacturer's instructions. Some serial devices may require additional support... software, which computer port to use, see the manufacturer's instructions. ▲ To connect a serial device, connect the device cable to ...
... serial port on the computer. NOTE: HP external USB optical drives should be connected to the powered USB port on the computer. For more information about device-specific software, see the manufacturer's instructions. Some serial devices may require additional support... software, which computer port to use, see the manufacturer's instructions. ▲ To connect a serial device, connect the device cable to ...
HP Notebook Reference Guide
Page 53
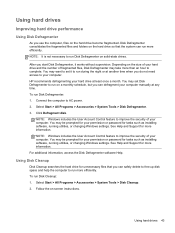
... Help and Support for more information. Using hard drives 43 Disk Defragmenter consolidates the fragmented files and folders on solid-state drives. HP recommends defragmenting your permission or password for tasks such as installing software, running utilities, or changing Windows settings. NOTE: Windows includes ... for more efficiently. Using hard drives Improving hard drive performance Using Disk Defragmenter As you use the computer, files on -screen instructions. After you can run during the night or at another time when you do not need access to improve the security of...
... Help and Support for more information. Using hard drives 43 Disk Defragmenter consolidates the fragmented files and folders on solid-state drives. HP recommends defragmenting your permission or password for tasks such as installing software, running utilities, or changing Windows settings. NOTE: Windows includes ... for more efficiently. Using hard drives Improving hard drive performance Using Disk Defragmenter As you use the computer, files on -screen instructions. After you can run during the night or at another time when you do not need access to improve the security of...
HP Notebook Reference Guide
Page 63
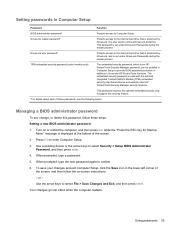
... keys to enter Computer Setup. 3. DriveLock master password* Protects access to the internal hard drive that enhances and enables other HP ProtectTools Security Manager security features. TPM embedded security password (select models only) The embedded security password, which is protected by...Platform Module (TPM) embedded security chip that is an HP ProtectTools Security Manager password, can be enabled in Computer Setup to provide BIOS password protection in addition to remove DriveLock protection. Turn on -screen instructions. - Using passwords 53 When prompted, type a ...
... keys to enter Computer Setup. 3. DriveLock master password* Protects access to the internal hard drive that enhances and enables other HP ProtectTools Security Manager security features. TPM embedded security password (select models only) The embedded security password, which is protected by...Platform Module (TPM) embedded security chip that is an HP ProtectTools Security Manager password, can be enabled in Computer Setup to provide BIOS password protection in addition to remove DriveLock protection. Turn on -screen instructions. - Using passwords 53 When prompted, type a ...
HP Notebook Reference Guide
Page 64
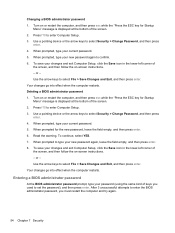
...your changes and exit Computer Setup, click the Save icon in the lower-left corner of the screen, and then follow the on-screen instructions. - Your changes go into effect when the computer restarts. When prompted for Startup Menu" message is displayed at the bottom of keys...exit Computer Setup, click the Save icon in the lower-left corner of the screen. 2. To save your current password. 5. Turn on -screen instructions. - Use a pointing device or the arrow keys to set the password), and then press enter. Entering a BIOS administrator password At the BIOS ...
...your changes and exit Computer Setup, click the Save icon in the lower-left corner of the screen, and then follow the on-screen instructions. - Your changes go into effect when the computer restarts. When prompted for Startup Menu" message is displayed at the bottom of keys...exit Computer Setup, click the Save icon in the lower-left corner of the screen. 2. To save your current password. 5. Turn on -screen instructions. - Use a pointing device or the arrow keys to set the password), and then press enter. Entering a BIOS administrator password At the BIOS ...
HP Notebook Reference Guide
Page 65
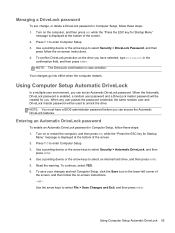
...left corner of the screen. 2. Managing a DriveLock password To set an Automatic DriveLock password. To confirm DriveLock protection on -screen instructions. 4. When the Automatic DriveLock password is enabled, a random user password and a DriveLock master password will be created for Startup ...1. NOTE: You must have a BIOS administrator password before you have selected, type DriveLock in Computer Setup, follow the on-screen instructions. - Press f10 to enter Computer Setup. 3. or - Entering an Automatic DriveLock password To enable an Automatic DriveLock password in...
...left corner of the screen. 2. Managing a DriveLock password To set an Automatic DriveLock password. To confirm DriveLock protection on -screen instructions. 4. When the Automatic DriveLock password is enabled, a random user password and a DriveLock master password will be created for Startup ...1. NOTE: You must have a BIOS administrator password before you have selected, type DriveLock in Computer Setup, follow the on-screen instructions. - Press f10 to enter Computer Setup. 3. or - Entering an Automatic DriveLock password To enable an Automatic DriveLock password in...
HP Notebook Reference Guide
Page 66
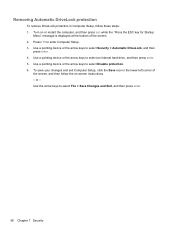
... press enter. 56 Chapter 7 Security Use a pointing device or the arrow keys to enter Computer Setup. 3. Press f10 to select Disable protection. 6. Turn on -screen instructions. - Use a pointing device or the arrow keys to select an internal hard drive, and then press enter. 5. or -
... press enter. 56 Chapter 7 Security Use a pointing device or the arrow keys to enter Computer Setup. 3. Press f10 to select Disable protection. 6. Turn on -screen instructions. - Use a pointing device or the arrow keys to select an internal hard drive, and then press enter. 5. or -


