
User Guide
Page 3
... example, messages related to emphasize or supplement important points of data or in this guide This guide provides technical specifications and information about monitor features, setting up the monitor, and using the software. CAUTION: Indicates a hazardous situation that , if not avoided, could result in minor or moderate injury. This product ... (for completing a task. Indicates a hazardous situation that , if not avoided, could result in loss of the main text. Depending on the model, your monitor may not have all the features included in damage to complete a task.
... example, messages related to emphasize or supplement important points of data or in this guide This guide provides technical specifications and information about monitor features, setting up the monitor, and using the software. CAUTION: Indicates a hazardous situation that , if not avoided, could result in minor or moderate injury. This product ... (for completing a task. Indicates a hazardous situation that , if not avoided, could result in loss of the main text. Depending on the model, your monitor may not have all the features included in damage to complete a task.

User Guide
Page 5
...monitor ...5 Attaching the monitor stand and base 5 Mounting the monitor head (select products only 7 Removing the monitor stand 7 Attaching the monitor head to a mounting device 8 Connecting the cables ...9 Connecting USB devices ...12 Adjusting the monitor ...13 Installing a security cable ...15 Turning on the monitor ...16 HP... watermark and image retention policy 16 2 Using the monitor ...17 Downloading software and utilities ...17 The Information ...
...monitor ...5 Attaching the monitor stand and base 5 Mounting the monitor head (select products only 7 Removing the monitor stand 7 Attaching the monitor head to a mounting device 8 Connecting the cables ...9 Connecting USB devices ...12 Adjusting the monitor ...13 Installing a security cable ...15 Turning on the monitor ...16 HP... watermark and image retention policy 16 2 Using the monitor ...17 Downloading software and utilities ...17 The Information ...
User Guide
Page 6
Locating the serial number and product number 24 4 Maintaining the monitor ...25 Maintenance guidelines ...25 Cleaning the monitor ...25 Shipping the monitor ...26 Appendix A Technical specifications ...27 68.6 cm (27.0 in) FHD model specifications ...27 68.6 cm (27.0 in) QHD ... ...31 QHD models ...32 WUXGA models ...33 Energy saver feature ...34 Appendix B Accessibility ...35 HP and accessibility ...35 Finding the technology tools you need 35 The HP commitment ...35 International Association of Accessibility Professionals (IAAP 35 Finding the best assistive technology 36 Assessing your...
Locating the serial number and product number 24 4 Maintaining the monitor ...25 Maintenance guidelines ...25 Cleaning the monitor ...25 Shipping the monitor ...26 Appendix A Technical specifications ...27 68.6 cm (27.0 in) FHD model specifications ...27 68.6 cm (27.0 in) QHD ... ...31 QHD models ...32 WUXGA models ...33 Energy saver feature ...34 Appendix B Accessibility ...35 HP and accessibility ...35 Finding the technology tools you need 35 The HP commitment ...35 International Association of Accessibility Professionals (IAAP 35 Finding the best assistive technology 36 Assessing your...
User Guide
Page 7
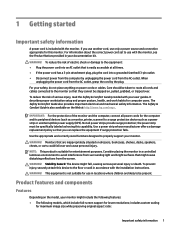
...cables connected to the equipment: ● Plug the power cord into an AC outlet that is easily accessible at http://www.hp.com/ergo. Use the appropriate and correctly sized furniture designed to be stepped on, pulled, grabbed, or tripped over and cause personal ...maximum image size while preserving original aspect ratio: Important safety information 1 1 Getting started Important safety information A power cord is included with the monitor, see the Product Notices provided in your documentation kit. If you can replace the equipment if surge protection fails. When unplugging the power ...
...cables connected to the equipment: ● Plug the power cord into an AC outlet that is easily accessible at http://www.hp.com/ergo. Use the appropriate and correctly sized furniture designed to be stepped on, pulled, grabbed, or tripped over and cause personal ...maximum image size while preserving original aspect ratio: Important safety information 1 1 Getting started Important safety information A power cord is included with the monitor, see the Product Notices provided in your documentation kit. If you can replace the equipment if surge protection fails. When unplugging the power ...
User Guide
Page 8
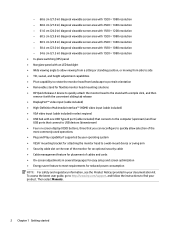
...swivel, and height adjustment capabilities ● Pivot capability to rotate the monitor head from landscape to portrait orientation ● Removable stand for flexible monitor head mounting solutions ● HP Quick Release 2 device to quickly attach the monitor head to the stand with a simple click, and then remove it... by your operating system ● VESA® mounting bracket for attaching the monitor head to a wall-mount device or swing arm ● Security cable slot on the rear of the monitor for an optional security cable ● Cable management feature for placement of cables...
...swivel, and height adjustment capabilities ● Pivot capability to rotate the monitor head from landscape to portrait orientation ● Removable stand for flexible monitor head mounting solutions ● HP Quick Release 2 device to quickly attach the monitor head to the stand with a simple click, and then remove it... by your operating system ● VESA® mounting bracket for attaching the monitor head to a wall-mount device or swing arm ● Security cable slot on the rear of the monitor for an optional security cable ● Cable management feature for placement of cables...

User Guide
Page 9
... in a reduced power state because of inactivity. You can reassign the function buttons to navigate through the menu. Blinking amber: The monitor is on page 20. For a description of an Energy Saver setting. See Energy saver feature on page 19. See Using AutoSleep ...Mode on . Product features and components 3 Amber: The monitor is in a reduced power state because of these functions, see Using the function buttons on page 34. Front components Table 1-1 Front components and their...
... in a reduced power state because of inactivity. You can reassign the function buttons to navigate through the menu. Blinking amber: The monitor is on page 20. For a description of an Energy Saver setting. See Energy saver feature on page 19. See Using AutoSleep ...Mode on . Product features and components 3 Amber: The monitor is in a reduced power state because of these functions, see Using the function buttons on page 34. Front components Table 1-1 Front components and their...

User Guide
Page 10
... cable. (2) Power connector Connects the power cord. (3) VESA release button Releases the stand from the source device to the monitor to enable USB Type-A ports on the monitor. (8) USB ports (2) (downstream) Connect a USB cable to a peripheral device, such as a keyboard, mouse, or USB...and charge peripheral devices. 4 Chapter 1 Getting started NOTE: A USB Type-B cable or a USB Type-C cable must be connected from the monitor. (4) DisplayPort connector Connects the DisplayPort cable to a source device such as a computer or game console. (5) HDMI port Connects the HDMI cable...
... cable. (2) Power connector Connects the power cord. (3) VESA release button Releases the stand from the source device to the monitor to enable USB Type-A ports on the monitor. (8) USB ports (2) (downstream) Connect a USB cable to a peripheral device, such as a keyboard, mouse, or USB...and charge peripheral devices. 4 Chapter 1 Getting started NOTE: A USB Type-B cable or a USB Type-C cable must be connected from the monitor. (4) DisplayPort connector Connects the DisplayPort cable to a source device such as a computer or game console. (5) HDMI port Connects the HDMI cable...
User Guide
Page 11
... serious injury, read the Safety & Comfort Guide. To reduce the risk of the monitor, because surrounding light and bright surfaces might be different on the Web at http://www.hp.com/ergo. IMPORTANT: To prevent damage to the monitor, do not touch the surface of the liquid crystals. IMPORTANT: To prevent the screen...
... serious injury, read the Safety & Comfort Guide. To reduce the risk of the monitor, because surrounding light and bright surfaces might be different on the Web at http://www.hp.com/ergo. IMPORTANT: To prevent damage to the monitor, do not touch the surface of the liquid crystals. IMPORTANT: To prevent the screen...

User Guide
Page 12
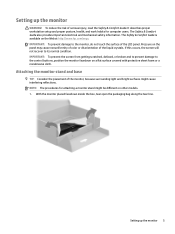
b. c. Tighten the two thumbscrews into place (2). 3. With the monitor still placed facedown inside the box, lower the bottom of the stand's mounting plate into the back of the monitor's recess (1) until it in place (2). 2. With the monitor still placed facedown inside the box: a. Confirm that the arrow on the monitor stand is aligned with the arrow on the bottom of the monitor stand (1). Insert the base into the bottom of the base (3). Swivel the base counterclockwise to lock it snaps into the base (4). 6 Chapter 1 Getting started d.
b. c. Tighten the two thumbscrews into place (2). 3. With the monitor still placed facedown inside the box, lower the bottom of the stand's mounting plate into the back of the monitor's recess (1) until it in place (2). 2. With the monitor still placed facedown inside the box: a. Confirm that the arrow on the monitor stand is aligned with the arrow on the bottom of the monitor stand (1). Insert the base into the bottom of the base (3). Swivel the base counterclockwise to lock it snaps into the base (4). 6 Chapter 1 Getting started d.

User Guide
Page 13
... on a flat surface covered by a UL-listed or CSA-listed wall-mount bracket. Be sure to verify that the monitor is compliant with the monitor. Swing the bottom of the stand up the latch near the bottom center of the stand's mounting plate (1). 4. For best performance..., use four 4 mm, 0.7 pitch, and 10 mm long screws. IMPORTANT: This monitor supports the VESA industry-standard 100 mm mounting holes. Removing the monitor stand IMPORTANT: Before disassembling the monitor, be sure that the manufacturer's mounting solution is turned off and all cables from the...
... on a flat surface covered by a UL-listed or CSA-listed wall-mount bracket. Be sure to verify that the monitor is compliant with the monitor. Swing the bottom of the stand up the latch near the bottom center of the stand's mounting plate (1). 4. For best performance..., use four 4 mm, 0.7 pitch, and 10 mm long screws. IMPORTANT: This monitor supports the VESA industry-standard 100 mm mounting holes. Removing the monitor stand IMPORTANT: Before disassembling the monitor, be sure that the manufacturer's mounting solution is turned off and all cables from the...

User Guide
Page 14
Remove the four screws from the VESA holes located on the back of the monitor head. 2. To attach the monitor head to a swing arm or other mounting device, insert four mounting screws through the holes on the mounting device and into the VESA screw holes on the rear of the monitor head. IMPORTANT: If these instructions do not apply to your device, then follow the mounting device manufacturer's instructions when mounting the monitor to a mounting device 1. Attaching the monitor head to a wall or swing arm. 8 Chapter 1 Getting started
Remove the four screws from the VESA holes located on the back of the monitor head. 2. To attach the monitor head to a swing arm or other mounting device, insert four mounting screws through the holes on the mounting device and into the VESA screw holes on the rear of the monitor head. IMPORTANT: If these instructions do not apply to your device, then follow the mounting device manufacturer's instructions when mounting the monitor to a mounting device 1. Attaching the monitor head to a wall or swing arm. 8 Chapter 1 Getting started
User Guide
Page 15
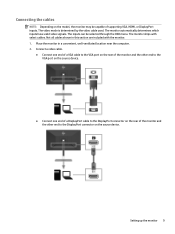
... a convenient, well-ventilated location near the computer. 2. The inputs can be capable of the monitor and the other end to the DisplayPort connector on the model, the monitor may be selected through the OSD menu. Setting up the monitor 9 Connect a video cable. ● Connect one end of a VGA cable to the VGA port... on the rear of the monitor and the other end to the VGA port on the source device. ● Connect one end of a DisplayPort cable to the DisplayPort connector on the ...
... a convenient, well-ventilated location near the computer. 2. The inputs can be capable of the monitor and the other end to the DisplayPort connector on the model, the monitor may be selected through the OSD menu. Setting up the monitor 9 Connect a video cable. ● Connect one end of a VGA cable to the VGA port... on the rear of the monitor and the other end to the VGA port on the source device. ● Connect one end of a DisplayPort cable to the DisplayPort connector on the ...

User Guide
Page 16
... one end of an HDMI cable to the HDMI port on the rear of the monitor and the other end to the HDMI port on the source device. 3. For more information, see Connecting USB devices on the monitor. NOTE: You must connect either a USB Type-B or USB Type-C cable from the source... device (computer, laptop, gaming console) to the rear of the monitor to enable the USB Type-A ports on page 12. 10 Chapter 1 Getting started...
... one end of an HDMI cable to the HDMI port on the rear of the monitor and the other end to the HDMI port on the source device. 3. For more information, see Connecting USB devices on the monitor. NOTE: You must connect either a USB Type-B or USB Type-C cable from the source... device (computer, laptop, gaming console) to the rear of the monitor to enable the USB Type-A ports on page 12. 10 Chapter 1 Getting started...

User Guide
Page 17
... cord from the AC outlet, grasp the cord by unplugging the power cord from the equipment by the plug. Setting up the monitor 11 To reduce the risk of the monitor and the other end to the equipment: Do not disable the power cord grounding plug. Do not pull on power cords...
... cord from the AC outlet, grasp the cord by unplugging the power cord from the equipment by the plug. Setting up the monitor 11 To reduce the risk of the monitor and the other end to the equipment: Do not disable the power cord grounding plug. Do not pull on power cords...

User Guide
Page 18
...started Table 1-3 USB port locations USB Ports (1) USB Type-A downstream ports (2) (2) USB Type-B upstream port from the source device (computer) to the rear of the monitor to enable the USB Type-A ports to serve as a USB hub for a mouse, keyboards, phones, external hard drives, and practically anything that is one USB...are used to connect devices such as a digital camera, USB keyboard, or USB mouse. Connecting USB devices USB ports are four USB ports on the monitor to connect to a device (downstream): two USB Type-A on the rear and two USB Type-A on the rear to act as a hub (upstream...
...started Table 1-3 USB port locations USB Ports (1) USB Type-A downstream ports (2) (2) USB Type-B upstream port from the source device (computer) to the rear of the monitor to enable the USB Type-A ports to serve as a USB hub for a mouse, keyboards, phones, external hard drives, and practically anything that is one USB...are used to connect devices such as a digital camera, USB keyboard, or USB mouse. Connecting USB devices USB ports are four USB ports on the monitor to connect to a device (downstream): two USB Type-A on the rear and two USB Type-A on the rear to act as a hub (upstream...
User Guide
Page 19
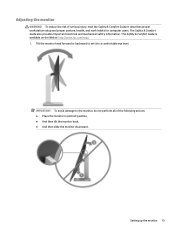
...eye level. Setting up the monitor 13 It describes proper workstation setup and proper posture, health, and work habits for computer users. Adjusting the monitor WARNING! The Safety & Comfort Guide is available on the Web at http://www.hp.com/ergo. 1. Tilt the monitor head forward or backward to ...set it to the monitor, do not perform all of serious injury, read the Safety...
...eye level. Setting up the monitor 13 It describes proper workstation setup and proper posture, health, and work habits for computer users. Adjusting the monitor WARNING! The Safety & Comfort Guide is available on the Web at http://www.hp.com/ergo. 1. Tilt the monitor head forward or backward to ...set it to the monitor, do not perform all of serious injury, read the Safety...

User Guide
Page 20
... orientation viewing to adapt to full tilt position (1). 14 Chapter 1 Getting started a. Reposition your monitor as you adjust your individual workstation. Adjust the monitor to full height position and tilt the monitor back to your eye height. The monitor's top bezel edge should not exceed a height that is parallel to your application. Swivel the...
... orientation viewing to adapt to full tilt position (1). 14 Chapter 1 Getting started a. Reposition your monitor as you adjust your individual workstation. Adjust the monitor to full height position and tilt the monitor back to your eye height. The monitor's top bezel edge should not exceed a height that is parallel to your application. Swivel the...

User Guide
Page 21
...come in contact with the base and potentially cause damage to the monitor. IMPORTANT: If the monitor is not in full height and full tilt position when pivoting, the bottom right corner of the monitor panel will come in contact with an optional security cable available from...to landscape. Setting up the monitor 15 Installing a security cable You can secure the monitor to a fixed object with the base when pivoting and potentially cause damage to the monitor, install it after pivoting the monitor. Pivot the monitor clockwise or counterclockwise 90° from HP. b. If you are adding...
...come in contact with the base and potentially cause damage to the monitor. IMPORTANT: If the monitor is not in full height and full tilt position when pivoting, the bottom right corner of the monitor panel will come in contact with an optional security cable available from...to landscape. Setting up the monitor 15 Installing a security cable You can secure the monitor to a fixed object with the base when pivoting and potentially cause damage to the monitor, install it after pivoting the monitor. Pivot the monitor clockwise or counterclockwise 90° from HP. b. If you are adding...
User Guide
Page 22
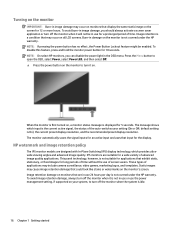
.... To disable this feature, press and hold the monitor power button for the display. NOTE: On select HP monitors, you should always activate a screen saver application or turn off the monitor when it will not be enabled. HP watermark and image retention policy The IPS monitor models are suitable for long periods of advanced image quality...
.... To disable this feature, press and hold the monitor power button for the display. NOTE: On select HP monitors, you should always activate a screen saver application or turn off the monitor when it will not be enabled. HP watermark and image retention policy The IPS monitor models are suitable for long periods of advanced image quality...
User Guide
Page 23
... requires that the computer's graphics card is written in accordance with graphics programs to provide consistent color matching from monitor screen to printer, or from scanner to http://www.hp.com/support. 2. Select your HP monitor model in conjunction with the International Color Consortium (ICC) Profile Format specification. Downloading software and utilities 17 Go...
... requires that the computer's graphics card is written in accordance with graphics programs to provide consistent color matching from monitor screen to printer, or from scanner to http://www.hp.com/support. 2. Select your HP monitor model in conjunction with the International Color Consortium (ICC) Profile Format specification. Downloading software and utilities 17 Go...


