Safety and Regulatory Information Desktops, Thin Clients, and Personal Workstations
Page 16
..., the Principles enumerated in respect to the nature of the personal information collected, the purpose for its collection, how it is disclosed to any single manual call initiation. Some parameters required for compliance with Telecom's Telepermit requirements are dependent on the equipment (PC) associated with in the Privacy Act 1993 shall...
..., the Principles enumerated in respect to the nature of the personal information collected, the purpose for its collection, how it is disclosed to any single manual call initiation. Some parameters required for compliance with Telecom's Telepermit requirements are dependent on the equipment (PC) associated with in the Privacy Act 1993 shall...

Advanced Setup Guide
Page 16
... documents and files. 10 Advanced Setup Guide (features vary by using USB or FireWire (IEEE 1394) ports. This allows easy access to all computer user manuals and warranty information in an easy-to-find, safe location. These peripheral devices include printers, scanners, video cameras, digital photo cameras, memory card readers, and...
... documents and files. 10 Advanced Setup Guide (features vary by using USB or FireWire (IEEE 1394) ports. This allows easy access to all computer user manuals and warranty information in an easy-to-find, safe location. These peripheral devices include printers, scanners, video cameras, digital photo cameras, memory card readers, and...

Limited Warranty and Support Guide
Page 11
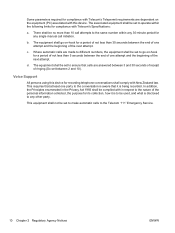
... connected to a single line at all times. WARNING: When using this modem. Changing the voltage select switch to persons, including the following limits for a single manual call attempts to the telephone line. WARNING: Always disconnect the modem cord from the telephone network, plug your computer and void any time should always...
... connected to a single line at all times. WARNING: When using this modem. Changing the voltage select switch to persons, including the following limits for a single manual call attempts to the telephone line. WARNING: Always disconnect the modem cord from the telephone network, plug your computer and void any time should always...
Limited Warranty and Support Guide
Page 11
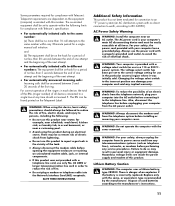
... one attempt and the beginning of the next attempt. • For automatically initiated calls to different numbers: The equipment shall be on-hook for a single manual call attempts to reduce the risk of the first ring. WARNING: When using this product near an AC outlet. The AC power cord is your...
... one attempt and the beginning of the next attempt. • For automatically initiated calls to different numbers: The equipment shall be on-hook for a single manual call attempts to reduce the risk of the first ring. WARNING: When using this product near an AC outlet. The AC power cord is your...
Warranty and Support Guide
Page 13
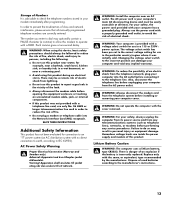
... modem immediately after programming. Storage of Numbers It is incorrectly replaced. Always use this device, basic safety precautions should always be easily accessible at all manually programmed telephone numbers are inside the power supply and modem of used batteries according to reduce the risk of electrical shock. WARNING: Your computer is...
... modem immediately after programming. Storage of Numbers It is incorrectly replaced. Always use this device, basic safety precautions should always be easily accessible at all manually programmed telephone numbers are inside the power supply and modem of used batteries according to reduce the risk of electrical shock. WARNING: Your computer is...

Advanced Setup Guide
Page 16
This allows easy access to all computer user manuals and warranty information in an easy-to-find, safe location. NOTE: You must use a 6-pin (not a 4-pin) FireWire (IEEE 1394) cable with the computer. NOTE: ...
This allows easy access to all computer user manuals and warranty information in an easy-to-find, safe location. NOTE: You must use a 6-pin (not a 4-pin) FireWire (IEEE 1394) cable with the computer. NOTE: ...
Getting Started Guide
Page 6
... Drive 90 Inserting the Drive into an HP Drive Bay 90 Connecting the Drive to a Computer Without a Drive Bay 91 Locating the Drive and Assigning a Drive Letter 92 Using the Drive ...93 Transferring files to another computer manually 93 Disconnecting the Drive 94 Troubleshooting the HP Media Drive 95 vi Getting Started (features...
... Drive 90 Inserting the Drive into an HP Drive Bay 90 Connecting the Drive to a Computer Without a Drive Bay 91 Locating the Drive and Assigning a Drive Letter 92 Using the Drive ...93 Transferring files to another computer manually 93 Disconnecting the Drive 94 Troubleshooting the HP Media Drive 95 vi Getting Started (features...
Getting Started Guide
Page 10
... for TV Programs 189 Searching for TV programs by using categories 190 Recording TV Programs 191 Recording TV by using the guide 192 Recording programs manually without using the guide 192 Recording quality and hard disk drive storage space 193 Watching TV programs stored on the... TV recording folder for Windows Media Center to find 197 Changing disk space for recording TV programs 197 Updating recorded TV list after removing the HP Media Drive 197 System requirements to view recorded TV programs on other computers 198 Copying recorded TV programs to DVD or CD 198 Media copy...
... for TV Programs 189 Searching for TV programs by using categories 190 Recording TV Programs 191 Recording TV by using the guide 192 Recording programs manually without using the guide 192 Recording quality and hard disk drive storage space 193 Watching TV programs stored on the... TV recording folder for Windows Media Center to find 197 Changing disk space for recording TV programs 197 Updating recorded TV list after removing the HP Media Drive 197 System requirements to view recorded TV programs on other computers 198 Copying recorded TV programs to DVD or CD 198 Media copy...
Getting Started Guide
Page 11
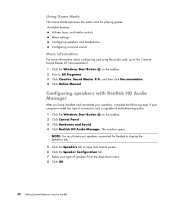
... the Web You can find guides and information for your computer by using the Internet to access the Support Web site. 1 Go to http://www.hp.com/support in your Web browser. 2 Select your country/region and language. 3 Click Support and Drivers. 4 Enter the model number of the following: Click the... , and then do one of your computer). Right-click the title, click Save Target As, specify a location on your computer, and then click Search . 5 Click Manuals. 6 Locate the manual you want to display the file in Adobe Acrobat Reader (which you can download from the...
... the Web You can find guides and information for your computer by using the Internet to access the Support Web site. 1 Go to http://www.hp.com/support in your Web browser. 2 Select your country/region and language. 3 Click Support and Drivers. 4 Enter the model number of the following: Click the... , and then do one of your computer). Right-click the title, click Save Target As, specify a location on your computer, and then click Search . 5 Click Manuals. 6 Locate the manual you want to display the file in Adobe Acrobat Reader (which you can download from the...

Getting Started Guide
Page 15
... computer. 3 Turn on the speakers, if they are present. 4 Set up the computer by following the onscreen instructions. 6 Follow the onscreen instructions to register with HP or Compaq, sign up Microsoft® Windows Vista® by manually starting Easy Internet Services.
... computer. 3 Turn on the speakers, if they are present. 4 Set up the computer by following the onscreen instructions. 6 Follow the onscreen instructions to register with HP or Compaq, sign up Microsoft® Windows Vista® by manually starting Easy Internet Services.

Getting Started Guide
Page 17
... to do so. Turning On the Computer for the computer to go through the normal startup routine when you put the computer into Sleep mode manually: Press the Sleep button on the front of the computer. The computer can retrieve e-mail messages and download information from Sleep mode: Press the Sleep...
... to do so. Turning On the Computer for the computer to go through the normal startup routine when you put the computer into Sleep mode manually: Press the Sleep button on the front of the computer. The computer can retrieve e-mail messages and download information from Sleep mode: Press the Sleep...

Getting Started Guide
Page 18
... hard disk drive, and then turns itself off. NOTE: If Hibernate is available as an advanced power setting. To put the computer into Hibernate mode manually: 1 Click the Windows Start Button on the taskbar. 2 Click the Arrow button next to go into Hibernate mode automatically; When the computer is in Hibernate...
... hard disk drive, and then turns itself off. NOTE: If Hibernate is available as an advanced power setting. To put the computer into Hibernate mode manually: 1 Click the Windows Start Button on the taskbar. 2 Click the Arrow button next to go into Hibernate mode automatically; When the computer is in Hibernate...
Getting Started Guide
Page 50
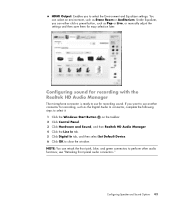
... for Realtek to display the Speakers tab. 5 Click the Speakers tab to All Programs. 3 Click Creative, Sound Blaster X-Fi, and then click Documentation. 4 Click Online Manual. Available features: Volume, bass, and treble controls Mixer settings Configuring speakers and headphones Configuring surround sound More information For more information about configuring and using...
... for Realtek to display the Speakers tab. 5 Click the Speakers tab to All Programs. 3 Click Creative, Sound Blaster X-Fi, and then click Documentation. 4 Click Online Manual. Available features: Volume, bass, and treble controls Mixer settings Configuring speakers and headphones Configuring surround sound More information For more information about configuring and using...
Getting Started Guide
Page 51
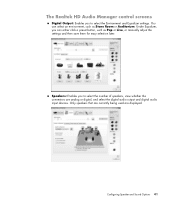
... and Sound Options 41 The Realtek HD Audio Manager control screens Digital Output: Enables you can select an environment, such as Pop or Live, or manually adjust the settings and then save them for easy selection later. You can either click a preset button, such as Stone Room or Auditorium. Under Equalizer...
... and Sound Options 41 The Realtek HD Audio Manager control screens Digital Output: Enables you can select an environment, such as Pop or Live, or manually adjust the settings and then save them for easy selection later. You can either click a preset button, such as Stone Room or Auditorium. Under Equalizer...
Getting Started Guide
Page 53
... tab, and then select Set Default Device. 6 Click OK to close the window. NOTE: You can select an environment, such as Pop or Live, or manually adjust the settings and then save them for easy selection later. If you to select the Environment and Equalizer settings. Configuring Speaker and Sound Options...
... tab, and then select Set Default Device. 6 Click OK to close the window. NOTE: You can select an environment, such as Pop or Live, or manually adjust the settings and then save them for easy selection later. If you to select the Environment and Equalizer settings. Configuring Speaker and Sound Options...
Getting Started Guide
Page 61
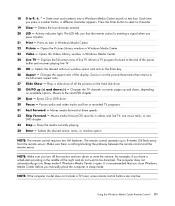
... tuner, some remote control buttons are inactive. 18 0 to 8 meters (26 feet) away from the remote sensor. Make sure there is emitting a signal when you manually place the computer in Windows Media Center. 24 Live TV - Using the Windows Media Center Remote Control 51 The LED tells you that you close...
... tuner, some remote control buttons are inactive. 18 0 to 8 meters (26 feet) away from the remote sensor. Make sure there is emitting a signal when you manually place the computer in Windows Media Center. 24 Live TV - Using the Windows Media Center Remote Control 51 The LED tells you that you close...
Getting Started Guide
Page 72
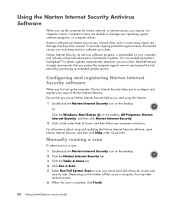
... model) Antivirus software can detect most viruses, remove them, and, in most cases, repair any onscreen instructions. Hewlett-Packard strongly recommends that they have caused. Manually running a scan To select and run a scan: 1 Double-click the Norton Internet Security icon on the desktop. Depending on the number of Norton Internet Security...
... model) Antivirus software can detect most viruses, remove them, and, in most cases, repair any onscreen instructions. Hewlett-Packard strongly recommends that they have caused. Manually running a scan To select and run a scan: 1 Double-click the Norton Internet Security icon on the desktop. Depending on the number of Norton Internet Security...
Getting Started Guide
Page 82
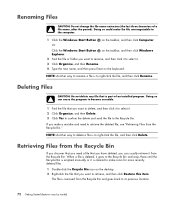
... goes back to the Recycle Bin. When a file is deleted, it goes to the Recycle Bin and stays there until the Recycle Bin is emptied manually or it . 2 Click Organize, and then Delete. 3 Click Yes to confirm the delete and send the file to its previous location. 72 Getting Started (features...
... goes back to the Recycle Bin. When a file is deleted, it goes to the Recycle Bin and stays there until the Recycle Bin is emptied manually or it . 2 Click Organize, and then Delete. 3 Click Yes to confirm the delete and send the file to its previous location. 72 Getting Started (features...

Getting Started Guide
Page 83
Or Click the Windows Start Button on the program menu bar, and then click Print. 2 Select your particular printer to the user manual that came with the computer. If it does not, follow the instructions that came with the printer to the computer, and if the computer has ... the printer. Determine the number of pages). Select an item in Computer or in which you have a printer connected to install the specific printer driver manually. To print: 1 Click File on the taskbar, and then click Windows Explorer. 2 Find the file that you want to put the file. 5 Click Organize, and...
Or Click the Windows Start Button on the program menu bar, and then click Print. 2 Select your particular printer to the user manual that came with the computer. If it does not, follow the instructions that came with the printer to the computer, and if the computer has ... the printer. Determine the number of pages). Select an item in Computer or in which you have a printer connected to install the specific printer driver manually. To print: 1 Click File on the taskbar, and then click Windows Explorer. 2 Find the file that you want to put the file. 5 Click Organize, and...
Getting Started Guide
Page 103
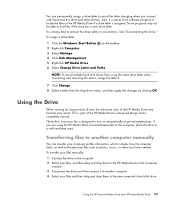
... the drives, assign the letter Z. 7 Click Change. 8 Select a letter from using the HP Media Drive connected externally to the computer, place the drive in a well-ventilated area. Also, it to another computer manually You can permanently assign a drive letter to find files if the drive has a new drive .... 3 Disconnect the drive and then connect it is easier for long periods of time, the aluminum case of the HP Media Drive's advanced design and is assigned. To transfer your files manually: 1 Connect the drive to the computer. 2 Select your files, and then drag and drop them to the...
... the drives, assign the letter Z. 7 Click Change. 8 Select a letter from using the HP Media Drive connected externally to the computer, place the drive in a well-ventilated area. Also, it to another computer manually You can permanently assign a drive letter to find files if the drive has a new drive .... 3 Disconnect the drive and then connect it is easier for long periods of time, the aluminum case of the HP Media Drive's advanced design and is assigned. To transfer your files manually: 1 Connect the drive to the computer. 2 Select your files, and then drag and drop them to the...


