Compaq 325 and 326 Notebook PCs HP 425 and 625 Notebook PCs - Maintenance and Service Guide
Page 117
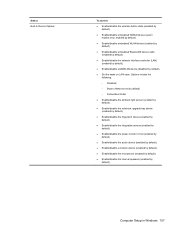
...Windows 107 Options include the following: ◦ Disabled ◦ Boot to Network (set by default) ◦ Follow Boot Order ● Enable/disable the ambient light sensor (enabled by default). ● Enable/disable the notebook upgrade bay device (enabled by default). ● Enable/disable the fingerprint... (enabled by default). ● Enable/disable embedded Bluetooth® device radio (enabled by default). ● Enable/disable the network interface controller (LAN) (enabled by default). ● Enable/disable LAN/WLAN device (disabled by default). ● Set the wake on LAN state.
...Windows 107 Options include the following: ◦ Disabled ◦ Boot to Network (set by default) ◦ Follow Boot Order ● Enable/disable the ambient light sensor (enabled by default). ● Enable/disable the notebook upgrade bay device (enabled by default). ● Enable/disable the fingerprint... (enabled by default). ● Enable/disable embedded Bluetooth® device radio (enabled by default). ● Enable/disable the network interface controller (LAN) (enabled by default). ● Enable/disable LAN/WLAN device (disabled by default). ● Set the wake on LAN state.
Compaq 325 and 326 Notebook PCs HP 425 and 625 Notebook PCs - Maintenance and Service Guide
Page 123
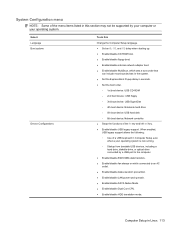
...9702; 2nd boot device: USB floppy ◦ 3rd boot device: USB SuperDisk ◦ 4th boot device: Notebook hard drive ◦ 5th boot device: USB hard disk ◦ 6th boot device: Network controller ● Swap the functions of the fn key and left ctrl key. ● Enable/disable USB legacy support..., f10, and f12 delay when starting up. ● Enable/disable CD-ROM boot. ● Enable/disable floppy boot. ● Enable/disable internal network adapter boot. ● Enable/disable MultiBoot, which sets a boot order that can include most boot devices in the system. ● Set the Express ...
...9702; 2nd boot device: USB floppy ◦ 3rd boot device: USB SuperDisk ◦ 4th boot device: Notebook hard drive ◦ 5th boot device: USB hard disk ◦ 6th boot device: Network controller ● Swap the functions of the fn key and left ctrl key. ● Enable/disable USB legacy support..., f10, and f12 delay when starting up. ● Enable/disable CD-ROM boot. ● Enable/disable floppy boot. ● Enable/disable internal network adapter boot. ● Enable/disable MultiBoot, which sets a boot order that can include most boot devices in the system. ● Set the Express ...
Compaq 325 and 326 Notebook PCs HP 425 and 625 Notebook PCs - Maintenance and Service Guide
Page 124
Select Built-in device options Port options To do this ● Enable/disable embedded WLAN Device Radio. ● Enable/disable embedded Bluetooth Device Radio. ● Enable/disable Network Interface Controller (NIC) ● Enable/disable LAN/WLAN Switching. ● Enable/disable Wake on LAN. ● Enable/disable the integrated camera (webcam) ● Enable/disable USB port. ● Enable/disable ExpressCard slot. 114 Chapter 5 Computer Setup
Select Built-in device options Port options To do this ● Enable/disable embedded WLAN Device Radio. ● Enable/disable embedded Bluetooth Device Radio. ● Enable/disable Network Interface Controller (NIC) ● Enable/disable LAN/WLAN Switching. ● Enable/disable Wake on LAN. ● Enable/disable the integrated camera (webcam) ● Enable/disable USB port. ● Enable/disable ExpressCard slot. 114 Chapter 5 Computer Setup
Compaq 325 and 326 Notebook PCs HP 425 and 625 Notebook PCs - Maintenance and Service Guide
Page 155
... light sensor 107 audio device 107 bay device 107 Bluetooth device 107 fingerprint reader 107 integrated camera 107 internal speakers 107 microphone 107 modem 107 Network Interface Controller (LAN) 107 options 107 power monitor circuit 107 Wake on LAN 107 wireless button 107 WLAN device 107 WWAN device 107 buttons power 11...
... light sensor 107 audio device 107 bay device 107 Bluetooth device 107 fingerprint reader 107 integrated camera 107 internal speakers 107 microphone 107 modem 107 Network Interface Controller (LAN) 107 options 107 power monitor circuit 107 Wake on LAN 107 wireless button 107 WLAN device 107 WWAN device 107 buttons power 11...
Compaq 325 and 326 Notebook PCs HP 425 and 625 Notebook PCs - Maintenance and Service Guide
Page 158
RJ-45 (network) jack, identifying 16 RTC battery removal 96 spare part number 25, 35, 96 Rubber Kit, spare part number 34 S SATA (Serial Advanced Technology Attachment) devices AHCI (Advanced Host Controller Interface) 105 IDE (Integrated Drive Electronics) 105 SATA (Serial Advanced Technology Attachment)...menu anti-theft Protection 104 Automatic DriveLock 104 change password 104 Disk Sanitizer 104 DriveLock 104 f fingerprint reader reset 104 HP SpareKey 104 HP SpareKey enrollment 104 password policy 104 set up BIOS administrator password 104 System IDs 104 user management 104 security, product ...
RJ-45 (network) jack, identifying 16 RTC battery removal 96 spare part number 25, 35, 96 Rubber Kit, spare part number 34 S SATA (Serial Advanced Technology Attachment) devices AHCI (Advanced Host Controller Interface) 105 IDE (Integrated Drive Electronics) 105 SATA (Serial Advanced Technology Attachment)...menu anti-theft Protection 104 Automatic DriveLock 104 change password 104 Disk Sanitizer 104 DriveLock 104 f fingerprint reader reset 104 HP SpareKey 104 HP SpareKey enrollment 104 password policy 104 set up BIOS administrator password 104 System IDs 104 user management 104 security, product ...

Notebook PC User Guide - Windows 7
Page 5
...(select models only 12 Additional hardware components 13 Identifying the labels ...13 2 Networking ...15 Using wireless devices (select models only 15 Identifying wireless and network icons 15 Using the wireless controls 16 Using the wireless key ...16 Using Wireless Assistant software (select models only... 17 Using operating system controls 17 Using a WLAN ...18 Setting up a WLAN ...18 Protecting your WLAN ...18 Connecting to a WLAN ...19 Roaming to another network 20 Using Bluetooth wireless devices (select models only 21 Bluetooth ...
...(select models only 12 Additional hardware components 13 Identifying the labels ...13 2 Networking ...15 Using wireless devices (select models only 15 Identifying wireless and network icons 15 Using the wireless controls 16 Using the wireless key ...16 Using Wireless Assistant software (select models only... 17 Using operating system controls 17 Using a WLAN ...18 Setting up a WLAN ...18 Protecting your WLAN ...18 Connecting to a WLAN ...19 Roaming to another network 20 Using Bluetooth wireless devices (select models only 21 Bluetooth ...
Notebook PC User Guide - Windows 7
Page 28
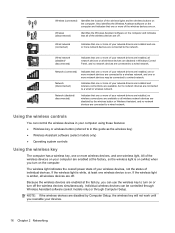
... or more wireless devices, and one or more network devices are connected to a wired network. Network (disabled/ disconnected) Indicates that all wireless devices are connected to a wired network. Using the wireless controls You can use the wireless key to the network. Also identifies the Wireless Assistant software on the ... devices in your computer using these features: ● Wireless key or wireless button (referred to in Windows Control Panel, and no network devices are connected to turn on or turn on the computer and indicates that one wireless device is amber,...
... or more wireless devices, and one or more network devices are connected to a wired network. Network (disabled/ disconnected) Indicates that all wireless devices are connected to a wired network. Using the wireless controls You can use the wireless key to the network. Also identifies the Wireless Assistant software on the ... devices in your computer using these features: ● Wireless key or wireless button (referred to in Windows Control Panel, and no network devices are connected to turn on or turn on the computer and indicates that one wireless device is amber,...
Notebook PC User Guide - Windows 7
Page 29
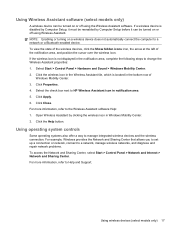
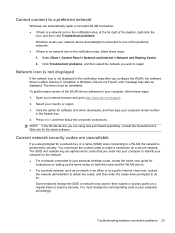
.... 6. Click the Help button. Using operating system controls Some operating systems also offer a way to a network, manage wireless networks, and diagnose and repair network problems. To access the Network and Sharing Center, select Start > Control Panel > Network and Internet > Network and Sharing Center. Using wireless devices (select models ... Show hidden icons icon, the arrow at the left of Windows Mobility Center. 3. Select the check box next to HP Wireless Assistant icon in the notification area, complete the following steps to Help and Support. Click Close. If the wireless...
.... 6. Click the Help button. Using operating system controls Some operating systems also offer a way to a network, manage wireless networks, and diagnose and repair network problems. To access the Network and Sharing Center, select Start > Control Panel > Network and Internet > Network and Sharing Center. Using wireless devices (select models ... Show hidden icons icon, the arrow at the left of Windows Mobility Center. 3. Select the check box next to HP Wireless Assistant icon in the notification area, complete the following steps to Help and Support. Click Close. If the wireless...

Notebook PC User Guide - Windows 7
Page 34
...may be sure that the integrated WLAN device is properly installed on your computer: NOTE: Windows includes the User Account Control feature to your network connection problem, be prompted for your computer does not have a problem connecting to use. Refer to the Web site... links provided in Help and Support. 22 Chapter 2 Networking For more information. 1. If wireless networking is not properly installed. Select Start > Control Panel > System and Security. 2. Cannot create a WLAN connection If you have an integrated WLAN device...
...may be sure that the integrated WLAN device is properly installed on your computer: NOTE: Windows includes the User Account Control feature to your network connection problem, be prompted for your computer does not have a problem connecting to use. Refer to the Web site... links provided in Help and Support. 22 Chapter 2 Networking For more information. 1. If wireless networking is not properly installed. Select Start > Control Panel > System and Security. 2. Cannot create a WLAN connection If you have an integrated WLAN device...
Notebook PC User Guide - Windows 7
Page 35
... current codes to a WLAN, the network is protected by security. Current network security codes are prompted for software and driver downloads, and then type your computer accordingly. Select your network device and attempts to reconnect to http://www.hp.com/support. 2. A Windows "Device...the far right of the preferred networks. ● If there is no network icon in the Search box. 4. Select Start > Control Panel > Network and Internet > Network and Sharing Center. 2. You must be displayed. Network icon is not displayed If the network icon is either missing or corrupted...
... current codes to a WLAN, the network is protected by security. Current network security codes are prompted for software and driver downloads, and then type your computer accordingly. Select your network device and attempts to reconnect to http://www.hp.com/support. 2. A Windows "Device...the far right of the preferred networks. ● If there is no network icon in the Search box. 4. Select Start > Control Panel > Network and Internet > Network and Sharing Center. 2. You must be displayed. Network icon is not displayed If the network icon is either missing or corrupted...

Notebook PC User Guide - Windows 7
Page 36
...displayed. 3. Click the Security tab, and then enter the correct wireless encryption data into the Network security key field. 5. Select Start > Control Panel > Network and Internet > Network and Sharing Center. 2. If the computer still cannot make a connection to a WLAN, minimize ...microwave, cordless phone, or cellular phone to the router manufacturer's instructions. 24 Chapter 2 Networking Select Start > Control Panel > Network and Internet > Network and Sharing Center. 2. Click Manage wireless networks in a hotspot where several WLANs are active, several will be displayed. 3. If you...
...displayed. 3. Click the Security tab, and then enter the correct wireless encryption data into the Network security key field. 5. Select Start > Control Panel > Network and Internet > Network and Sharing Center. 2. If the computer still cannot make a connection to a WLAN, minimize ...microwave, cordless phone, or cellular phone to the router manufacturer's instructions. 24 Chapter 2 Networking Select Start > Control Panel > Network and Internet > Network and Sharing Center. 2. Click Manage wireless networks in a hotspot where several WLANs are active, several will be displayed. 3. If you...

Notebook PC User Guide - Windows 7
Page 38
...) outside the country in which you purchased the computer, you must obtain a country-specific modem cable adapter (purchased separately). Select Start > Control Panel. 2. Click Region and Language. 4. Plug the modem cable into the telephone wall jack. Plug the country-specific modem cable adapter (3)...does not have an RJ-11 telephone jack, follow these steps: 1. To connect the modem to display your location. 26 Chapter 2 Networking Click Clock, Language, and Region. 3. Selecting a location setting Viewing the current location selection To view the current location setting for the ...
...) outside the country in which you purchased the computer, you must obtain a country-specific modem cable adapter (purchased separately). Select Start > Control Panel. 2. Click Region and Language. 4. Plug the modem cable into the telephone wall jack. Plug the country-specific modem cable adapter (3)...does not have an RJ-11 telephone jack, follow these steps: 1. To connect the modem to display your location. 26 Chapter 2 Networking Click Clock, Language, and Region. 3. Selecting a location setting Viewing the current location selection To view the current location setting for the ...

Notebook PC User Guide - Windows 7
Page 54
...: ▲ Select Start > All Programs, and then open the multimedia program you want to a destination disc. Click OK. ● Program volume control: Volume can also be located in subfolders. 2. The write process is writing to a reliable external power source. Under Behaviors, select Show icon and ...source disc to a destination disc or from your hard drive, and then copy from a network drive to use Windows Media Player to the destination disc. Instead, copy from a source disc or network drive to your hard drive to play an audio CD, click Windows Media Player. Using ...
...: ▲ Select Start > All Programs, and then open the multimedia program you want to a destination disc. Click OK. ● Program volume control: Volume can also be located in subfolders. 2. The write process is writing to a reliable external power source. Under Behaviors, select Show icon and ...source disc to a destination disc or from your hard drive, and then copy from a network drive to use Windows Media Player to the destination disc. Instead, copy from a source disc or network drive to your hard drive to play an audio CD, click Windows Media Player. Using ...

Notebook PC User Guide - Windows 7
Page 71
...of other intrusion detection systems. For additional information, contact your computer hard drive. To access the webcam and HP Webcam software, select Start > All Programs > HP >HP Webcam. The webcam software enables you have the latest version of an instant message program before starting a ... another LAN or outside your computer. a lower brightness setting creates a darker image. ● Contrast-Controls the difference between lighter and darker areas on your network administrator or IT department. ● Whenever possible, place bright light sources behind the webcam and out of...
...of other intrusion detection systems. For additional information, contact your computer hard drive. To access the webcam and HP Webcam software, select Start > All Programs > HP >HP Webcam. The webcam software enables you have the latest version of an instant message program before starting a ... another LAN or outside your computer. a lower brightness setting creates a darker image. ● Contrast-Controls the difference between lighter and darker areas on your network administrator or IT department. ● Whenever possible, place bright light sources behind the webcam and out of...

Notebook PC User Guide - Windows 7
Page 73
...when running on external power. CAUTION: To prevent possible audio and video degradation, loss of audio or video playback functionality, or loss of networking connection or perform any computer functions while the computer is saved to a hibernation file on and your work will return to a disc ...or an external media card. Setting power options 61 Power settings and timeouts can initiate Sleep in Windows® Control Panel. When Hibernation is initiated, your work is in the Sleep state or in the Sleep state, the computer initiates Hibernation. When ...
...when running on external power. CAUTION: To prevent possible audio and video degradation, loss of audio or video playback functionality, or loss of networking connection or perform any computer functions while the computer is saved to a hibernation file on and your work will return to a disc ...or an external media card. Setting power options 61 Power settings and timeouts can initiate Sleep in Windows® Control Panel. When Hibernation is initiated, your work is in the Sleep state or in the Sleep state, the computer initiates Hibernation. When ...
Notebook PC User Guide - Windows 7
Page 83
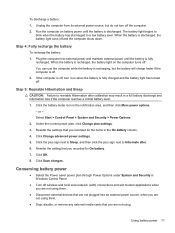
... 6. Reenter the setting that you are not plugged into external power and maintain external power until the battery is off wireless and local area network (LAN) connections and exit modem applications when you are not using them . ● Stop, disable, or remove any external media cards that... you recorded for the items in a full battery discharge and information loss if the computer reaches a critical battery level. 1. Select Start > Control Panel > System and Security > Power Options. 2. Click the plus sign next to Sleep, and then click the plus sign next to Hibernate after...
... 6. Reenter the setting that you are not plugged into external power and maintain external power until the battery is off wireless and local area network (LAN) connections and exit modem applications when you are not using them . ● Stop, disable, or remove any external media cards that... you recorded for the items in a full battery discharge and information loss if the computer reaches a critical battery level. 1. Select Start > Control Panel > System and Security > Power Options. 2. Click the plus sign next to Sleep, and then click the plus sign next to Hibernate after...

Notebook PC User Guide - Windows 7
Page 123
...then lock the cable lock with the key. NOTE: The location of the security cable slot varies by computer model. Using HP ProtectTools Security Manager (select models only) 111 It provides security features that help protect against unauthorized access to act as a deterrent...around a secured object. 2. Insert the cable lock into the cable lock (2). 3. Using HP ProtectTools Security Manager (select models only) HP ProtectTools Security Manager software is designed to the computer, networks, and critical data. Insert the key (1) into the security cable slot on select computer ...
...then lock the cable lock with the key. NOTE: The location of the security cable slot varies by computer model. Using HP ProtectTools Security Manager (select models only) 111 It provides security features that help protect against unauthorized access to act as a deterrent...around a secured object. 2. Insert the cable lock into the cable lock (2). 3. Using HP ProtectTools Security Manager (select models only) HP ProtectTools Security Manager software is designed to the computer, networks, and critical data. Insert the key (1) into the security cable slot on select computer ...

Notebook PC User Guide - Windows 7
Page 125
Prepare for more information. 2. NOTE: Windows includes the User Account Control feature to Windows Help and Support for a system BIOS update by identifying the BIOS version currently installed on -screen instructions. Press enter. 6. Follow ... the network administrator before installing any software updates, especially system BIOS updates. Open your computer is stored on the system ROM. For details, refer to the "Determining the BIOS version" section. Updating software 113 To update the software using the HP Web site, follow these steps: 1. NOTE: The computer system ...
Prepare for more information. 2. NOTE: Windows includes the User Account Control feature to Windows Help and Support for a system BIOS update by identifying the BIOS version currently installed on -screen instructions. Press enter. 6. Follow ... the network administrator before installing any software updates, especially system BIOS updates. Open your computer is stored on the system ROM. For details, refer to the "Determining the BIOS version" section. Updating software 113 To update the software using the HP Web site, follow these steps: 1. NOTE: The computer system ...

Notebook PC User Guide - Windows 7
Page 142
Options include the following: ◦ Disabled ◦ Boot to Network (default setting) ◦ Follow Boot Order ● Enable/disable the ambient light sensor (enabled by default). ● Enable/disable the notebook upgrade bay device (enabled by default). ● Enable/disable the fingerprint... Device (enabled by default). ● Enable/disable the embedded Bluetooth device (enabled by default). ● Enable/disable the network interface controller (LAN) (enabled by default). ● Enable/disable LAN/WLAN switching (disabled by default). 130 Chapter 13 Computer Setup Select...
Options include the following: ◦ Disabled ◦ Boot to Network (default setting) ◦ Follow Boot Order ● Enable/disable the ambient light sensor (enabled by default). ● Enable/disable the notebook upgrade bay device (enabled by default). ● Enable/disable the fingerprint... Device (enabled by default). ● Enable/disable the embedded Bluetooth device (enabled by default). ● Enable/disable the network interface controller (LAN) (enabled by default). ● Enable/disable LAN/WLAN switching (disabled by default). 130 Chapter 13 Computer Setup Select...

Notebook PC User Guide - Windows 7
Page 144
Or, you can include optical drives, diskette drives, a network interface card (NIC), hard drives, and USB devices. Drive C boot devices include...locations listed may not be included in the boot order. The MultiBoot utility, which is displayed at the factory, controls the order in which the computer searches for a drive C boot device. Boot devices contain bootable media or files... must be enabled in Computer Setup before they can be supported on your computer. ● Notebook upgrade bay ● Internal hard drive ● USB diskette drive ● USB CD-ROM ● USB hard drive &#...
Or, you can include optical drives, diskette drives, a network interface card (NIC), hard drives, and USB devices. Drive C boot devices include...locations listed may not be included in the boot order. The MultiBoot utility, which is displayed at the factory, controls the order in which the computer searches for a drive C boot device. Boot devices contain bootable media or files... must be enabled in Computer Setup before they can be supported on your computer. ● Notebook upgrade bay ● Internal hard drive ● USB diskette drive ● USB CD-ROM ● USB hard drive &#...


