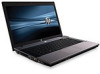
Compaq 325 and 326 Notebook PCs HP 425 and 625 Notebook PCs - Maintenance and Service Guide
Page 12
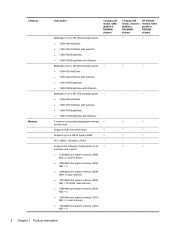
...AntiGlare with webcam ● 1366×768 BrightView ● 1366×768 BrightView with Webcam 2 customer-accessible/upgradable memory √ module slots Supports dual-channel memory √ Supports up to 8 GB of system RAM √ PC3-10600, 1333-MHz, DDR3 √ ...MB total system memory (2048MB + 1024-MB, dual-channel) ● 2048-MB total system memory (2048MB × 1) ● 2048-MB total system memory (1024MB × 2, dual-channel) ● 1024-MB total system memory (1024MB × 1) Compaq 326 model, Discrete graphics, RS880MD chipset HP 425/625 models, UMA graphics...
...AntiGlare with webcam ● 1366×768 BrightView ● 1366×768 BrightView with Webcam 2 customer-accessible/upgradable memory √ module slots Supports dual-channel memory √ Supports up to 8 GB of system RAM √ PC3-10600, 1333-MHz, DDR3 √ ...MB total system memory (2048MB + 1024-MB, dual-channel) ● 2048-MB total system memory (2048MB × 1) ● 2048-MB total system memory (1024MB × 2, dual-channel) ● 1024-MB total system memory (1024MB × 1) Compaq 326 model, Discrete graphics, RS880MD chipset HP 425/625 models, UMA graphics...

Notebook PC User Guide - Windows 7
Page 10
Upgrading a memory module in the primary memory module slot 96 10 Security ...100 Protecting the computer ...100 Using passwords ...101 Setting passwords in Windows 101 Setting passwords in Computer Setup 101 BIOS ... Viewing Computer Setup System Information 107 Using Computer Setup System IDs 108 Using antivirus software ...109 Using firewall software ...109 Installing critical updates ...110 Using HP ProtectTools Security Manager (select models only 111 Installing a security cable ...111 11 Software updates ...112 Updating software ...112 Updating the BIOS ...114 Determining the BIOS...
Upgrading a memory module in the primary memory module slot 96 10 Security ...100 Protecting the computer ...100 Using passwords ...101 Setting passwords in Windows 101 Setting passwords in Computer Setup 101 BIOS ... Viewing Computer Setup System Information 107 Using Computer Setup System IDs 108 Using antivirus software ...109 Using firewall software ...109 Installing critical updates ...110 Using HP ProtectTools Security Manager (select models only 111 Installing a security cable ...111 11 Software updates ...112 Updating software ...112 Updating the BIOS ...114 Determining the BIOS...

Notebook PC User Guide - Windows 7
Page 103
...beginning any procedure, touch a grounded metal object to be sure that the upgrade modules are discharged of the computer can damage electronic components. 9 Memory modules The computer has one memory module compartment, which is located on the bottom of electric shock and damage... the power cord and remove all batteries before installing a memory module. All memory modules installed in the computer must be upgraded by adding a memory module to the vacant expansion memory module slot or by upgrading the existing memory module in the computer. CAUTION: Electrostatic discharge (ESD) can...
...beginning any procedure, touch a grounded metal object to be sure that the upgrade modules are discharged of the computer can damage electronic components. 9 Memory modules The computer has one memory module compartment, which is located on the bottom of electric shock and damage... the power cord and remove all batteries before installing a memory module. All memory modules installed in the computer must be upgraded by adding a memory module to the vacant expansion memory module slot or by upgrading the existing memory module in the computer. CAUTION: Electrostatic discharge (ESD) can...

Notebook PC User Guide - Windows 7
Page 108
... the illustration that most closely matches your work. 2. NOTE: If a memory module is stacked above the primary memory module slot. To upgrade a memory module in the primary memory module slot The expansion memory module slot is installed in Hibernation, turn the computer on a flat surface.... 6. Save your computer. Then shut down the computer and close the display. Remove the battery from the computer. Upgrading a memory module in the primary memory module slot, follow these steps: 1. Shut down the computer through the operating system. 3. Loosen the bottom door screws...
... the illustration that most closely matches your work. 2. NOTE: If a memory module is stacked above the primary memory module slot. To upgrade a memory module in the primary memory module slot The expansion memory module slot is installed in Hibernation, turn the computer on a flat surface.... 6. Save your computer. Then shut down the computer and close the display. Remove the battery from the computer. Upgrading a memory module in the primary memory module slot, follow these steps: 1. Shut down the computer through the operating system. 3. Loosen the bottom door screws...

Notebook PC User Guide - Windows 7
Page 109
... in an electrostatic-safe container. 10. The memory module tilts up. b. To protect a memory module after removal, place it is seated. Upgrading a memory module in the primary memory module slot: a. CAUTION: To prevent damage to the memory module, hold the memory module by the edges only. Grasp the edge of the memory module (2), and gently pull the module...
... in an electrostatic-safe container. 10. The memory module tilts up. b. To protect a memory module after removal, place it is seated. Upgrading a memory module in the primary memory module slot: a. CAUTION: To prevent damage to the memory module, hold the memory module by the edges only. Grasp the edge of the memory module (2), and gently pull the module...

Notebook PC User Guide - Windows 7
Page 111
Turn the computer right-side up, and then reconnect external power and external devices. 15. NOTE: Refer to the illustration that most closely matches your computer. 13. Replace the battery. 14. Upgrading a memory module in the primary memory module slot 99 12. Turn on the computer. Tighten the bottom door screws. (3).
Turn the computer right-side up, and then reconnect external power and external devices. 15. NOTE: Refer to the illustration that most closely matches your computer. 13. Replace the battery. 14. Upgrading a memory module in the primary memory module slot 99 12. Turn on the computer. Tighten the bottom door screws. (3).

Notebook PC User Guide - Windows 7
Page 144
... ● Internal hard drive ● USB diskette drive ● USB CD-ROM ● USB hard drive ● Notebook Ethernet ● Secure Digital (SD) Memory Card ● Docking station upgrade bay ● External SATA drive You can change the order in which the system selects a boot device. Drive C boot devices include optical drives and...
... ● Internal hard drive ● USB diskette drive ● USB CD-ROM ● USB hard drive ● Notebook Ethernet ● Secure Digital (SD) Memory Card ● Docking station upgrade bay ● External SATA drive You can change the order in which the system selects a boot device. Drive C boot devices include optical drives and...

Notebook PC User Guide - Windows 7
Page 158
...opening Help and Support 34 switching screen image 34 using 33 volume mute 41 HP Client Configuration Manager 139, 140 HP Client Manager for Altiris 139 HP QuickLook 129 HP SpareKey enrollment 127 HP System Software Manager 139, 140 hubs 83 I icons Connection Manager 15 network 23...level 68 M maintenance Disk Cleanup 77 Disk Defragmenter 77 media controls, hotkeys 36 memory module adding 92 inserting 97 removing 93, 97 replacing 92, 96 upgrading primary 96 memory module compartment, identifying 11 memory, replacing memory modules 92, 96 microphone (audio-in) jack 8 microphone, identifying 12, 40...
...opening Help and Support 34 switching screen image 34 using 33 volume mute 41 HP Client Configuration Manager 139, 140 HP Client Manager for Altiris 139 HP QuickLook 129 HP SpareKey enrollment 127 HP System Software Manager 139, 140 hubs 83 I icons Connection Manager 15 network 23...level 68 M maintenance Disk Cleanup 77 Disk Defragmenter 77 media controls, hotkeys 36 memory module adding 92 inserting 97 removing 93, 97 replacing 92, 96 upgrading primary 96 memory module compartment, identifying 11 memory, replacing memory modules 92, 96 microphone (audio-in) jack 8 microphone, identifying 12, 40...

Notebook PC User Guide - Windows Vista
Page 9
... models only 86 Configuring an ExpressCard 86 Inserting an ExpressCard 86 Stopping and removing an ExpressCard 87 9 Memory modules ...89 Adding or replacing a memory module in the expansion memory module slot 90 Upgrading a memory module in the primary memory module slot 94 10 Security ...98 Protecting the computer ...98 Using passwords ...99 Setting passwords in Windows...
... models only 86 Configuring an ExpressCard 86 Inserting an ExpressCard 86 Stopping and removing an ExpressCard 87 9 Memory modules ...89 Adding or replacing a memory module in the expansion memory module slot 90 Upgrading a memory module in the primary memory module slot 94 10 Security ...98 Protecting the computer ...98 Using passwords ...99 Setting passwords in Windows...

Notebook PC User Guide - Windows Vista
Page 101
... you are the same type as those already installed in the primary memory module slot. CAUTION: Electrostatic discharge (ESD) can be upgraded by upgrading the existing memory module in the computer. All memory modules installed in the computer must be sure that the upgrade modules are discharged of electric shock and damage to the vacant expansion...
... you are the same type as those already installed in the primary memory module slot. CAUTION: Electrostatic discharge (ESD) can be upgraded by upgrading the existing memory module in the computer. All memory modules installed in the computer must be sure that the upgrade modules are discharged of electric shock and damage to the vacant expansion...

Notebook PC User Guide - Windows Vista
Page 106
... surface. 6. Remove the battery from the computer. To upgrade a memory module in the primary memory module slot, follow these steps: 1. Upgrading a memory module in the primary memory module slot The expansion memory module slot is installed in the expansion memory module slot, first remove the expansion memory module. 94 Chapter 9 Memory modules Slide the bottom door forward (2), and then lift...
... surface. 6. Remove the battery from the computer. To upgrade a memory module in the primary memory module slot, follow these steps: 1. Upgrading a memory module in the primary memory module slot The expansion memory module slot is installed in the expansion memory module slot, first remove the expansion memory module. 94 Chapter 9 Memory modules Slide the bottom door forward (2), and then lift...

Notebook PC User Guide - Windows Vista
Page 107
... not touch the components on the memory module. b. Upgrading a memory module in the memory module slot. The memory module tilts up. CAUTION: To prevent damage to the memory module, hold the memory module by the edges only. b. CAUTION: To prevent damage to the memory module, hold the memory module by the edges only. Insert a memory module in an electrostatic-safe...
... not touch the components on the memory module. b. Upgrading a memory module in the memory module slot. The memory module tilts up. CAUTION: To prevent damage to the memory module, hold the memory module by the edges only. b. CAUTION: To prevent damage to the memory module, hold the memory module by the edges only. Insert a memory module in an electrostatic-safe...

Notebook PC User Guide - Windows Vista
Page 109
Turn on the computer. Replace the battery. 14. Tighten the bottom door screws. (3). Turn the computer right-side up, and then reconnect external power and external devices. 15. 12. NOTE: Refer to the illustration that most closely matches your computer. 13. Upgrading a memory module in the primary memory module slot 97
Turn on the computer. Replace the battery. 14. Tighten the bottom door screws. (3). Turn the computer right-side up, and then reconnect external power and external devices. 15. 12. NOTE: Refer to the illustration that most closely matches your computer. 13. Upgrading a memory module in the primary memory module slot 97
Notebook PC User Guide - Windows Vista
Page 140
... ● Internal hard drive ● USB diskette drive ● USB CD-ROM ● USB hard drive ● Notebook Ethernet ● Secure Digital (SD) Memory Card ● Docking station upgrade bay ● External SATA drive You can be supported on or restarts. The factory setting is disabled, the computer uses a fixed boot order that...
... ● Internal hard drive ● USB diskette drive ● USB CD-ROM ● USB hard drive ● Notebook Ethernet ● Secure Digital (SD) Memory Card ● Docking station upgrade bay ● External SATA drive You can be supported on or restarts. The factory setting is disabled, the computer uses a fixed boot order that...
Notebook PC User Guide - Windows Vista
Page 154
...opening Help and Support 33 switching screen image 33 using 32 volume mute 40 HP Client Configuration Manager 135, 136 HP Client Manager for Altiris 135 HP QuickLook 125 HP SpareKey enrollment 123 HP System Software Manager 135, 136 hubs 81 I icons Connection Manager 15 network ... 36 M maintenance Disk Cleanup 75 Disk Defragmenter 75 media controls, hotkeys 35 memory module adding 90 inserting 95 removing 91, 95 replacing 90, 94 upgrading primary 94 memory module compartment, identifying 11 memory, replacing memory modules 90, 94 microphone (audio-in) jack 8 microphone, identifying 12, 39...
...opening Help and Support 33 switching screen image 33 using 32 volume mute 40 HP Client Configuration Manager 135, 136 HP Client Manager for Altiris 135 HP QuickLook 125 HP SpareKey enrollment 123 HP System Software Manager 135, 136 hubs 81 I icons Connection Manager 15 network ... 36 M maintenance Disk Cleanup 75 Disk Defragmenter 75 media controls, hotkeys 35 memory module adding 90 inserting 95 removing 91, 95 replacing 90, 94 upgrading primary 94 memory module compartment, identifying 11 memory, replacing memory modules 90, 94 microphone (audio-in) jack 8 microphone, identifying 12, 39...

