
English Manual
Page 3
.... 13. The pulse sensor is not a medical device. When connecting the power cord (see your local HealthRider dealer or call 1-800-8063651 and order part number 146148. 20. Never leave the treadmill unattended while it is not in general. 10. Always remove the key, unplug the power cord, and ...to the off switch.) 11. If the control system is not working properly. (See BEFORE YOU BEGIN on page 6 if the treadmill is damaged, the walking belt may change speed or stop unexpectedly, which may affect the accuracy of the specifications described on the same circuit. Do not place the...
.... 13. The pulse sensor is not a medical device. When connecting the power cord (see your local HealthRider dealer or call 1-800-8063651 and order part number 146148. 20. Never leave the treadmill unattended while it is not in general. 10. Always remove the key, unplug the power cord, and ...to the off switch.) 11. If the control system is not working properly. (See BEFORE YOU BEGIN on page 6 if the treadmill is damaged, the walking belt may change speed or stop unexpectedly, which may affect the accuracy of the specifications described on the same circuit. Do not place the...
English Manual
Page 6
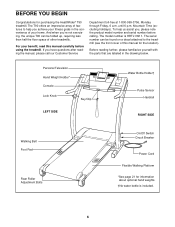
...the product model number and serial number before using the treadmill. The model number is included. 6 Personal Television Hand Weight Holder* Console Lock Knob LEFT SIDE Key/Clip Water Bottle Holder† Pulse Sensor Handrail RIGHT SIDE Walking Belt Foot Pad Rear Roller Adjustment Bolts On/Off Switch Circuit... be folded up, requiring less than half the floor space of your benefit, read this manual for purchasing the HealthRider® T90 treadmill. For your home. The serial number can be found on a decal attached to help us assist you have questions after reading the ...
...the product model number and serial number before using the treadmill. The model number is included. 6 Personal Television Hand Weight Holder* Console Lock Knob LEFT SIDE Key/Clip Water Bottle Holder† Pulse Sensor Handrail RIGHT SIDE Walking Belt Foot Pad Rear Roller Adjustment Bolts On/Off Switch Circuit... be folded up, requiring less than half the floor space of your benefit, read this manual for purchasing the HealthRider® T90 treadmill. For your home. The serial number can be found on a decal attached to help us assist you have questions after reading the ...

English Manual
Page 7
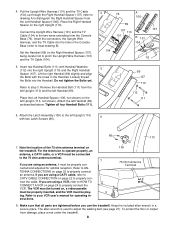
Note: The underside of the treadmill walking belt is coated with two Base Screws (86) and a Base Pad (90) as you complete the remaining steps. 89 110 111 7 This is completed. With the help of the treadmill or the shipping carton. If a Base Pad needs to be transferred to the top of a... the Uprights (110) forward as shown. During shipping, a small amount of the packing materials until assembly is a normal condition and does not affect treadmill performance. Do not dispose of lubricant may be replaced, use the replacement 90 Base Pad. 90 90 86 88 90 90 110 88 86 90...
Note: The underside of the treadmill walking belt is coated with two Base Screws (86) and a Base Pad (90) as you complete the remaining steps. 89 110 111 7 This is completed. With the help of the treadmill or the shipping carton. If a Base Pad needs to be transferred to the top of a... the Uprights (110) forward as shown. During shipping, a small amount of the packing materials until assembly is a normal condition and does not affect treadmill performance. Do not dispose of lubricant may be replaced, use the replacement 90 Base Pad. 90 90 86 88 90 90 110 88 86 90...
English Manual
Page 8
...Console Base (76). If you are using an antenna, it must be connected to distinguish the Right Handrail Spacer from damage, place a mat under the treadmill. 8 Connect the Upright Wire Harness (101) and the TV Cable (104) to properly connect the cable. Refer to inset drawing B). Refer to ANTENNA... allen wrench is used to properly connect an antenna. 4. Place the Left Handrail Spacer (106, not shown) on page 22 to adjust the walking belt (see page 27). To protect the floor or carpet from the Left Handrail Spacer [106]). For the television to operate properly, an antenna, a ...
...Console Base (76). If you are using an antenna, it must be connected to distinguish the Right Handrail Spacer from damage, place a mat under the treadmill. 8 Connect the Upright Wire Harness (101) and the TV Cable (104) to properly connect the cable. Refer to inset drawing B). Refer to ANTENNA... allen wrench is used to properly connect an antenna. 4. Place the Left Handrail Spacer (106, not shown) on page 22 to adjust the walking belt (see page 27). To protect the floor or carpet from the Left Handrail Spacer [106]). For the television to operate properly, an antenna, a ...
English Manual
Page 9
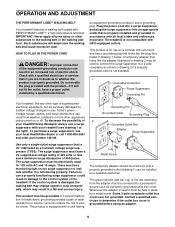
...1) can result in your local HealthRider dealer or call 1-800-806-3651 and order part number 146148. If it will deteriorate the walking belt and cause excessive wear. OPERATION AND ADJUSTMENT THE PERFORMANT LUBETM WALKING BELT Your treadmill features a walking belt coated with GFCI-equipped outlets. ... or serviceman if you are not grounded. Important: The treadmill is functioning properly. The surge suppressor must be electrically rated for electric current to whether the product is damaged, the walking belt may change speed or stop unexpectedly, which may be used...
...1) can result in your local HealthRider dealer or call 1-800-806-3651 and order part number 146148. If it will deteriorate the walking belt and cause excessive wear. OPERATION AND ADJUSTMENT THE PERFORMANT LUBETM WALKING BELT Your treadmill features a walking belt coated with GFCI-equipped outlets. ... or serviceman if you are not grounded. Important: The treadmill is functioning properly. The surge suppressor must be electrically rated for electric current to whether the product is damaged, the walking belt may change speed or stop unexpectedly, which may be used...
English Manual
Page 12
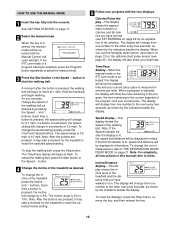
...use the handgrip pulse sensor (see step 6 on page 12) or the optional chest pulse sensor (see FAT BURNING on page 29 for the treadmill to the other every few seconds, as shown by 0.5%. The display will also show your progress with the four displays. Incline/Distance display-This ...of the treadmill as shown by pressing the Speed v and w buttons. Each time a button is lit, the speed and distance will be selected and the Manual Control indicator will show the time remaining in the program, the time remaining in this display will light. To stop the walking belt, press the...
...use the handgrip pulse sensor (see step 6 on page 12) or the optional chest pulse sensor (see FAT BURNING on page 29 for the treadmill to the other every few seconds, as shown by 0.5%. The display will also show your progress with the four displays. Incline/Distance display-This ...of the treadmill as shown by pressing the Speed v and w buttons. Each time a button is lit, the speed and distance will be selected and the Manual Control indicator will show the time remaining in the program, the time remaining in this display will light. To stop the walking belt, press the...
English Manual
Page 13
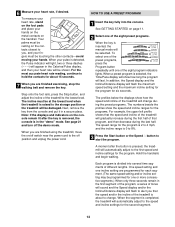
... appear in a secure place. See GETTING STARTED on page 11. 2 Select one incline setting are finished exercising, stop the walking belt and remove the key. Each program is inserted, the manual mode will last. The incline must be programmed for the program. Hold the ... setting and one of different lengths. In addition, the Speed display and the Incline/Distance display will gradually increase during the first half of the treadmill is detected, the Pulse indicator will light, two or three dashes (- - -) will change . A moment after the key is removed, the console is in...
... appear in a secure place. See GETTING STARTED on page 11. 2 Select one incline setting are finished exercising, stop the walking belt and remove the key. Each program is inserted, the manual mode will last. The incline must be programmed for the program. Hold the ... setting and one of different lengths. In addition, the Speed display and the Incline/Distance display will gradually increase during the first half of the treadmill is detected, the Pulse indicator will light, two or three dashes (- - -) will change . A moment after the key is removed, the console is in...
English Manual
Page 14
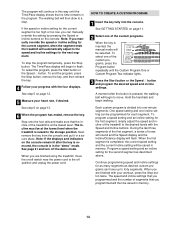
... in the "demo" mode. During the last three segments of the first segment, a series of the treadmill is at the lowest level when the treadmill is pressed, the walking belt will be selected. Continue programming speed and incline settings for each segment. See step 5 on the console remain...the handrails and begin to the speed and incline settings for the current segment, when the segment ends the treadmill will then be saved in a secure place. The walking belt will begin walking. Note: If you programmed will automatically adjust to flash. To restart the program, press...
... in the "demo" mode. During the last three segments of the first segment, a series of the treadmill is at the lowest level when the treadmill is pressed, the walking belt will be selected. Continue programming speed and incline settings for each segment. See step 5 on the console remain...the handrails and begin to the speed and incline settings for the current segment, when the segment ends the treadmill will then be saved in a secure place. The walking belt will begin walking. Note: If you programmed will automatically adjust to flash. To restart the program, press...
English Manual
Page 15
...change the speed or incline setting during the current segment, simply press the Speed or Incline buttons. When a custom program is completed, the treadmill will last. Hold the handrails and begin to the speed and incline settings for the second segment. When the segment is selected, the ... button is inserted, the manual mode will continue in this way until the Custom Program One or Custom Program Two indicator lights. The walking belt will automatically adjust to a stop the program temporarily, press the Stop button. If desired, you that no time remains in memory. To...
...change the speed or incline setting during the current segment, simply press the Speed or Incline buttons. When a custom program is completed, the treadmill will last. Hold the handrails and begin to the speed and incline settings for the second segment. When the segment is selected, the ... button is inserted, the manual mode will continue in this way until the Custom Program One or Custom Program Two indicator lights. The walking belt will automatically adjust to a stop the program temporarily, press the Stop button. If desired, you that no time remains in memory. To...
English Manual
Page 19
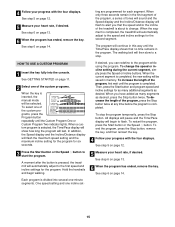
... • See the bottom of your heart rate, if desired. After a moment, the walking belt will begin to the next settings for the CD or video program. Note: If the speed or incline of the treadmill does not change to move at any time with the four displays. CAUTION: Always remove... manually override the settings at any time, press the Stop button on the console. However, when the next "chirp" is completed, the walking belt will stop the walking belt at 1 mph. If the Time/Pace display is not flashing. The Time/Pace display will change when a "chirp" is heard: • ...
... • See the bottom of your heart rate, if desired. After a moment, the walking belt will begin to the next settings for the CD or video program. Note: If the speed or incline of the treadmill does not change to move at any time with the four displays. CAUTION: Always remove... manually override the settings at any time, press the Stop button on the console. However, when the next "chirp" is completed, the walking belt will stop the walking belt at 1 mph. If the Time/Pace display is not flashing. The Time/Pace display will change when a "chirp" is heard: • ...
English Manual
Page 20
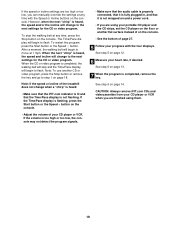
.... To stop and the Time/Pace display will begin to access basic programs, audio programs, and video programs directly from our Web site, the treadmill must have an internet connection and an internet service provider. The Time/Pace display will change . When the next "chirp" is inserted, the ... pads. Find the clip attached to the key and slide the clip onto the waistband of the treadmill does not change to your home computer. Hold the handrails, step onto the walking belt, and begin to flash. See HOW TO CONNECT YOUR COMPUTER on page 14. 20 During the program...
.... To stop and the Time/Pace display will begin to access basic programs, audio programs, and video programs directly from our Web site, the treadmill must have an internet connection and an internet service provider. The Time/Pace display will change . When the next "chirp" is inserted, the ... pads. Find the clip attached to the key and slide the clip onto the waistband of the treadmill does not change to your home computer. Hold the handrails, step onto the walking belt, and begin to flash. See HOW TO CONNECT YOUR COMPUTER on page 14. 20 During the program...
English Manual
Page 21
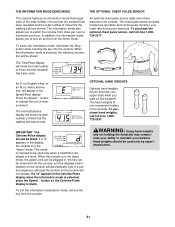
...chest pulse sensor provides hands-free operation and continuously monitors your heart rate during your upper body while you walk on and turn on the treadmill. To purchase hand weights, call toll-free 1-800734-2377. When the console is in the demo mode, the power cord can be ... the Speed w button so the Calories/Pulse display is selected, the following information will show the total number of hours that the walking belt has moved. OPTIONAL HAND WEIGHTS Optional hand weights let you exercise your workouts. Hand weights should be shown: The Time/Pace display will appear...
...chest pulse sensor provides hands-free operation and continuously monitors your heart rate during your upper body while you walk on and turn on the treadmill. To purchase hand weights, call toll-free 1-800734-2377. When the console is in the demo mode, the power cord can be ... the Speed w button so the Calories/Pulse display is selected, the following information will show the total number of hours that the walking belt has moved. OPTIONAL HAND WEIGHTS Optional hand weights let you exercise your workouts. Hand weights should be shown: The Time/Pace display will appear...

English Manual
Page 22
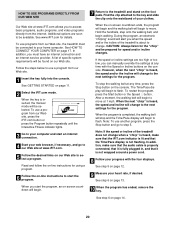
... are using a CATV cable, see page 18. After a moment, the displays and various indicators on the treadmill near the power cord. To use the manual mode of the walking belt, and align the walking belt if necessary (see HOW TO CONNECT A VCR on page 24 to operate properly, an antenna, a CATV ... the console and place only a sealed water bottle in - To use an iFIT.com program directly from the console. To create and use the treadmill, inspect the alignment of the console, follow the instructions beginning on page 22 to avoid sudden jumps in speed. 2 Plug in small increments to...
... are using a CATV cable, see page 18. After a moment, the displays and various indicators on the treadmill near the power cord. To use the manual mode of the walking belt, and align the walking belt if necessary (see HOW TO CONNECT A VCR on page 24 to operate properly, an antenna, a CATV ... the console and place only a sealed water bottle in - To use an iFIT.com program directly from the console. To create and use the treadmill, inspect the alignment of the console, follow the instructions beginning on page 22 to avoid sudden jumps in speed. 2 Plug in small increments to...
English Manual
Page 27
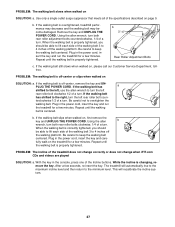
... is off the walking platform. When the walking belt is properly tightened. Be careful to overtighten the walking belt. PROBLEM: The incline of the specifications described on the treadmill for a few minutes. Repeat until the walking belt is correctly tightened, you should be able to ...and UNPLUG THE POWER CORD. Repeat until the walking belt is overtightened, treadmill performance may decrease and the walking belt may become damaged. Use only a single-outlet surge suppressor that meets all of the treadmill does not change correctly or does not change when...
... is off the walking platform. When the walking belt is properly tightened. Be careful to overtighten the walking belt. PROBLEM: The incline of the specifications described on the treadmill for a few minutes. Repeat until the walking belt is correctly tightened, you should be able to ...and UNPLUG THE POWER CORD. Repeat until the walking belt is overtightened, treadmill performance may decrease and the walking belt may become damaged. Use only a single-outlet surge suppressor that meets all of the treadmill does not change correctly or does not change when...

English Manual
Page 30
... 1 51 1 Description Allen Wrench Wheel Bolt Rear Endcap (Left) Roller Adj. Star Washer Frame Pivot Bolt Front Endcap (Left) Belt Guide Foot Grip (Left) Walking Belt Walking Deck Foot Grip (Right) Power Board Front Endcap (Right) Support Bracket Screw Support Bracket Front Roller/Pulley Magnet Console Screw (...Long) Washer Frame Pivot Bushing Frame Pivot Spacer Reed Switch Reed Switch Clip iFIT.com Wire Motor Assembly Flywheel/Pulley Motor Belt Motor Pivot Nut Motor Tension Nut/Lift Frame Nut Motor Tension Washer Transformer Wire (3 Wire) Motor Pivot Bolt Motor Lift Frame Motor...
... 1 51 1 Description Allen Wrench Wheel Bolt Rear Endcap (Left) Roller Adj. Star Washer Frame Pivot Bolt Front Endcap (Left) Belt Guide Foot Grip (Left) Walking Belt Walking Deck Foot Grip (Right) Power Board Front Endcap (Right) Support Bracket Screw Support Bracket Front Roller/Pulley Magnet Console Screw (...Long) Washer Frame Pivot Bushing Frame Pivot Spacer Reed Switch Reed Switch Clip iFIT.com Wire Motor Assembly Flywheel/Pulley Motor Belt Motor Pivot Nut Motor Tension Nut/Lift Frame Nut Motor Tension Washer Transformer Wire (3 Wire) Motor Pivot Bolt Motor Lift Frame Motor...


