

English Manual
Page 2
...suppressor must have a UL suppressed voltage rating of 400 volts or less and a minimum surge dissipation of 450 joules. Never move the walking belt while the power is capable of high speeds. Never use the treadmill with eight feet of clearance behind it. Do not operate the treadmill where... the owner to persons, read the following important precautions and information before operating the treadmill. 1. When connecting the power cord (see your local HEALTHRIDER dealer or call 1800-999-3756 and order part number 146148. 11. To protect the floor or carpet from damage, place a mat under...
...suppressor must have a UL suppressed voltage rating of 400 volts or less and a minimum surge dissipation of 450 joules. Never move the walking belt while the power is capable of high speeds. Never use the treadmill with eight feet of clearance behind it. Do not operate the treadmill where... the owner to persons, read the following important precautions and information before operating the treadmill. 1. When connecting the power cord (see your local HEALTHRIDER dealer or call 1800-999-3756 and order part number 146148. 11. To protect the floor or carpet from damage, place a mat under...

English Manual
Page 4
... the product model number and serial number before using the treadmill. until 6 p.m. From the advanced console to the cushioned walking belt, the SOFTSTRIDER S700xi is designed to the treadmill (see the front cover of this manual carefully before calling. Hand Weights Chest Pulse Sensor Holder Water...drawing below. To help you 're not exercising, the SOFTSTRIDER S700xi can be folded away, taking less than half the floor space of your benefit, read this manual for purchasing the HealthRider® SOFTSTRIDER S700xi™ treadmill. The serial number can be found on a...
... the product model number and serial number before using the treadmill. until 6 p.m. From the advanced console to the cushioned walking belt, the SOFTSTRIDER S700xi is designed to the treadmill (see the front cover of this manual carefully before calling. Hand Weights Chest Pulse Sensor Holder Water...drawing below. To help you 're not exercising, the SOFTSTRIDER S700xi can be folded away, taking less than half the floor space of your benefit, read this manual for purchasing the HealthRider® SOFTSTRIDER S700xi™ treadmill. The serial number can be found on a...
English Manual
Page 5
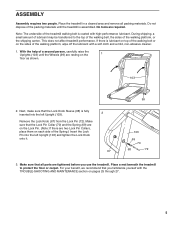
...of the packing materials until the Wheels (99) are required. Place a mat beneath the treadmill to the top of the walking belt, the sides of the treadmill walking belt is coated with the TROUBLE-SHOOTING AND MAINTENANCE section on the 1 floor as shown. 103 2. No tools are resting on ...assembled. During shipping, a small amount of lubricant may be transferred to protect the floor or carpet. If there is lubricant on top of the walking belt or on each side of a second person, carefully raise the Uprights (103) until the treadmill is fully inserted into the left Upright (103). 2...
...of the packing materials until the Wheels (99) are required. Place a mat beneath the treadmill to the top of the walking belt, the sides of the treadmill walking belt is coated with the TROUBLE-SHOOTING AND MAINTENANCE section on the 1 floor as shown. 103 2. No tools are resting on ...assembled. During shipping, a small amount of lubricant may be transferred to protect the floor or carpet. If there is lubricant on top of the walking belt or on each side of a second person, carefully raise the Uprights (103) until the treadmill is fully inserted into the left Upright (103). 2...

English Manual
Page 6
..., position yourself near the center of the sensor unit. Adjust the length of the sensor unit, as is used with the front of the walking belt. If the chest pulse sensor does not function properly, try the steps below. • Make sure that this is a problem, try moving it is suspected...
..., position yourself near the center of the sensor unit. Adjust the length of the sensor unit, as is used with the front of the walking belt. If the chest pulse sensor does not function properly, try the steps below. • Make sure that this is a problem, try moving it is suspected...

English Manual
Page 7
... or serviceman if you are not grounded. This product is for use a surge suppressor with the product-if it will deteriorate the walking belt and cause excessive wear. If it must be held in place by sudden voltage changes in accordance with PERFORMANT LUBETM, a high-performance lubricant...in doubt as a properly grounded outlet box cover. The surge suppressor must be grounded. Do not modify the plug provided with your local HEALTHRIDER dealer or call 1-800-999-3756 and order part number 146148. The surge suppressor must be connected to a 2-pole receptacle as a transient...
... or serviceman if you are not grounded. This product is for use a surge suppressor with the product-if it will deteriorate the walking belt and cause excessive wear. If it must be held in place by sudden voltage changes in accordance with PERFORMANT LUBETM, a high-performance lubricant...in doubt as a properly grounded outlet box cover. The surge suppressor must be grounded. Do not modify the plug provided with your local HEALTHRIDER dealer or call 1-800-999-3756 and order part number 146148. The surge suppressor must be connected to a 2-pole receptacle as a transient...

English Manual
Page 8
... on page 10. As you through an effective workout. With the treadmill connected to your heart rate. steps beginning on the face of the walking belt. stereo, portable stereo, or computer and play iFIT.com video programs (videocassettes are also offered. Video programs offer the same benefits as a personal trainer guides...
... on page 10. As you through an effective workout. With the treadmill connected to your heart rate. steps beginning on the face of the walking belt. stereo, portable stereo, or computer and play iFIT.com video programs (videocassettes are also offered. Video programs offer the same benefits as a personal trainer guides...

English Manual
Page 9
...be reset, and a new program or the manual mode will change during , L. Incline buttons-These buttons control the incline of the walking belt. Speed buttons-These buttons control the speed of the program. Stop buttons-These buttons are pressed, the display will be used . Distance/...Incline display-This display shows the distance you to start the walking belt. Select Workout button-This button is pressed, the incline will alternate between one number and the other every seven seconds. The included ...
...be reset, and a new program or the manual mode will change during , L. Incline buttons-These buttons control the incline of the walking belt. Speed buttons-These buttons control the speed of the program. Stop buttons-These buttons are pressed, the display will be used . Distance/...Incline display-This display shows the distance you to start the walking belt. Select Workout button-This button is pressed, the incline will alternate between one number and the other every seven seconds. The included ...
English Manual
Page 10
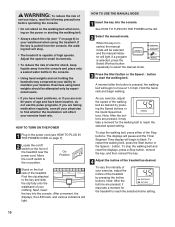
... select the manual mode. 3 Press the Start button or the Speed L button to reach the selected incline setting. 10 To restart the walking belt, press the Start button or the Speed L button. Note: After the buttons are taking medication regularly, consult your physician to find whether the...when using hand weights should be selected and the manual indicator will begin walking. As you are pressed, it may take a moment for the walking belt to flash. After a moment, the displays, the LED track, and various indicators will stop. • The treadmill is inserted, the manual ...
... select the manual mode. 3 Press the Start button or the Speed L button to reach the selected incline setting. 10 To restart the walking belt, press the Start button or the Speed L button. Note: After the buttons are taking medication regularly, consult your physician to find whether the...when using hand weights should be selected and the manual indicator will begin walking. As you are pressed, it may take a moment for the walking belt to flash. After a moment, the displays, the LED track, and various indicators will stop. • The treadmill is inserted, the manual ...
English Manual
Page 11
... a displayed in either miles distance of the Stop buttons while inserting the key into the console. This display shows the approximate numbers of the walking belt. The display 7 When you use the handgrip pulse sensor (see step 6) or the chest pulse sensor (see FAT BURNING on page 13. A new To ...show a Note: The speed can be resting on /off the demo mode. ing the chest pulse sensor and you are finished exercising, stop the walking belt and remove the key. Time/Segment Time display-When the manual mode or an iFIT.com program is in the current segment of the treadmill...
... a displayed in either miles distance of the Stop buttons while inserting the key into the console. This display shows the approximate numbers of the walking belt. The display 7 When you use the handgrip pulse sensor (see step 6) or the chest pulse sensor (see FAT BURNING on page 13. A new To ...show a Note: The speed can be resting on /off the demo mode. ing the chest pulse sensor and you are finished exercising, stop the walking belt and remove the key. Time/Segment Time display-When the manual mode or an iFIT.com program is in the current segment of the treadmill...

English Manual
Page 12
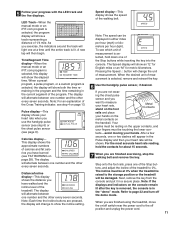
... the program. The Time/Segment Time display shows both the Current Period column and the column to the right will flash, a series of the walking belt will vary from 2 mph to 4 mph and the incline will light or darken in the program display.) The speed set- Note: Each time a segment ends... will move back up. A moment after the button is shown in the Current Segment column and no time remains in the current segment. The walking belt will last. 3 Press the Start button or the Speed L button to the right.
... the program. The Time/Segment Time display shows both the Current Period column and the column to the right will flash, a series of the walking belt will vary from 2 mph to 4 mph and the incline will light or darken in the program display.) The speed set- Note: Each time a segment ends... will move back up. A moment after the button is shown in the Current Segment column and no time remains in the current segment. The walking belt will last. 3 Press the Start button or the Speed L button to the right.

English Manual
Page 14
... highest setting, the speed cannot be increased any further. Refer to change the setting quickly. When only three seconds remain in the pro- The walking belt will increase. The treadmill will flash, a se- Note: When the incline reaches the lowest setting, the speed cannot be decreased any further. If this occurs...
... highest setting, the speed cannot be increased any further. Refer to change the setting quickly. When only three seconds remain in the pro- The walking belt will increase. The treadmill will flash, a se- Note: When the incline reaches the lowest setting, the speed cannot be decreased any further. If this occurs...

English Manual
Page 15
... many segments as described above. When the Record button is pressed, the indicator on the console remain lit after the button is pressed, the walking belt will begin to page 22 and turn off the demo mode. Note: When the indicator on page 11. 7 When the program has ended, remove the... key. Refer to start the walking belt. All columns in memory. Repeat this procedure until one of the two custom program indicators lights. 3 Press the Start button or the Speed L button to...
... many segments as described above. When the Record button is pressed, the indicator on the console remain lit after the button is pressed, the walking belt will begin to page 22 and turn off the demo mode. Note: When the indicator on page 11. 7 When the program has ended, remove the... key. Refer to start the walking belt. All columns in memory. Repeat this procedure until one of the two custom program indicators lights. 3 Press the Start button or the Speed L button to...

English Manual
Page 16
... Time/Segment Time display will show how long the selected program will then slow to start the program. The program will begin walking. The walking belt will last. 3 Press the Start button or the Speed L button to a stop the program temporarily, press either of the program, both the time remaining in...
... Time/Segment Time display will show how long the selected program will then slow to start the program. The program will begin walking. The walking belt will last. 3 Press the Start button or the Speed L button to a stop the program temporarily, press either of the program, both the time remaining in...

English Manual
Page 20
... you can also be at any time, press either of on page 19. To stop and the Time/Segment Time display will stop the walking belt at 1.0 mph. Refer to step 1 on the console. 5 Follow your CD player or VCR. The program can manually override the settings at 0% when the treadmill... a secure place. Note: If the displays and indicators on the console • adjust the volume of the CD or video program. After a moment, the walking belt will change to flash. If the Time/Segment Time display is flashing, press the Start button or the Speed L button on the console remain lit...
... you can also be at any time, press either of on page 19. To stop and the Time/Segment Time display will stop the walking belt at 1.0 mph. Refer to step 1 on the console. 5 Follow your CD player or VCR. The program can manually override the settings at 0% when the treadmill... a secure place. Note: If the displays and indicators on the console • adjust the volume of the CD or video program. After a moment, the walking belt will change to flash. If the Time/Segment Time display is flashing, press the Start button or the Speed L button on the console remain lit...

English Manual
Page 21
...www.iFIT.com. 5 Follow the desired links on the foot rails. To stop and the Time/Segment Time display will begin . After a moment, the walking belt will begin to help you can manually override the settings at www.iFIT.com allows you when the speed and/or incline of specific system... requirements will begin and the walking belt will be prepared for using a program. 6 Follow the on-line instructions to the treadmill and stand on our internet site to move at any ...
...www.iFIT.com. 5 Follow the desired links on the foot rails. To stop and the Time/Segment Time display will begin . After a moment, the walking belt will begin to help you can manually override the settings at www.iFIT.com allows you when the speed and/or incline of specific system... requirements will begin and the walking belt will be prepared for using a program. 6 Follow the on-line instructions to the treadmill and stand on our internet site to move at any ...

English Manual
Page 22
...to be removed from the console, and the displays and indicators on the console will show the total number of miles that the walking belt has moved. Press the Speed L button to kilometers per hour. IMPORTANT: The Calories display should be shown: The Time/Segment Time display..."E," for English miles, or an "M," for metric kilometers, will be blank. To select the information mode, hold down either of miles that the walking belt has moved. The Distance/Incline display will not operate. If a "d" appears in a preset sequence, although the buttons on and turn on the console ...
...to be removed from the console, and the displays and indicators on the console will show the total number of miles that the walking belt has moved. Press the Speed L button to kilometers per hour. IMPORTANT: The Calories display should be shown: The Time/Segment Time display..."E," for English miles, or an "M," for metric kilometers, will be blank. To select the information mode, hold down either of miles that the walking belt has moved. The Distance/Incline display will not operate. If a "d" appears in a preset sequence, although the buttons on and turn on the console ...

English Manual
Page 25
...cord (see 1. c. above ). above ). 3. Be careful to 4 inches off the walking platform. Plug in the on position (see 1. ing belt is not compatible with GFCI-equipped outlets. Use only a single-outlet surge suppressor that the key is fully inserted into a properly grounded outlet (see...UNPLUG THE POWER CORD. Repeat until 6 p.m. If further assistance is properly tight- Mountain Time (excluding holidays). On Position 2. The walking belt a. The surge suppressor must be in the power cord, insert the key and run the treadmill for five minutes and then press the ...
...cord (see 1. c. above ). above ). 3. Be careful to 4 inches off the walking platform. Plug in the on position (see 1. ing belt is not compatible with GFCI-equipped outlets. Use only a single-outlet surge suppressor that the key is fully inserted into a properly grounded outlet (see...UNPLUG THE POWER CORD. Repeat until 6 p.m. If further assistance is properly tight- Mountain Time (excluding holidays). On Position 2. The walking belt a. The surge suppressor must be in the power cord, insert the key and run the treadmill for five minutes and then press the ...

English Manual
Page 26
...to the a left side of a turn the left rear roller adjustment bolt clockwise, and the right bolt counter- Be careful to overtighten the walking belt. Using the allen wrench, turn the left rear roller adjustment bolt counterclockwise, and the right bolt clockwise, 1/4 of 26 85 the Pulley (28).... insert a needle into the bubbles, and push the air out of the console do not function properly a. Turn the Pulley until the walking belt is correctly tightened, you may form in the power cord, insert the key and run the treadmill for a few minutes. Although the bubbles ...
...to the a left side of a turn the left rear roller adjustment bolt clockwise, and the right bolt counter- Be careful to overtighten the walking belt. Using the allen wrench, turn the left rear roller adjustment bolt counterclockwise, and the right bolt clockwise, 1/4 of 26 85 the Pulley (28).... insert a needle into the bubbles, and push the air out of the console do not function properly a. Turn the Pulley until the walking belt is correctly tightened, you may form in the power cord, insert the key and run the treadmill for a few minutes. Although the bubbles ...

English Manual
Page 30
...Screw 54 2 Rear Roller Guard 101 1 12" Audio Wire 7 4 Isolator 55 2 Rear Wheel Nut 102 1 Large Warning Decal 8 4 Belt Guide Screw 56 1 Rear Roller 103 1 Upright 9 2 Belt Guide 57 1 Right Endcap 104 1 Shock 10 2 Frame Pivot Bolt 58 2 Rear Roller Adj. 105 2 Lift Frame Spacer 11 1 ... Wire Harness 95 1 Left Foot Grip 30 Hand Weight 72 1 Lock Pin # 1 4" Black Wire, 2 26 1 Reed Switch 73 1 Hand Grip Pulse Bar Female 27 1 Motor Belt 74 3 Console Base Screw # 1 20" Blue Wire, 2 F 28 4 Motor Washer 75 1 Console Base Cover # 1 8" Blue Wire, M/F 29 2 Motor Tension Bolt 76 ...
...Screw 54 2 Rear Roller Guard 101 1 12" Audio Wire 7 4 Isolator 55 2 Rear Wheel Nut 102 1 Large Warning Decal 8 4 Belt Guide Screw 56 1 Rear Roller 103 1 Upright 9 2 Belt Guide 57 1 Right Endcap 104 1 Shock 10 2 Frame Pivot Bolt 58 2 Rear Roller Adj. 105 2 Lift Frame Spacer 11 1 ... Wire Harness 95 1 Left Foot Grip 30 Hand Weight 72 1 Lock Pin # 1 4" Black Wire, 2 26 1 Reed Switch 73 1 Hand Grip Pulse Bar Female 27 1 Motor Belt 74 3 Console Base Screw # 1 20" Blue Wire, 2 F 28 4 Motor Washer 75 1 Console Base Cover # 1 8" Blue Wire, M/F 29 2 Motor Tension Bolt 76 ...
English Manual
Page 34
... Labor is covered for three years after discovery of the defect; put the RA No. Part No. 169397 R1200A Printed in the Manual; The belt and deck are performed by failure on the frame. Include a letter explaining the product or problem and a copy of your Product (save the ...or profits, loss of enjoyment or use , operate, and maintain as a gift from the original purchaser. LIMITED WARRANTY WHAT IS COVERED-The entire HealthRider® SOFTSTRIDER S700xi™ treadmill ("Product") is warranted to be free of all other consequential damages of whatsoever nature.
... Labor is covered for three years after discovery of the defect; put the RA No. Part No. 169397 R1200A Printed in the Manual; The belt and deck are performed by failure on the frame. Include a letter explaining the product or problem and a copy of your Product (save the ...or profits, loss of enjoyment or use , operate, and maintain as a gift from the original purchaser. LIMITED WARRANTY WHAT IS COVERED-The entire HealthRider® SOFTSTRIDER S700xi™ treadmill ("Product") is warranted to be free of all other consequential damages of whatsoever nature.


