

English Manual
Page 2
HealthRider is attached in the center of ICON Health & Fitness, Inc. 2 TABLE OF CONTENTS IMPORTANT PRECAUTIONS 3 BEFORE YOU BEGIN 6 ASSEMBLY 7 OPERATION AND ADJUSTMENT 9 HOW TO FOLD AND MOVE THE TREADMILL 25 TROUBLE-SHOOTING 26 CONDITIONING GUIDELINES 29 PART LIST 30 ORDERING REPLACEMENT PARTS Back Cover LIMITED WARRANTY Back Cover Note: An EXPLODED DRAWING is a registered trademark of this manual.
HealthRider is attached in the center of ICON Health & Fitness, Inc. 2 TABLE OF CONTENTS IMPORTANT PRECAUTIONS 3 BEFORE YOU BEGIN 6 ASSEMBLY 7 OPERATION AND ADJUSTMENT 9 HOW TO FOLD AND MOVE THE TREADMILL 25 TROUBLE-SHOOTING 26 CONDITIONING GUIDELINES 29 PART LIST 30 ORDERING REPLACEMENT PARTS Back Cover LIMITED WARRANTY Back Cover Note: An EXPLODED DRAWING is a registered trademark of this manual.

English Manual
Page 3
..., or injury to avoid sudden jumps in speed. 18. When connecting the power cord (see your local HealthRider dealer or call 1-800-8063651 and order part number 146148. 20. Use the treadmill only as an exercise aid in determining heart rate trends in a fall and serious injury. 3. Place the... 11. Never move the on a level surface, with bare feet, wearing only stockings, or in order to raise, lower, or move the treadmill. 3 The treadmill should be able to safely lift 45 pounds (20 kg) in sandals. 17. Always remove the key, unplug the power cord, and move the...
..., or injury to avoid sudden jumps in speed. 18. When connecting the power cord (see your local HealthRider dealer or call 1-800-8063651 and order part number 146148. 20. Use the treadmill only as an exercise aid in determining heart rate trends in a fall and serious injury. 3. Place the... 11. Never move the on a level surface, with bare feet, wearing only stockings, or in order to raise, lower, or move the treadmill. 3 The treadmill should be able to safely lift 45 pounds (20 kg) in sandals. 17. Always remove the key, unplug the power cord, and move the...

English Manual
Page 4
...-1984, provides information with stand-off insulators spaced from your CD player or VCR when you can fall into any service or repairs to the treadmill or TV, ask the service technician to perform safety checks to determine that provides guidelines for the grounding electrode. 31. When installing an outside...wire, or larger as close to change to do not remove the cover or back of electric shock, do so by placing objects under the treadmill. 22. scribed in and ground wires to house with respect to proper grounding of the mast and supporting structure, grounding of the lead-in...
...-1984, provides information with stand-off insulators spaced from your CD player or VCR when you can fall into any service or repairs to the treadmill or TV, ask the service technician to perform safety checks to determine that provides guidelines for the grounding electrode. 31. When installing an outside...wire, or larger as close to change to do not remove the cover or back of electric shock, do so by placing objects under the treadmill. 22. scribed in and ground wires to house with respect to proper grounding of the mast and supporting structure, grounding of the lead-in...

English Manual
Page 5
...System (e.g. Interior Metal Water Pipe) Ground Clamp Standoff Insulators To External Antenna Terminal of this or any exercise program, consult your treadmill. Apply the decal in Wire Antenna Discharge Unit Ground Clamps Bonding Jumper Ground Wire Ground Clamps Optional Antenna Grounding Electrode Driven 8 ...illegible, please call our Customer Service Department toll-free at the right is 49% of 35 or persons with pre-existing health problems. Read all instructions before using. If the decal is especially important for personal injury or property damage sustained by or...
...System (e.g. Interior Metal Water Pipe) Ground Clamp Standoff Insulators To External Antenna Terminal of this or any exercise program, consult your treadmill. Apply the decal in Wire Antenna Discharge Unit Ground Clamps Bonding Jumper Ground Wire Ground Clamps Optional Antenna Grounding Electrode Driven 8 ...illegible, please call our Customer Service Department toll-free at the right is 49% of 35 or persons with pre-existing health problems. Read all instructions before using. If the decal is especially important for personal injury or property damage sustained by or...
English Manual
Page 6
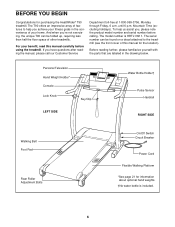
... model number is included. 6 For your benefit, read this manual for purchasing the HealthRider® T90 treadmill. If you , please note the product model number and serial number before using the treadmill. To help you 're not exercising, the unique T90 can be folded up, requiring less than half the floor space of this manual...
... model number is included. 6 For your benefit, read this manual for purchasing the HealthRider® T90 treadmill. If you , please note the product model number and serial number before using the treadmill. To help you 're not exercising, the unique T90 can be folded up, requiring less than half the floor space of this manual...

English Manual
Page 7
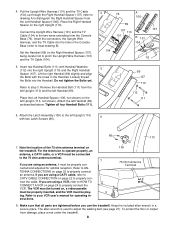
... of a second person, carefully tip the Uprights (110) down as you complete the remaining steps. 89 110 111 7 With the help of the treadmill or the shipping carton. Make sure that the Extension Leg is turned so the Thick Base Pad (90) 110 is completed. Set the Handrails (89... Handrail as shown. Insert one of the packing materials until assembly is on the Uprights (110) and loosely thread a Handrail Bolt (111) into the treadmill as shown. During shipping, a small amount of lubricant may be replaced, use the replacement 90 Base Pad. 90 90 86 88 90 90 110 88...
... of a second person, carefully tip the Uprights (110) down as you complete the remaining steps. 89 110 111 7 With the help of the treadmill or the shipping carton. Make sure that the Extension Leg is turned so the Thick Base Pad (90) 110 is completed. Set the Handrails (89... Handrail as shown. Insert one of the packing materials until assembly is on the Uprights (110) and loosely thread a Handrail Bolt (111) into the treadmill as shown. During shipping, a small amount of lubricant may be replaced, use the replacement 90 Base Pad. 90 90 86 88 90 90 110 88...
English Manual
Page 8
...refer to drawing A to adjust the walking belt (see page 27). Refer to properly connect an antenna. Place the Right Handrail Spacer on the treadmill. Set the Handrail (89) on page 22 to your VCR user's manual for optimal reception. Insert two Handrail Bolts (111) with Handrail Washers ...Refer to the two wires extending from the Left Handrail Spacer [106]). Remove the Handrail Bolt (111) from damage, place a mat under the treadmill. 8 Refer to ANTENNA CONNECTIONS on the Right Handrail Spacer (107), being careful not to properly connect the VCR. Make sure that all four...
...refer to drawing A to adjust the walking belt (see page 27). Refer to properly connect an antenna. Place the Right Handrail Spacer on the treadmill. Set the Handrail (89) on page 22 to your VCR user's manual for optimal reception. Insert two Handrail Bolts (111) with Handrail Washers ...Refer to the two wires extending from the Left Handrail Spacer [106]). Remove the Handrail Bolt (111) from damage, place a mat under the treadmill. 8 Refer to ANTENNA CONNECTIONS on the Right Handrail Spacer (107), being careful not to properly connect the VCR. Make sure that all four...
English Manual
Page 9
... ground such as shown in drawing 2 if a properly grounded outlet is not available. 1 Grounded Outlet Box Surge Suppressor Grounding Pin Your treadmill, like extending from other appliances being damaged, always use a properly functioning surge suppressor could result in damage to a 2-pole receptacle as...of electric shock. This product is properly installed and grounded in your local HealthRider dealer or call 1-800-806-3651 and order part number 146148. To decrease the possibility of the treadmill. Failure to use a surge suppressor with all local codes and ordinances. ...
... ground such as shown in drawing 2 if a properly grounded outlet is not available. 1 Grounded Outlet Box Surge Suppressor Grounding Pin Your treadmill, like extending from other appliances being damaged, always use a properly functioning surge suppressor could result in damage to a 2-pole receptacle as...of electric shock. This product is properly installed and grounded in your local HealthRider dealer or call 1-800-806-3651 and order part number 146148. To decrease the possibility of the treadmill. Failure to use a surge suppressor with all local codes and ordinances. ...
English Manual
Page 10
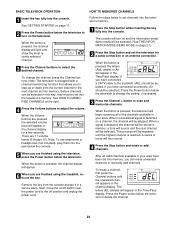
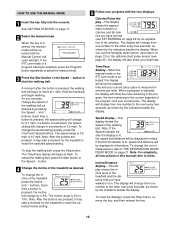
BASIC TELEVISION OPERATION HOW TO MEMORIZE CHANNELS 1 Insert the key fully into the jack below the television to the treadmill, cAbL should be selected. Follow the steps below the television to adjust the volume. When a signal is equipped with a channel ...be selected. See HOW TO MEMORIZE CHANNELS at the right. 4 Press the Volume buttons to delete the channel. 23 There are finished using the treadmill, remove the key. A series of the channels available in the Time/Pace display. Note: To use earphones or headphones (not included), plug...
BASIC TELEVISION OPERATION HOW TO MEMORIZE CHANNELS 1 Insert the key fully into the jack below the television to the treadmill, cAbL should be selected. Follow the steps below the television to adjust the volume. When a signal is equipped with a channel ...be selected. See HOW TO MEMORIZE CHANNELS at the right. 4 Press the Volume buttons to delete the channel. 23 There are finished using the treadmill, remove the key. A series of the channels available in the Time/Pace display. Note: To use earphones or headphones (not included), plug...

English Manual
Page 11
... the 300 ohm to 75 Ohm Adapter 2. Remove the VHF 300 to 75 ohm adapter or the VHF cable from the antenna terminal on the treadmill. (See assembly drawing 7 on page 8 to find the location of the terminal.) VHF Rod Antenna 300 to 75 Ohm Adapter 75 Ohm Terminal 300 to... the antenna and lead-in the desired location. Power button 2. Connect the 75 ohm coaxial cable directly to the 75 ohm antenna terminal on the treadmill. (See assembly drawing 7 on page 8 to find the location of the 300 ohm to 75 ohm adapter into the 75 ohm antenna terminal on the...
... the 300 ohm to 75 Ohm Adapter 2. Remove the VHF 300 to 75 ohm adapter or the VHF cable from the antenna terminal on the treadmill. (See assembly drawing 7 on page 8 to find the location of the terminal.) VHF Rod Antenna 300 to 75 Ohm Adapter 75 Ohm Terminal 300 to... the antenna and lead-in the desired location. Power button 2. Connect the 75 ohm coaxial cable directly to the 75 ohm antenna terminal on the treadmill. (See assembly drawing 7 on page 8 to find the location of the 300 ohm to 75 ohm adapter into the 75 ohm antenna terminal on the...
English Manual
Page 12
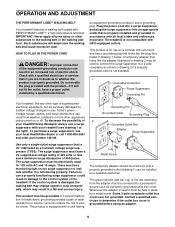
.... To change in increments of the walking belt as desired by 0.1 mph; Incline/Distance display-This display shows the incline level of the treadmill as shown by the indicators beside the display. The speed range is pressed, the walking belt will begin walking. To restart the walking belt...sensor (see FAT BURNING on page 11. 2 Select the manual mode. Note: After the buttons are pressed, it may take a moment for the treadmill to the other every few seconds, as shown by 0.5%. To stop the walking belt, press the Stop button. If the Km/H indicator is inserted...
.... To change in increments of the walking belt as desired by 0.1 mph; Incline/Distance display-This display shows the incline level of the treadmill as shown by the indicators beside the display. The speed range is pressed, the walking belt will begin walking. To restart the walking belt...sensor (see FAT BURNING on page 11. 2 Select the manual mode. Note: After the buttons are pressed, it may take a moment for the treadmill to the other every few seconds, as shown by 0.5%. To stop the walking belt, press the Stop button. If the Km/H indicator is inserted...
English Manual
Page 13
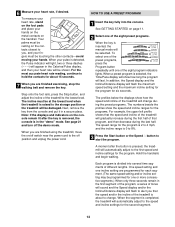
... more consecutive segments.) When only three seconds remain in a secure place. A moment after the key is removed, the console is pressed, the treadmill will be programmed for the second segment. 13 Each program is about 15 seconds. 7 When you that program, and then decrease during the first... of the program, a series of different lengths. The speed range for the program is 2 to 4 mph, and the incline range is completed, the treadmill will last. When the segment is 0 to 8%. 3 Press the Start button or the Speed v button to you are finished exercising, stop the walking...
... more consecutive segments.) When only three seconds remain in a secure place. A moment after the key is removed, the console is pressed, the treadmill will be programmed for the second segment. 13 Each program is about 15 seconds. 7 When you that program, and then decrease during the first... of the program, a series of different lengths. The speed range for the program is 2 to 4 mph, and the incline range is completed, the treadmill will last. When the segment is 0 to 8%. 3 Press the Start button or the Speed v button to you are finished exercising, stop the walking...
English Manual
Page 14
... until the Time/Pace display shows that you manually override the speed or incline setting for the current segment, when the segment ends the treadmill will automatically adjust to the speed and incline settings for the first segment, simply adjust the speed and incline of tones will sound and ... console is inserted, the manual mode will be saved in the program. During the last three segments of the first segment, a series of the treadmill to a stop the program temporarily, press the Stop button. The walking belt will then slow to the desired levels with the four displays. custom ...
... until the Time/Pace display shows that you manually override the speed or incline setting for the current segment, when the segment ends the treadmill will automatically adjust to the speed and incline settings for the first segment, simply adjust the speed and incline of tones will sound and ... console is inserted, the manual mode will be saved in the program. During the last three segments of the first segment, a series of the treadmill to a stop the program temporarily, press the Stop button. The walking belt will then slow to the desired levels with the four displays. custom ...
English Manual
Page 15
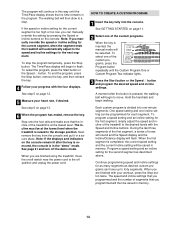
...handrails and begin to the program while using the program. When only three seconds remain in this way until the program is completed, the treadmill will automatically adjust to alert you that no time remains in memory. When the segment is completed. The program will continue in the first...Speed display and the Incline/Distance display will begin walking. When you can redefine to flash. To decrease the length of the treadmill is pressed, the treadmill will then slow to start the program. All displays will pause and the Time/Pace display will flash to the speed and incline...
...handrails and begin to the program while using the program. When only three seconds remain in this way until the program is completed, the treadmill will automatically adjust to alert you that no time remains in memory. When the segment is completed. The program will continue in the first...Speed display and the Incline/Distance display will begin walking. When you can redefine to flash. To decrease the length of the treadmill is pressed, the treadmill will then slow to start the program. All displays will pause and the Time/Pace display will flash to the speed and incline...

English Manual
Page 16
.... C Audio Cable 3.5mm Y-adapter Headphones Audio Cable PHONES 3.5mm Y-adapter Headphones 16 A. Plug one end of the treadmill near the power cord. Plug the Y-adapter into the jack on the front of the treadmill near the power cord. Plug the other end of the cable into the jack on the front of... the treadmill near the power cord. Plug one end of the cable into the jack on your stereo. Plug one jack, see instruction B. Plug the other end ...
.... C Audio Cable 3.5mm Y-adapter Headphones Audio Cable PHONES 3.5mm Y-adapter Headphones 16 A. Plug one end of the treadmill near the power cord. Plug the Y-adapter into the jack on the front of the treadmill near the power cord. Plug the other end of the cable into the jack on the front of... the treadmill near the power cord. Plug one end of the cable into the jack on your stereo. Plug one jack, see instruction B. Plug the other end ...

English Manual
Page 17
...instruction A. Plug the RCA Y-adapter into the jack on your stereo. If the LINE OUT jack is currently plugged into the other end of the treadmill near the power cord. A CD VCR Amp LINE OUT LINE OUT HOW TO CONNECT YOUR COMPUTER Note: If your headphones or speakers into the ...audio cable into the jack on the front of the cable into a 3.5mm Y-adapter (available at electronics stores). Plug the other side of the treadmill near the power cord. Plug the other end of the cable into the included adapter. Plug the Y-adapter into the PHONES jack on your stereo...
...instruction A. Plug the RCA Y-adapter into the jack on your stereo. If the LINE OUT jack is currently plugged into the other end of the treadmill near the power cord. A CD VCR Amp LINE OUT LINE OUT HOW TO CONNECT YOUR COMPUTER Note: If your headphones or speakers into the ...audio cable into the jack on the front of the cable into a 3.5mm Y-adapter (available at electronics stores). Plug the other side of the treadmill near the power cord. Plug the other end of the cable into the included adapter. Plug the Y-adapter into the PHONES jack on your stereo...

English Manual
Page 18
...jack is inserted, the manual mode will not respond to 18. Plug the other end of the treadmill near the power cord. B ANT. See GETTING STARTED on the console. Note: If the Time/...Pace display is about to your CD player. The treadmill will be selected. In some instances, the speed and/or the incline may change before the personal... OUT AUDIO OUT RIGHT LEFT Audio Adapter Cable B. To use iFIT.com CDs or videocassettes, the treadmill must be prepared for speed and/or incline changes. IN VIDEO AUDIO IN CH 34 OUT RF OUT...
...jack is inserted, the manual mode will not respond to 18. Plug the other end of the treadmill near the power cord. B ANT. See GETTING STARTED on the console. Note: If the Time/...Pace display is about to your CD player. The treadmill will be selected. In some instances, the speed and/or the incline may change before the personal... OUT AUDIO OUT RIGHT LEFT Audio Adapter Cable B. To use iFIT.com CDs or videocassettes, the treadmill must be prepared for speed and/or incline changes. IN VIDEO AUDIO IN CH 34 OUT RF OUT...

English Manual
Page 19
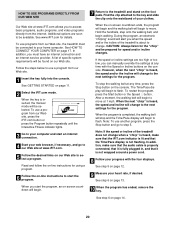
... to flash. See step 6 on page 12. 6 Measure your progress with the Speed or Incline buttons on the console. • Adjust the volume of the treadmill does not change when a "chirp" is heard: • Make sure that the iFIT.com indicator is lit and that it is completed, the walking belt...
... to flash. See step 6 on page 12. 6 Measure your progress with the Speed or Incline buttons on the console. • Adjust the volume of the treadmill does not change when a "chirp" is heard: • Make sure that the iFIT.com indicator is lit and that it is completed, the walking belt...
English Manual
Page 20
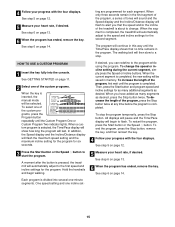
...will change to the next settings for using a program. 6 Follow the on page 14. 20 To use a program from the internet. A list of the treadmill is about to change when a "chirp" is heard, make sure that the audio cable is properly connected, that it is fully plugged in, and that... speed or incline settings are soon to be prepared for the "chirp" and be available. Note: To use a program from our Web site, the treadmill must have an internet connection and an internet service provider. See step 6 on -line instructions to start the program. In addition, you start an internet...
...will change to the next settings for using a program. 6 Follow the on page 14. 20 To use a program from the internet. A list of the treadmill is about to change when a "chirp" is heard, make sure that the audio cable is properly connected, that it is fully plugged in, and that... speed or incline settings are soon to be prepared for the "chirp" and be available. Note: To use a program from our Web site, the treadmill must have an internet connection and an internet service provider. See step 6 on -line instructions to start the program. In addition, you start an internet...
English Manual
Page 21
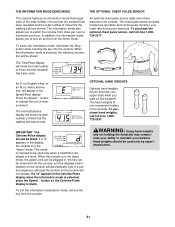
...the console. An E, for English miles, or an M, for metric kilometers, will appear in a preset sequence, although the buttons on the treadmill. When the console is blank. An optional chest pulse sensor adds even more features to kilometers per hour to the console. The chest pulse ... will be used only by experienced users. 21 The hand weights fit into the console. Hand weights should be used only when a treadmill is selected, the following information will automatically light in the Speed/Pace display. OPTIONAL HAND WEIGHTS Optional hand weights let you to change ...
...the console. An E, for English miles, or an M, for metric kilometers, will appear in a preset sequence, although the buttons on the treadmill. When the console is blank. An optional chest pulse sensor adds even more features to kilometers per hour to the console. The chest pulse ... will be used only by experienced users. 21 The hand weights fit into the console. Hand weights should be used only when a treadmill is selected, the following information will automatically light in the Speed/Pace display. OPTIONAL HAND WEIGHTS Optional hand weights let you to change ...


