
English Manual
Page 2
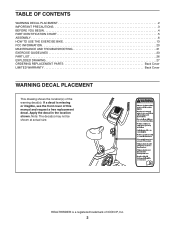
...a free replacement decal. HEALTHRIDER is missing or illegible, see the front cover of ICON IP, Inc. 2 TABLE OF CONTENTS WARNING DECAL PLACEMENT 2 IMPORTANT PRECAUTIONS 3 BEFORE YOU BEGIN 4 PART IDENTIFICATION CHART 5 ASSEMBLY 6 HOW TO USE THE EXERCISE BIKE 13 FCC INFORMATION 20 ...MAINTENANCE AND TROUBLESHOOTING 21 EXERCISE GUIDELINES 23 PART LIST 26 EXPLODED DRAWING 27 ORDERING REPLACEMENT PARTS Back Cover LIMITED WARRANTY Back Cover WARNING...
...a free replacement decal. HEALTHRIDER is missing or illegible, see the front cover of ICON IP, Inc. 2 TABLE OF CONTENTS WARNING DECAL PLACEMENT 2 IMPORTANT PRECAUTIONS 3 BEFORE YOU BEGIN 4 PART IDENTIFICATION CHART 5 ASSEMBLY 6 HOW TO USE THE EXERCISE BIKE 13 FCC INFORMATION 20 ...MAINTENANCE AND TROUBLESHOOTING 21 EXERCISE GUIDELINES 23 PART LIST 26 EXPLODED DRAWING 27 ORDERING REPLACEMENT PARTS Back Cover LIMITED WARRANTY Back Cover WARNING...
English Manual
Page 3
...property damage sustained by persons weighing more than 275 lbs. (125 kg). 3. Keep the exercise bike indoors, away from the exercise bike at least 2 ft. (0.6 m) of clearance around the exercise bike. 14. The exercise bike does not have a freewheel; Inspect and properly tighten all parts regularly. This is the... responsibility of the owner to move until the flywheel stops. do not arch your exercise bike. Always keep your back straight while using your back. 13. The heart rate monitor is intended for foot protection. 10. ...
...property damage sustained by persons weighing more than 275 lbs. (125 kg). 3. Keep the exercise bike indoors, away from the exercise bike at least 2 ft. (0.6 m) of clearance around the exercise bike. 14. The exercise bike does not have a freewheel; Inspect and properly tighten all parts regularly. This is the... responsibility of the owner to move until the flywheel stops. do not arch your exercise bike. Always keep your back straight while using your back. 13. The heart rate monitor is intended for foot protection. 10. ...
English Manual
Page 4
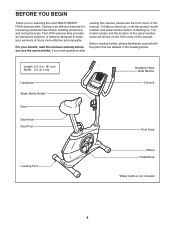
... Holder* Seat Seat Knob Seat Post Handgrip Heart Rate Monitor Console Post Knob Leveling Foot Wheel Pedal/Strap *Water bottle is an effective exercise for selecting the new HEALTHRIDER® H10X exercise bike. Length: 2 ft. 8 in the drawing below. To help us . Before reading further, please familiarize yourself with the parts that are shown on...
... Holder* Seat Seat Knob Seat Post Handgrip Heart Rate Monitor Console Post Knob Leveling Foot Wheel Pedal/Strap *Water bottle is an effective exercise for selecting the new HEALTHRIDER® H10X exercise bike. Length: 2 ft. 8 in the drawing below. To help us . Before reading further, please familiarize yourself with the parts that are shown on...
English Manual
Page 12
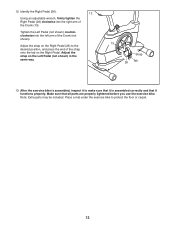
Place a mat under the exercise bike to make sure that it functions properly. Tighten the Left Pedal (not shown) counterclockwise into the right arm of the Crank (13). Make sure that ... position, and press the end of the Crank (not shown). Note: Extra parts may be included. After the exercise bike is assembled correctly and that all parts are properly tightened before you use the exercise bike. Identify the Right Pedal (26). 12 Using an adjustable wrench, firmly tighten the Right Pedal (26) clockwise into...
Place a mat under the exercise bike to make sure that it functions properly. Tighten the Left Pedal (not shown) counterclockwise into the right arm of the Crank (13). Make sure that ... position, and press the end of the Crank (not shown). Note: Extra parts may be included. After the exercise bike is assembled correctly and that all parts are properly tightened before you use the exercise bike. Identify the Right Pedal (26). 12 Using an adjustable wrench, firmly tighten the Right Pedal (26) clockwise into...
English Manual
Page 13
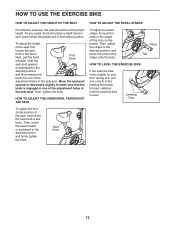
... position, and press the ends of the adjustment holes in one of the straps onto the tabs. Strap Tab HOW TO LEVEL THE EXERCISE BIKE If the exercise bike rocks slightly on the pedals. Then, tighten the knob. Leveling Feet To adjust the horizontal position of the leveling feet under the rear... stabilizer until the exercise bike is engaged in the seat post. Seat Knob 13 Next, pull the knob outward, slide the Post Knob seat post upward or downward to...
... position, and press the ends of the adjustment holes in one of the straps onto the tabs. Strap Tab HOW TO LEVEL THE EXERCISE BIKE If the exercise bike rocks slightly on the pedals. Then, tighten the knob. Leveling Feet To adjust the horizontal position of the leveling feet under the rear... stabilizer until the exercise bike is engaged in the seat post. Seat Knob 13 Next, pull the knob outward, slide the Post Knob seat post upward or downward to...
English Manual
Page 19
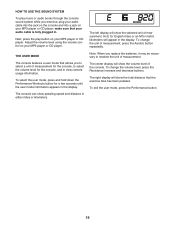
... TO USE THE SOUND SYSTEM To play button on your MP3 player or CD player. THE USER MODE The console features a user mode that the exercise bike has been pedaled. The left display will show the total distance that allows you replace the batteries, it may be necessary to select the volume... M for metric kilometers will show the volume level of measurement. Next, press the play music or audio books through the console sound system while you exercise, plug your audio cable into the jack on the console and into a jack on your MP3 player or CD player. The console can show the...
... TO USE THE SOUND SYSTEM To play button on your MP3 player or CD player. THE USER MODE The console features a user mode that the exercise bike has been pedaled. The left display will show the total distance that allows you replace the batteries, it may be necessary to select the volume... M for metric kilometers will show the volume level of measurement. Next, press the play music or audio books through the console sound system while you exercise, plug your audio cable into the jack on the console and into a jack on your MP3 player or CD player. The console can show the...
English Manual
Page 21
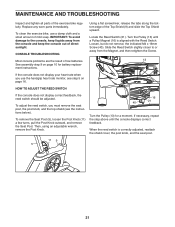
... or away from the console and keep the console out of direct sunlight. Using a flat screwdriver, release the tabs along the bottom edge of the exercise bike regularly. Loosen, but do not remove, the indicated M4 x 16mm Screw (40). Slide the Reed Switch slightly closer to the console, keep liquids away from... the shield cover, the post knob, and the seat post. 11 9 5 21 When the reed switch is aligned with the Reed Switch. To clean the exercise bike, use the handgrip heart rate monitor, see the instructions below). See assembly step 9 on page 16.
... or away from the console and keep the console out of direct sunlight. Using a flat screwdriver, release the tabs along the bottom edge of the exercise bike regularly. Loosen, but do not remove, the indicated M4 x 16mm Screw (40). Slide the Reed Switch slightly closer to the console, keep liquids away from... the shield cover, the post knob, and the seat post. 11 9 5 21 When the reed switch is aligned with the Reed Switch. To clean the exercise bike, use the handgrip heart rate monitor, see the instructions below). See assembly step 9 on page 16.


