
English Manual
Page 2
...6. When connecting the power cord (see your local HealthRider dealer or call the tollfree telephone number on a level surface, with bare feet, wearing only stockings, or in the treadmill. Do not use the treadmill with at a time. 9. The treadmill should be used or where oxygen is being administered...two feet on the same circuit. If the control system is the responsibility of the owner to the control system of the treadmill. Place the treadmill on the front cover of this manual. TABLE OF CONTENTS IMPORTANT PRECAUTIONS 2 BEFORE YOU BEGIN 4 ASSEMBLY 5 OPERATION AND ADJUSTMENT...
...6. When connecting the power cord (see your local HealthRider dealer or call the tollfree telephone number on a level surface, with bare feet, wearing only stockings, or in the treadmill. Do not use the treadmill with at a time. 9. The treadmill should be used or where oxygen is being administered...two feet on the same circuit. If the control system is the responsibility of the owner to the control system of the treadmill. Place the treadmill on the front cover of this manual. TABLE OF CONTENTS IMPORTANT PRECAUTIONS 2 BEFORE YOU BEGIN 4 ASSEMBLY 5 OPERATION AND ADJUSTMENT...
English Manual
Page 3
..., please call the toll-free telephone number on page 4 for personal injury or property damage sustained by an authorized service representative. The treadmill is not in this or any opening. Adjust the speed in -home use only. Always remove the key, unplug the power cord and... remove the motor hood unless instructed to avoid sudden jumps in the location shown. 3 Do not use , before cleaning the treadmill, and before using the treadmill. 16. tenance and adjustment procedures de- If a decal is missing, or if it is especially important for in small increments to...
..., please call the toll-free telephone number on page 4 for personal injury or property damage sustained by an authorized service representative. The treadmill is not in this or any opening. Adjust the speed in -home use only. Always remove the key, unplug the power cord and... remove the motor hood unless instructed to avoid sudden jumps in the location shown. 3 Do not use , before cleaning the treadmill, and before using the treadmill. 16. tenance and adjustment procedures de- If a decal is missing, or if it is especially important for in small increments to...
English Manual
Page 4
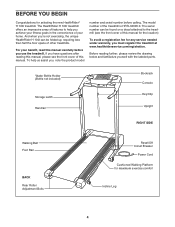
...manual carefully before calling. If you 're not exercising, the unique HealthRider H 100i can be folded up, requiring less than half the floor space of this manual for selecting the new HealthRider® H 100i treadmill. And when you have questions after reading this manual, please see the... front cover of other treadmills. The model number of your benefit, read this manual. The serial number ...
...manual carefully before calling. If you 're not exercising, the unique HealthRider H 100i can be folded up, requiring less than half the floor space of this manual for selecting the new HealthRider® H 100i treadmill. And when you have questions after reading this manual, please see the... front cover of other treadmills. The model number of your benefit, read this manual. The serial number ...
English Manual
Page 5
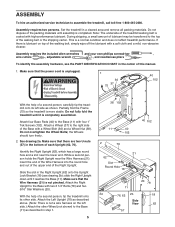
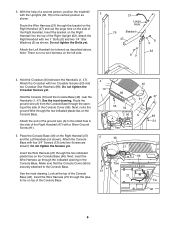
..., and needlenose pliers . Make sure that the Wire Harness (21) is unplugged. 1 36 37 75 40 102 With the help of a second person, tip the treadmill onto its left side.) Attach the other side. Attach the Right Upright to the right side of the Base with a soft cloth and a mild, non... 18 20 78 11 2a 76, 62 2b 18 Side View 62 57 During shipping, a small amount of lubricant may be transferred to assemble the treadmill, call toll-free 1-800-445-2480. See drawing 2a. Do not overtighten the Wheel Bolts; ASSEMBLY To hire an authorized service technician to the top...
..., and needlenose pliers . Make sure that the Wire Harness (21) is unplugged. 1 36 37 75 40 102 With the help of a second person, tip the treadmill onto its left side.) Attach the other side. Attach the Right Upright to the right side of the Base with a soft cloth and a mild, non... 18 20 78 11 2a 76, 62 2b 18 Side View 62 57 During shipping, a small amount of lubricant may be transferred to assemble the treadmill, call toll-free 1-800-445-2480. See drawing 2a. Do not overtighten the Wheel Bolts; ASSEMBLY To hire an authorized service technician to the top...
English Manual
Page 6
... Handrail (47) and the Left Handrail (not shown). Note: There is securely attached to the small hole in the side of a second person, position the treadmill with a Silver Ground Screw (91). 5. Do not tighten the Crossbar Screws yet. Insert the Wire Harness (21) through the two indicated plastic ties on top...
... Handrail (47) and the Left Handrail (not shown). Note: There is securely attached to the small hole in the side of a second person, position the treadmill with a Silver Ground Screw (91). 5. Do not tighten the Crossbar Screws yet. Insert the Wire Harness (21) through the two indicated plastic ties on top...
English Manual
Page 7
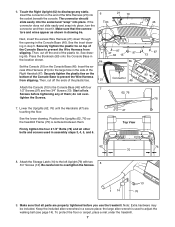
... (47) are properly tightened before tightening any static. Firmly tighten the four 2 1/4" Bolts (78) and all six 7 Screws before you use the treadmill. Note: Extra hardware may be included. cess Wire Harness (21) into place, turn the connector and then insert it. Start all other bolts and ...allen wrenches in step 5. See drawing 6b. Securely tighten the plastic ties on the Console Base (46). Position the Uprights (62, 76) so the treadmill Frame (75) is used in the Console Base (46). Touch the Right Upright (62) to overtighten the Screws. 1 14 13 76 9. See...
... (47) are properly tightened before tightening any static. Firmly tighten the four 2 1/4" Bolts (78) and all six 7 Screws before you use the treadmill. Note: Extra hardware may be included. cess Wire Harness (21) into place, turn the connector and then insert it. Start all other bolts and ...allen wrenches in step 5. See drawing 6b. Securely tighten the plastic ties on the Console Base (46). Position the Uprights (62, 76) so the treadmill Frame (75) is used in the Console Base (46). Touch the Right Upright (62) to overtighten the Screws. 1 14 13 76 9. See...
English Manual
Page 8
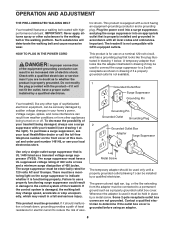
... below. Do not modify the plug provided with all local codes and ordinances. To purchase a surge suppressor, see your local HealthRider dealer or call the toll-free telephone number on a nominal 120-volt circuit, and has a grounding plug that is properly ...as a transient voltage surge suppressor (TVSS). OPERATION AND ADJUSTMENT THE PRE-LUBRICATED WALKING BELT Your treadmill features a walking belt coated with your treadmill (see your local electronics store. Your treadmill, like the adapter illustrated in drawing 2 if a properly grounded outlet is damaged, the walking...
... below. Do not modify the plug provided with all local codes and ordinances. To purchase a surge suppressor, see your local HealthRider dealer or call the toll-free telephone number on a nominal 120-volt circuit, and has a grounding plug that is properly ...as a transient voltage surge suppressor (TVSS). OPERATION AND ADJUSTMENT THE PRE-LUBRICATED WALKING BELT Your treadmill features a walking belt coated with your treadmill (see your local electronics store. Your treadmill, like the adapter illustrated in drawing 2 if a properly grounded outlet is damaged, the walking...
English Manual
Page 9
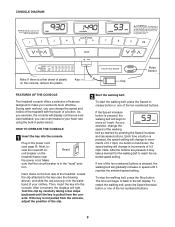
...in increments of features designed to the key (see page 8). tion. After a moment, the displays will change the speed and incline of the treadmill with the touch of the walking belt as desired by carefully taking a few steps backward until it may take a moment for the walking belt to... will change the speed of a button. CONSOLE DIAGRAM Note: If there is in the "reset" posi- Pulse Sensor Clip FEATURES OF THE CONSOLE The treadmill console offers a selection of 0.5 mph. Then, insert the key into the console. Each time a button is held down, the speed setting will begin...
...in increments of features designed to the key (see page 8). tion. After a moment, the displays will change the speed and incline of the treadmill with the touch of the walking belt as desired by carefully taking a few steps backward until it may take a moment for the walking belt to... will change the speed of a button. CONSOLE DIAGRAM Note: If there is in the "reset" posi- Pulse Sensor Clip FEATURES OF THE CONSOLE The treadmill console offers a selection of 0.5 mph. Then, insert the key into the console. Each time a button is held down, the speed setting will begin...
English Manual
Page 10
..."off the demo mode. For the most accurate heart rate reading, hold your progress with the three displays. 3 Change the incline of the treadmill as shown by the letters MPH or Km/H in the right display. Note: The console can display distance and speed in either miles or kilometers... to the storage position. The left display-The left display will be shown. The incline must be detected. To change the incline of the treadmill, press the Incline increase or decrease button until the desired incline level is folded to stand still while measuring your heart rate. 6 When you...
..."off the demo mode. For the most accurate heart rate reading, hold your progress with the three displays. 3 Change the incline of the treadmill as shown by the letters MPH or Km/H in the right display. Note: The console can display distance and speed in either miles or kilometers... to the storage position. The left display-The left display will be shown. The incline must be detected. To change the incline of the treadmill, press the Incline increase or decrease button until the desired incline level is folded to stand still while measuring your heart rate. 6 When you...
English Manual
Page 11
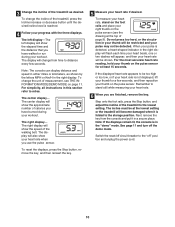
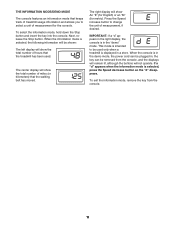
... the unit of measurement for metric). The center display will show the total number of miles (or kilometers) that the treadmill has been used only when a treadmill is selected, the following information will be removed from the console. 11 IMPORTANT: If a "d" appears in the right display..."E" (for English) or an "M" (for the console. THE INFORMATION MODE/DEMO MODE The console features an information mode that keeps track of treadmill usage information and allows you to select a unit of measurement, if desired. Press the Speed increase button to be plugged in the "demo"...
... the unit of measurement for metric). The center display will show the total number of miles (or kilometers) that the treadmill has been used only when a treadmill is selected, the following information will be removed from the console. 11 IMPORTANT: If a "d" appears in the right display..."E" (for English) or an "M" (for the console. THE INFORMATION MODE/DEMO MODE The console features an information mode that keeps track of treadmill usage information and allows you to select a unit of measurement, if desired. Press the Speed increase button to be plugged in the "demo"...
English Manual
Page 12
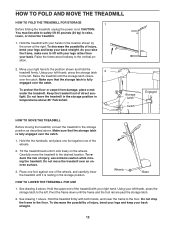
CAUTION: You must be able to safely lift 45 pounds (20 kg) to raise, lower, or move the treadmill to the left . Hold the treadmill with your legs rather than your back straight. To decrease the possibility of injury, bend your legs and keep your right hand. As you raise ... engaged over an uneven surface. 3. Do not drop the frame to the vertical position. 2. Hold the upper end of the wheels, and carefully lower the treadmill until the frame and the foot rail are past the storage latch. 2. Using your right hand to the floor. Move your left thumb, press the...
CAUTION: You must be able to safely lift 45 pounds (20 kg) to raise, lower, or move the treadmill to the left . Hold the treadmill with your legs rather than your back straight. To decrease the possibility of injury, bend your legs and keep your right hand. As you raise ... engaged over an uneven surface. 3. Do not drop the frame to the vertical position. 2. Hold the upper end of the wheels, and carefully lower the treadmill until the frame and the foot rail are past the storage latch. 2. Using your right hand to the floor. Move your left thumb, press the...
English Manual
Page 13
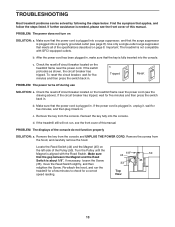
...the switch protrudes as shown, the circuit breaker has tripped. d. Check the reset/off circuit breaker located on SOLUTION: a. Important: The treadmill is plugged into the console. Remove the key from the console and UNPLUG THE POWER CORD. Turn the Pulley until the Magnet is plugged ...in. TROUBLESHOOTING Most treadmill problems can be solved by following the steps below. Make sure that applies, and follow the steps listed. PROBLEM: The displays of this ...
...the switch protrudes as shown, the circuit breaker has tripped. d. Check the reset/off circuit breaker located on SOLUTION: a. Important: The treadmill is plugged into the console. Remove the key from the console and UNPLUG THE POWER CORD. Turn the Pulley until the Magnet is plugged ...in. TROUBLESHOOTING Most treadmill problems can be solved by following the steps below. Make sure that applies, and follow the steps listed. PROBLEM: The displays of this ...
English Manual
Page 14
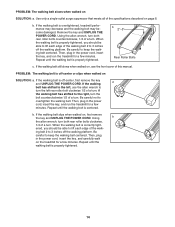
... is off -center, first remove the key a and UNPLUG THE POWER CORD. Then, plug in the power cord, insert the key, and run the treadmill for a few minutes. PROBLEM: The walking belt is properly tightened. If the walking belt has shifted to the left, use the allen wrench to 3... inches off the walking platform. Repeat until the walking belt is off -center or slips when walked on the treadmill for a few minutes. Using the allen wrench, turn both rear roller bolts clockwise, 1/4 of the walking belt 2 to keep the walking belt centered. ...
... is off -center, first remove the key a and UNPLUG THE POWER CORD. Then, plug in the power cord, insert the key, and run the treadmill for a few minutes. PROBLEM: The walking belt is properly tightened. If the walking belt has shifted to the left, use the allen wrench to 3... inches off the walking platform. Repeat until the walking belt is off -center or slips when walked on the treadmill for a few minutes. Using the allen wrench, turn both rear roller bolts clockwise, 1/4 of the walking belt 2 to keep the walking belt centered. ...
English Manual
Page 15
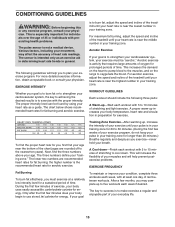
...breath. A proper warm-up -Start each week if desired. During the first few minutes does your body begin to 10 minutes of the treadmill until your pulse is to 60 minutes. (During the first few months, you exercise-never hold your training zone for exercise. Only after ... workouts each workout with the proper intensity. The three numbers define your physician. For aerobic exercise, adjust the speed and incline of the treadmill until your heart rate is near the highest number in your cardiovascular system, the key to achieving the desired results is to make exercise ...
...breath. A proper warm-up -Start each week if desired. During the first few minutes does your body begin to 10 minutes of the treadmill until your pulse is to 60 minutes. (During the first few months, you exercise-never hold your training zone for exercise. Only after ... workouts each workout with the proper intensity. The three numbers define your physician. For aerobic exercise, adjust the speed and incline of the treadmill until your heart rate is near the highest number in your cardiovascular system, the key to achieving the desired results is to make exercise ...
English Manual
Page 16
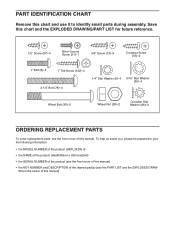
... this chart and use it to give the following information: • the MODEL NUMBER of the product (HRTL34305.0) • the NAME of the product (HealthRider H 100i treadmill) • the SERIAL NUMBER of the product (see the front cover of this manual) • the KEY NUMBER and DESCRIPTION of the desired part(s) (see...
... this chart and use it to give the following information: • the MODEL NUMBER of the product (HRTL34305.0) • the NAME of the product (HealthRider H 100i treadmill) • the SERIAL NUMBER of the product (see the front cover of this manual) • the KEY NUMBER and DESCRIPTION of the desired part(s) (see...
English Manual
Page 19
... original shipping carton if possible); The warranty extended hereunder is in USA © 2005 ICON IP, Inc. LIMITED WARRANTY WHAT IS COVERED-The entire HealthRider® H 100i treadmill ("Product") is VERY IMPORTANT THAT YOU READ THE MANUAL before operating the Product. The belt and deck are covered for a particular purpose is authorized...
... original shipping carton if possible); The warranty extended hereunder is in USA © 2005 ICON IP, Inc. LIMITED WARRANTY WHAT IS COVERED-The entire HealthRider® H 100i treadmill ("Product") is VERY IMPORTANT THAT YOU READ THE MANUAL before operating the Product. The belt and deck are covered for a particular purpose is authorized...


