
Operation Manual
Page 3
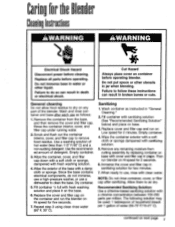
...service/repair specialists • Do not use a the container since the blender would be followed, including the following: • ...blender or container • Plug into blender container while operating blender. • To prevent damage to blender. When using • To reduce risk of blender container while operating blender. base in operation. If blending action stops during operation, turn blender OFF, remove container from container... submerge or wash the blender injury, keep hands and utensils out of personal injury and to blender, container, or cutter assembly, ...
...service/repair specialists • Do not use a the container since the blender would be followed, including the following: • ...blender or container • Plug into blender container while operating blender. • To prevent damage to blender. When using • To reduce risk of blender container while operating blender. base in operation. If blending action stops during operation, turn blender OFF, remove container from container... submerge or wash the blender injury, keep hands and utensils out of personal injury and to blender, container, or cutter assembly, ...
Operation Manual
Page 4
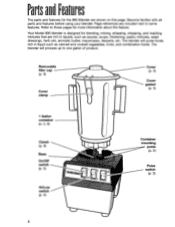
... 990 blender is designed for more information about the feature. Page references are included next to one gallon of product. The blender will process up to some features. The blender will puree foods rich in liquids, such as canned and cooked vegetables, fruits, and combination foods. Removable filler cap (p. 6) Cover clamp Cover (P• 5) Cover gasket (p. 5) 1 Gallon container...
... 990 blender is designed for more information about the feature. Page references are included next to one gallon of product. The blender will process up to some features. The blender will puree foods rich in liquids, such as canned and cooked vegetables, fruits, and combination foods. Removable filler cap (p. 6) Cover clamp Cover (P• 5) Cover gasket (p. 5) 1 Gallon container...
Operation Manual
Page 5
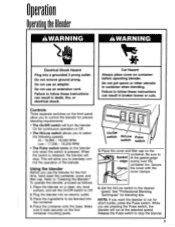
... panel allow you to precisely control the operation of the blender. Release the Pulse switch to follow these instructions can result in container when blending. Failure to stop . Operation Operatingthe Blender AWARNING AWARNING tev Electrical Shock Hazard Plug into an electric ...Clamp the cover with the cover clamps. 6. Place the blender on container before operating blender. Plug the blender into a grounded 3 prong outlet. While you to Off. 2. Using the blender Before you want the blender to follow these instructions can result in broken bones or cuts...
... panel allow you to precisely control the operation of the blender. Release the Pulse switch to follow these instructions can result in container when blending. Failure to stop . Operation Operatingthe Blender AWARNING AWARNING tev Electrical Shock Hazard Plug into an electric ...Clamp the cover with the cover clamps. 6. Place the blender on container before operating blender. Plug the blender into a grounded 3 prong outlet. While you to Off. 2. Using the blender Before you want the blender to follow these instructions can result in broken bones or cuts...
Operation Manual
Page 6
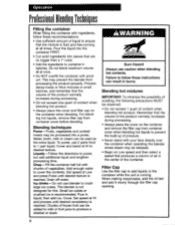
... increases during processing. • Always place the cover on the container and remove the filler cap from container cover before blending. To puree, use 2 parts food to cover the contents. Chop - Fill the container half full with your face directly over the container when operating the blender where steam may be released. • Begin on the...
... increases during processing. • Always place the cover on the container and remove the filler cap from container cover before blending. To puree, use 2 parts food to cover the contents. Chop - Fill the container half full with your face directly over the container when operating the blender where steam may be released. • Begin on the...
Operation Manual
Page 7
... washing solution and place it on Low speed for 2 minutes. Empty container. 3. Replace cover and filler cap and run blender on base. 3. When ready to dry on container before operating blender. Wipe the container, cover, and filler cap down with a soft cloth or sponge, ... damp cloth or sponge. General cleaning Do not allow food residue to use as instructed in place. Fill container with fresh washing solution. 4. Empty container. 4. Use the recommended amount of the blender. Since the base contains electrical components, do so can result in death or electrical...
... washing solution and place it on Low speed for 2 minutes. Empty container. 3. Replace cover and filler cap and run blender on base. 3. When ready to dry on container before operating blender. Wipe the container, cover, and filler cap down with a soft cloth or sponge, ... damp cloth or sponge. General cleaning Do not allow food residue to use as instructed in place. Fill container with fresh washing solution. 4. Empty container. 4. Use the recommended amount of the blender. Since the base contains electrical components, do so can result in death or electrical...
Operation Manual
Page 8
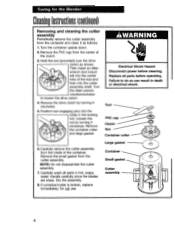
... 7. Remove the PVC cap from the container and clean it as shown. Position tool engaging pins into the cutter assembly shaft. Handle carefully since the blades are sharp. Dry the assembly. 8. Caring for the Blender CleaningInstructions(continued) Removing and cleaning the cutter... assembly Periodically remove the cutter assembly from the center of the clutch. 3. z ed) into the center hole of the container. Loosen the nut by turning it /0 clockwise....
... 7. Remove the PVC cap from the container and clean it as shown. Position tool engaging pins into the cutter assembly shaft. Handle carefully since the blades are sharp. Dry the assembly. 8. Caring for the Blender CleaningInstructions(continued) Removing and cleaning the cutter... assembly Periodically remove the cutter assembly from the center of the clutch. 3. z ed) into the center hole of the container. Loosen the nut by turning it /0 clockwise....
Operation Manual
Page 9
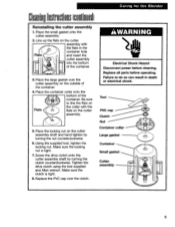
... Make sure the clutch is tight. 7. AWARNING Electrical Shock Hazard Disconnect power before operating. Tool PVC cap Clutch Nut Container collar Large gasket Container Small gasket Cutter assembly 9 Using the supplied tool, tighten the locking nut. Line up the flats on the cutter .... Be sure to do so can result in the container hole Flats 0 and insert the t- - Place the container collar onto the bottom of the container. 3.Place the large gasket over the clutch. Caring for the Blender CleaningInstructions(continued) Reinstalling the cutter assembly 1. cutter assembly ...
... Make sure the clutch is tight. 7. AWARNING Electrical Shock Hazard Disconnect power before operating. Tool PVC cap Clutch Nut Container collar Large gasket Container Small gasket Cutter assembly 9 Using the supplied tool, tighten the locking nut. Line up the flats on the cutter .... Be sure to do so can result in the container hole Flats 0 and insert the t- - Place the container collar onto the bottom of the container. 3.Place the large gasket over the clutch. Caring for the Blender CleaningInstructions(continued) Reinstalling the cutter assembly 1. cutter assembly ...
Operation Manual
Page 10
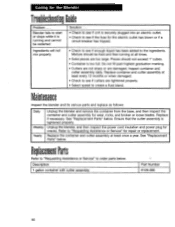
...-running at all times. • Solid pieces are damaged. Unplug the blender, and then inspect the power cord insulation and power plug for wear, nicks, and broken or loose blades. Description 1 gallon container with cutter assembly Part Number 6126-990 10 Replace container and cutter assembly at least once a year. Ensure that the cutter...
...-running at all times. • Solid pieces are damaged. Unplug the blender, and then inspect the power cord insulation and power plug for wear, nicks, and broken or loose blades. Description 1 gallon container with cutter assembly Part Number 6126-990 10 Replace container and cutter assembly at least once a year. Ensure that the cutter...
Operation Manual
Page 11
... or replaced, at Hamilton Beach's option, at 1-800...Hamilton Beach Commercial Service Center or your nearest authorized Hamilton Beach Commercial Service Center. EST Friday Product Warmly- The company's liability hereunder is warranted against defects in your local yellow pages for your local dealer. Hamilton Beach/Proctor-Silex, Inc. Please also record the purchase date of a defective product or an amount equal to wear (motor brushes, container...commercial.hamiltonbeach.com 8 a.m. - 5:30 p.m. EST Monday - You can find this information on the label on page 10. Hamilton Beach...
... or replaced, at Hamilton Beach's option, at 1-800...Hamilton Beach Commercial Service Center or your nearest authorized Hamilton Beach Commercial Service Center. EST Friday Product Warmly- The company's liability hereunder is warranted against defects in your local yellow pages for your local dealer. Hamilton Beach/Proctor-Silex, Inc. Please also record the purchase date of a defective product or an amount equal to wear (motor brushes, container...commercial.hamiltonbeach.com 8 a.m. - 5:30 p.m. EST Monday - You can find this information on the label on page 10. Hamilton Beach...


