Operation Manual
Page 2
Blender Safety IMPORTANT: This operation manual should be reviewed with all safety messages. This is very important. wWARNING You can be preceded by calling your nearest Hamilton Beach Commercial Service Center or your operator training program. Do not use an extension cord. Always read and obey all... are not followed. Call our Technical Service number: 866-285-1087 or 910-692-2223 8 a.m. - 5:30 p.m. EST Friday (www.commercial.hamiltonbeach.com) 2 All safety messages will be killed or seriously injured if you how to request assistance or service, you what can find ...
Blender Safety IMPORTANT: This operation manual should be reviewed with all safety messages. This is very important. wWARNING You can be preceded by calling your nearest Hamilton Beach Commercial Service Center or your operator training program. Do not use an extension cord. Always read and obey all... are not followed. Call our Technical Service number: 866-285-1087 or 910-692-2223 8 a.m. - 5:30 p.m. EST Friday (www.commercial.hamiltonbeach.com) 2 All safety messages will be killed or seriously injured if you how to request assistance or service, you what can find ...
Operation Manual
Page 3
Replace jar and cutter assembly at www.commercial.hamiltonbeach.com or call 910-692-2223. - IMPORTANT: If ...appliances, basic safety precautions should be hot. Use handles or knobs provided. • Extreme caution must be replaced by Hamilton Beach may be followed, including the following: • Read all instructions. • Plug into a socket. • ... appliance malfunctions, or is cut off, dispose of it must be used . Plug the blender into blender jar while operating blender, or store utensils in the "off parts or doing any appliance is necessary when any other...
Replace jar and cutter assembly at www.commercial.hamiltonbeach.com or call 910-692-2223. - IMPORTANT: If ...appliances, basic safety precautions should be hot. Use handles or knobs provided. • Extreme caution must be replaced by Hamilton Beach may be followed, including the following: • Read all instructions. • Plug into a socket. • ... appliance malfunctions, or is cut off, dispose of it must be used . Plug the blender into blender jar while operating blender, or store utensils in the "off parts or doing any appliance is necessary when any other...
Operation Manual
Page 4
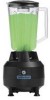
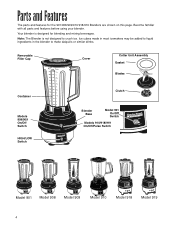
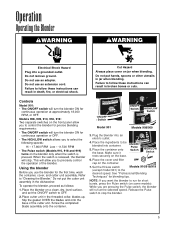
...parts and features before using your blender. Note: The Blender is designed for the 901/908/909/910/918/919 Blenders are shown on this page. Removable Filler Cap Cover Cutter Unit Assembly Gasket Blades Container Models 908/909 On/Off Switch HIGH/LOW Switch Clutch Blender Base Model 901 On/Off ...Switch Models 910/918/919 On/Off/Pulse Switch Model 901 Model 908 Model 909 Model 910 Model 918 Model 919 4 Your blender is not designed to make daiquiris...
...parts and features before using your blender. Note: The Blender is designed for the 901/908/909/910/918/919 Blenders are shown on this page. Removable Filler Cap Cover Cutter Unit Assembly Gasket Blades Container Models 908/909 On/Off Switch HIGH/LOW Switch Clutch Blender Base Model 901 On/Off ...Switch Models 910/918/919 On/Off/Pulse Switch Model 901 Model 908 Model 909 Model 910 Model 918 Model 919 4 Your blender is not designed to make daiquiris...
Operation Manual
Page 5
... models). Controls Model 901: • The ON/OFF switch will stop the blender. 5 Models 908, 909, 910, 918, 919: Two separate switches on the blender only when the switch is released, the blender will turn the blender ON for continuous operation or OFF. • The HIGH.LOW switch allows you.... ON/OFF Switch ON/OFF Switch HIGH/LOW Switch Model 901 Models 908/909 3. Plug the blender into a grounded outlet. Set the Hi/Low switch Models 910/918/919 (except model 901) to "Cleaning the Blender." NOTE: If you to follow these instructions can result in broken bones...
... models). Controls Model 901: • The ON/OFF switch will stop the blender. 5 Models 908, 909, 910, 918, 919: Two separate switches on the blender only when the switch is released, the blender will turn the blender ON for continuous operation or OFF. • The HIGH.LOW switch allows you.... ON/OFF Switch ON/OFF Switch HIGH/LOW Switch Model 901 Models 908/909 3. Plug the blender into a grounded outlet. Set the Hi/Low switch Models 910/918/919 (except model 901) to "Cleaning the Blender." NOTE: If you to follow these instructions can result in broken bones...
Operation Manual
Page 6
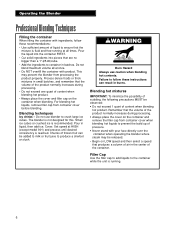
... place the cover and filler cap on the container when blending. Process dense foods or thick mixtures in burns. wWARNING Burn Hazard Always use blender to crush large ice cubes. Remember that are no bigger than a 1″ (2.5cm)cube. • Add the ingredients to prevent the...product. Do not use caution when blending hot contents. Small ice cubes or crushed ice is not designed for this. Pour in batches. The blender is recommended. Chunks of the container. Cover. Blending techniques Icy drinks - Pour the liquid into the container FIRST. • Cut solid ...
... place the cover and filler cap on the container when blending. Process dense foods or thick mixtures in burns. wWARNING Burn Hazard Always use blender to crush large ice cubes. Remember that are no bigger than a 1″ (2.5cm)cube. • Add the ingredients to prevent the...product. Do not use caution when blending hot contents. Small ice cubes or crushed ice is not designed for this. Pour in batches. The blender is recommended. Chunks of the container. Cover. Blending techniques Icy drinks - Pour the liquid into the container FIRST. • Cut solid ...
Operation Manual
Page 7
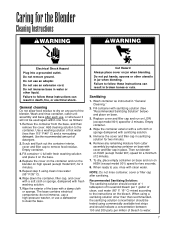
... speed for 2 minutes. 5. Use a washing solution of the base with cover and filler cap in jar when blending. Repeat step 3 using commercially available test strips and should consist of 1 tablespoon of household bleach per million of clean, cool water (60° F, 16° C) mixed... use, or whenever it on base. 3. Do not use a dishwasher to follow these instructions can result in sanitizing solution for the Blender Cleaning Instructions wWARNING wWARNING Electrical Shock Hazard Plug into a grounded outlet. The base contains electrical components: do not immerse, use a high...
... speed for 2 minutes. 5. Use a washing solution of the base with cover and filler cap in jar when blending. Repeat step 3 using commercially available test strips and should consist of 1 tablespoon of household bleach per million of clean, cool water (60° F, 16° C) mixed... use, or whenever it on base. 3. Do not use a dishwasher to follow these instructions can result in sanitizing solution for the Blender Cleaning Instructions wWARNING wWARNING Electrical Shock Hazard Plug into a grounded outlet. The base contains electrical components: do not immerse, use a high...
Operation Manual
Page 8
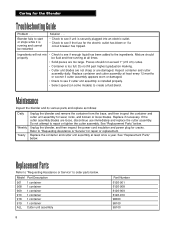
... to start or stops while it is too full. Caring for wear, nicks, and broken or loose blades. Blender fails to create a fluid blend. Model Part Description 901 1 container 908 1 container 909 1 container 910 1 container 918 1 container 919 1 container ALL Cutter unit assembly 8 Part Number... 6126-901 6126-908 6126-909 6126-910 98000 98100 99100 Ingredients will not mix properly • Check to order parts below . Inspect container and cutter assembly daily. Replace if necessary. See "Replacement Parts" below . Maintenance Inspect the blender and its various parts ...
... to start or stops while it is too full. Caring for wear, nicks, and broken or loose blades. Blender fails to create a fluid blend. Model Part Description 901 1 container 908 1 container 909 1 container 910 1 container 918 1 container 919 1 container ALL Cutter unit assembly 8 Part Number... 6126-901 6126-908 6126-909 6126-910 98000 98100 99100 Ingredients will not mix properly • Check to order parts below . Inspect container and cutter assembly daily. Replace if necessary. See "Replacement Parts" below . Maintenance Inspect the blender and its various parts ...


