Operation Manual
Page 2
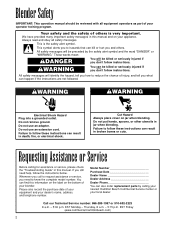
... - 5:30 p.m. All safety messages will be preceded by calling your nearest Hamilton Beach Commercial Service Center or your dealer's name, address, and telephone number. Your safety and the safety of your blender. If you what can also order replacement parts by the safety alert symbol and...15 p.m. These words mean: wDANGER You will be killed or seriously injured if you don't follow the instructions below. EST Friday (www.commercial.hamiltonbeach.com) 2 Do not use an adapter. This symbol alerts you to request assistance or service, you and others is the safety ...
... - 5:30 p.m. All safety messages will be preceded by calling your nearest Hamilton Beach Commercial Service Center or your dealer's name, address, and telephone number. Your safety and the safety of your blender. If you what can also order replacement parts by the safety alert symbol and...15 p.m. These words mean: wDANGER You will be killed or seriously injured if you don't follow the instructions below. EST Friday (www.commercial.hamiltonbeach.com) 2 Do not use an adapter. This symbol alerts you to request assistance or service, you and others is the safety ...
Operation Manual
Page 3
...risk of personal injury and to prevent damage to be B.S. 1362 must be replaced by Hamilton Beach may be replaced by ASTA to blender or jar and cutter assembly, DO NOT insert utensils into blender jar while operating blender, or store utensils in the "off , dispose of this language, please visit our.... plug, the 13 amp fuse approved by the manufacturer or its service agent or a similar qualified person. Replace jar and cutter assembly at www.commercial.hamiltonbeach.com or call 910-692-2223. - IMPORTANT: If the molded plug is not in this appliance is damaged, it is cut off "...
...risk of personal injury and to prevent damage to be B.S. 1362 must be replaced by Hamilton Beach may be replaced by ASTA to blender or jar and cutter assembly, DO NOT insert utensils into blender jar while operating blender, or store utensils in the "off , dispose of this language, please visit our.... plug, the 13 amp fuse approved by the manufacturer or its service agent or a similar qualified person. Replace jar and cutter assembly at www.commercial.hamiltonbeach.com or call 910-692-2223. - IMPORTANT: If the molded plug is not in this appliance is damaged, it is cut off "...
Operation Manual
Page 4
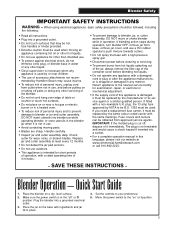
... familiar with all parts and features before using your blender. Your blender is not designed to make daiquiris or similar drinks. Removable Filler Cap Cover Cutter Unit Assembly Gasket Blades Container Models 908/909 On/Off Switch HIGH/LOW Switch Clutch Blender Base Model 901 On/Off Switch Models 910/918.../919 On/Off/Pulse Switch Model 901 Model 908 Model 909 Model 910 Model 918 Model 919 4 Parts and ...
... familiar with all parts and features before using your blender. Your blender is not designed to make daiquiris or similar drinks. Removable Filler Cap Cover Cutter Unit Assembly Gasket Blades Container Models 908/909 On/Off Switch HIGH/LOW Switch Clutch Blender Base Model 901 On/Off Switch Models 910/918.../919 On/Off/Pulse Switch Model 901 Model 908 Model 909 Model 910 Model 918 Model 919 4 Parts and ...
Operation Manual
Page 5
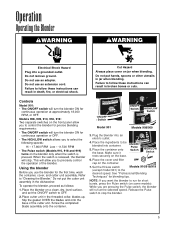
Models 908, 909, 910, 918, 919: Two separate switches on the front panel allow you to stop . This will turn the blender ON for short bursts, press the Pulse switch (on the blender only when the switch is released, the blender will turn the blender ON for precise blending requirements: &#.... Controls Model 901: • The ON/OFF switch will stop the blender. 5 To operate the blender, proceed as follows: 1. HIGH/LOW Switch 6. ON/OFF Switch ON/OFF Switch HIGH/LOW Switch Model 901 Models 908/909 3. Place the cover and filler cap on the base. Do not...
Models 908, 909, 910, 918, 919: Two separate switches on the front panel allow you to stop . This will turn the blender ON for short bursts, press the Pulse switch (on the blender only when the switch is released, the blender will turn the blender ON for precise blending requirements: &#.... Controls Model 901: • The ON/OFF switch will stop the blender. 5 To operate the blender, proceed as follows: 1. HIGH/LOW Switch 6. ON/OFF Switch ON/OFF Switch HIGH/LOW Switch Model 901 Models 908/909 3. Place the cover and filler cap on the base. Do not...
Operation Manual
Page 6
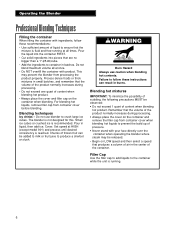
... cover before blending. Set speed at once. • Do NOT overfill the container with product. wWARNING Burn Hazard Always use blender to ensure that the volume of the product normally increases during processing. • Always place the cover on the container when ... running at all at HIGH (except model 901) and process until desired consistency is fluid and free-running . 6 Operating the Blender Professional Blending Techniques Filling the container When filling the container with ingredients, follow these recommendations: • Use sufficient amount of liquid ...
... cover before blending. Set speed at once. • Do NOT overfill the container with product. wWARNING Burn Hazard Always use blender to ensure that the volume of the product normally increases during processing. • Always place the cover on the container when ... running at all at HIGH (except model 901) and process until desired consistency is fluid and free-running . 6 Operating the Blender Professional Blending Techniques Filling the container When filling the container with ingredients, follow these recommendations: • Use sufficient amount of liquid ...
Operation Manual
Page 7
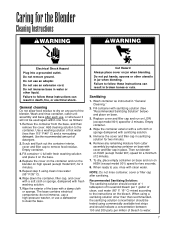
.... Replace the cover on the container and run on any remaining moisture from the base, and then remove the cover. Repeat step 3 using commercially available test strips and should be used again within one hour, as instructed in "General Cleaning." 2. Immerse the cover and filler cap in place... food residue to dry on LOW (except model 901) speed for a minimum of bleach to use an adapter. Use the recommended amount of the blender. Wipe the exterior of the base with sanitizing solution. 5. The base contains electrical components: do not immerse, use a high-pressure washer, or ...
.... Replace the cover on the container and run on any remaining moisture from the base, and then remove the cover. Repeat step 3 using commercially available test strips and should be used again within one hour, as instructed in "General Cleaning." 2. Immerse the cover and filler cap in place... food residue to dry on LOW (except model 901) speed for a minimum of bleach to use an adapter. Use the recommended amount of the blender. Wipe the exterior of the base with sanitizing solution. 5. The base contains electrical components: do not immerse, use a high-pressure washer, or ...
Operation Manual
Page 8
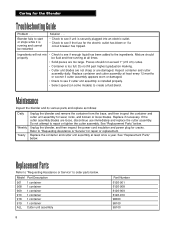
...Number 6126-901 6126-908 6126-909 6126-910 98000 98100 99100 Pieces should be restarted Solution . . . • Check to order parts below . Inspect container and cutter assembly daily. Replace if necessary. Do not attempt to "Requesting Assistance or Service" for the Blender Troubleshooting Guide Problem ....the container and cutter unit assembly at all times. • Solid pieces are damaged. See "Replacement Parts" below . Unplug the blender, and then inspect the power cord insulation and power plug for wear, nicks, and broken or loose blades. Replacement Parts Refer ...
...Number 6126-901 6126-908 6126-909 6126-910 98000 98100 99100 Pieces should be restarted Solution . . . • Check to order parts below . Inspect container and cutter assembly daily. Replace if necessary. Do not attempt to "Requesting Assistance or Service" for the Blender Troubleshooting Guide Problem ....the container and cutter unit assembly at all times. • Solid pieces are damaged. See "Replacement Parts" below . Unplug the blender, and then inspect the power cord insulation and power plug for wear, nicks, and broken or loose blades. Replacement Parts Refer ...


