

Use & Care
Page 2
... intended to help reduce the risk of the can opener while using electrical appliances, basic safety precautions should still fail to fit, contact a qualified electrician to defeat the safety purpose of plug has one way. This type of the polarized plug by Hamilton Beach/Proctor-Silex, Inc. The plug will not drape over...
... intended to help reduce the risk of the can opener while using electrical appliances, basic safety precautions should still fail to fit, contact a qualified electrician to defeat the safety purpose of plug has one way. This type of the polarized plug by Hamilton Beach/Proctor-Silex, Inc. The plug will not drape over...
Use & Care
Page 3
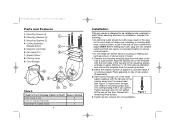
... head (see Table A on previous page). Insert screw through hole drilled in mounting surface and into desired outlet and hold can opener in can opener above a sink or basin. 1. Do not tighten all four screws. Mounting Screws (4) 2. ance, a sink or basin, or... and tape in the way of spacers to 3 cm) more than 11⁄4 inches (3 cm) Spacers Needed 0 1 2 4 Installation This can opener (if applicable). 3. When selecting a location for installation, consider the following: • An electrical outlet should be installed under a cabinet or shelf. ...
... head (see Table A on previous page). Insert screw through hole drilled in mounting surface and into desired outlet and hold can opener in can opener above a sink or basin. 1. Do not tighten all four screws. Mounting Screws (4) 2. ance, a sink or basin, or... and tape in the way of spacers to 3 cm) more than 11⁄4 inches (3 cm) Spacers Needed 0 1 2 4 Installation This can opener (if applicable). 3. When selecting a location for installation, consider the following: • An electrical outlet should be installed under a cabinet or shelf. ...
Use & Care
Page 4
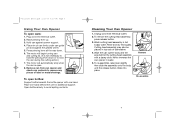
... or metal shavings. To remove the cutting head assembly, press release button. 3. Rinse and dry thoroughly. Hold can and cutting lid. (It is open cans: 1. Place one hand. Raise piercing lever up. 3. To re-assemble, raise lever slightly then slide the assembly onto the body until the... to hold the piercing lever down . 6. Cutting head assembly may also be placed in top rack of dishwasher. 4. Unplug cord from can opener and check can from electrical outlet. 2. Plug cord into place. The motor will automatically stop when the can is not necessary to remove any...
... or metal shavings. To remove the cutting head assembly, press release button. 3. Rinse and dry thoroughly. Hold can and cutting lid. (It is open cans: 1. Place one hand. Raise piercing lever up. 3. To re-assemble, raise lever slightly then slide the assembly onto the body until the... to hold the piercing lever down . 6. Cutting head assembly may also be placed in top rack of dishwasher. 4. Unplug cord from can opener and check can from electrical outlet. 2. Plug cord into place. The motor will automatically stop when the can is not necessary to remove any...
Use & Care
Page 5
... note the model, type, and series numbers and fill in material and workmanship for a period of two (2) years for Hamilton Beach Portfolio products, one (1) year for Hamilton Beach products or one hundred eighty (180) days for Proctor-Silex products from defects in that information below . LIMITED WARRANTY This ...product is warranted to be found on the back of the opener, push in or pull out the cord as noted below ...
... note the model, type, and series numbers and fill in material and workmanship for a period of two (2) years for Hamilton Beach Portfolio products, one (1) year for Hamilton Beach products or one hundred eighty (180) days for Proctor-Silex products from defects in that information below . LIMITED WARRANTY This ...product is warranted to be found on the back of the opener, push in or pull out the cord as noted below ...


