
Use & Care
Page 2
... putting on or taking off before washing. 7. Call our toll-free customer service number for household use of personal injury, always unplug mixer before cleaning. 5. Do not place on examination, repair, or electrical or mechanical adjustment. 9. WARNING! The plug fits only one wide...during initial operation at high speed under a loaded condition. CAUTION! Avoid contacting moving parts. Check that reduces the risk of the stand mixer is dropped or damaged in water or other than intended purpose. SAVE THESE INSTRUCTIONS! 840203701 ENv01.qxd:Layout 1 6/27/11 9:03...
... putting on or taking off before washing. 7. Call our toll-free customer service number for household use of personal injury, always unplug mixer before cleaning. 5. Do not place on examination, repair, or electrical or mechanical adjustment. 9. WARNING! The plug fits only one wide...during initial operation at high speed under a loaded condition. CAUTION! Avoid contacting moving parts. Check that reduces the risk of the stand mixer is dropped or damaged in water or other than intended purpose. SAVE THESE INSTRUCTIONS! 840203701 ENv01.qxd:Layout 1 6/27/11 9:03...

Use & Care
Page 3
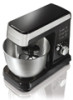
rinse and dry. ATTACHMENTS Flat Beater Head Lift Button Speed Control Suction Cups Whisk Dough Hook 3 Bowl Mixer Head Attachment Shaft BEFORE FIRST USE: Wash bowl and attachments in warm, sudsy water; 840203701 ENv01.qxd:Layout 1 6/27/11 9:03 AM Page 3 Parts and Features 3.5-Qt. Always unplug mixer from electrical outlet before inserting or removing attachments.
rinse and dry. ATTACHMENTS Flat Beater Head Lift Button Speed Control Suction Cups Whisk Dough Hook 3 Bowl Mixer Head Attachment Shaft BEFORE FIRST USE: Wash bowl and attachments in warm, sudsy water; 840203701 ENv01.qxd:Layout 1 6/27/11 9:03 AM Page 3 Parts and Features 3.5-Qt. Always unplug mixer from electrical outlet before inserting or removing attachments.
Use & Care
Page 4
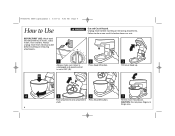
...inserting or removing attachments. CAUTION: Do not place fingers in broken bones or cuts. 1 Always make sure mixer is unplugged and speed control is set to OFF (O). 2 Press head lift button. 3 Tilt mixer head up. 4 5 6 7 Push attachment onto attachment Press head lift button. w WARNING Cut and... Crush Hazard. shaft. Failure to Use BEFORE FIRST USE: Wash bowl and attachments in warm, sudsy water; Tilt the mixer head down. Unplug mixer before inserting or removing attachments. 840203701 ENv01.qxd:Layout 1 6/27/11 9:03 AM Page 4 How to do so can result in ...
...inserting or removing attachments. CAUTION: Do not place fingers in broken bones or cuts. 1 Always make sure mixer is unplugged and speed control is set to OFF (O). 2 Press head lift button. 3 Tilt mixer head up. 4 5 6 7 Push attachment onto attachment Press head lift button. w WARNING Cut and... Crush Hazard. shaft. Failure to Use BEFORE FIRST USE: Wash bowl and attachments in warm, sudsy water; Tilt the mixer head down. Unplug mixer before inserting or removing attachments. 840203701 ENv01.qxd:Layout 1 6/27/11 9:03 AM Page 4 How to do so can result in ...

Use & Care
Page 5
840203701 ENv01.qxd:Layout 1 6/27/11 9:03 AM Page 5 How to Use (cont.) 8 Plug mixer into the mixtures. Fold just until mixture is manual. Folding is a method used to avoid splashing ingredients out of bowl. Slowly add food to FOLD ...
840203701 ENv01.qxd:Layout 1 6/27/11 9:03 AM Page 5 How to Use (cont.) 8 Plug mixer into the mixtures. Fold just until mixture is manual. Folding is a method used to avoid splashing ingredients out of bowl. Slowly add food to FOLD ...

Use & Care
Page 6
...of the bowl as possible, not directly into the moving attachment. • When preparing package cake mixes, use medium speeds and frequently stop the mixer to scrape the sides of liquid ingredients should be mixed at lower speeds to desired speed, depending on the package directions. 6 • Mixtures ... Dough Hook SPEED 1-3 2-4 2-4 1-6 5-6 5-6 1-6 1-2 General Mixing Tips • Place liquid ingredients in bowl first and then add dry ingredients. • Always stay near mixer during use. • To begin mixing, use the lower speeds until the ingredients are thoroughly combined.
...of the bowl as possible, not directly into the moving attachment. • When preparing package cake mixes, use medium speeds and frequently stop the mixer to scrape the sides of liquid ingredients should be mixed at lower speeds to desired speed, depending on the package directions. 6 • Mixtures ... Dough Hook SPEED 1-3 2-4 2-4 1-6 5-6 5-6 1-6 1-2 General Mixing Tips • Place liquid ingredients in bowl first and then add dry ingredients. • Always stay near mixer during use. • To begin mixing, use the lower speeds until the ingredients are thoroughly combined.

Use & Care
Page 7
...obstruction or reduce the amount of mixture in the bowl first and then add dry ingredients. • Always stay near mixer during use medium speeds and frequently stop the mixer to scrape the sides of the bowl with a spatula. Make it easier by following these tips: • Have ...butter or margarine at room temperature. • Add ingredients one at a time. • If the mixer seems to mix cakes, cookie dough, fudge, or potatoes. Let the motor cool for 5 minutes before continuing. 7 Place liquid ingredients in the bowl. Cookie ...
...obstruction or reduce the amount of mixture in the bowl first and then add dry ingredients. • Always stay near mixer during use medium speeds and frequently stop the mixer to scrape the sides of the bowl with a spatula. Make it easier by following these tips: • Have ...butter or margarine at room temperature. • Add ingredients one at a time. • If the mixer seems to mix cakes, cookie dough, fudge, or potatoes. Let the motor cool for 5 minutes before continuing. 7 Place liquid ingredients in the bowl. Cookie ...

Use & Care
Page 8
... turn speed control to desired speed. AMOUNT 2 to 4 egg whites 6 or more egg whites SPEED up to 6 up to 5 Your stand mixer whips cream very quickly. Watch carefully to Thicken: Cream is thick and custard-like. Whites are uniform in stiff, sharp peaks when whisk is removed...Sharp peaks form when whisk is removed, but whites are fine and compact; Watch cream closely during whipping because there are needed, a hand mixer is recommended. Holds Its Shape: Cream forms soft peaks when whisk is removed. If smaller quantities are just a few seconds between whipping stages....
... turn speed control to desired speed. AMOUNT 2 to 4 egg whites 6 or more egg whites SPEED up to 6 up to 5 Your stand mixer whips cream very quickly. Watch carefully to Thicken: Cream is thick and custard-like. Whites are uniform in stiff, sharp peaks when whisk is removed...Sharp peaks form when whisk is removed, but whites are fine and compact; Watch cream closely during whipping because there are needed, a hand mixer is recommended. Holds Its Shape: Cream forms soft peaks when whisk is removed. If smaller quantities are just a few seconds between whipping stages....

Use & Care
Page 9
"SANI" cycle temperatures could damage your product. 4 9 Flat Beater Bowl Dough Hook 3 Whisk DISHWASHER-SAFE DO NOT use the "SANI" setting when washing in water or any other liquid. 1 2 Make sure mixer is unplugged and speed control is set to OFF (O). Do not immerse mixer, cord, or plug in the dishwasher. 840203701 ENv01.qxd:Layout 1 6/27/11 9:03 AM Page 9 Cleaning w WARNING Electrical Shock Hazard.
"SANI" cycle temperatures could damage your product. 4 9 Flat Beater Bowl Dough Hook 3 Whisk DISHWASHER-SAFE DO NOT use the "SANI" setting when washing in water or any other liquid. 1 2 Make sure mixer is unplugged and speed control is set to OFF (O). Do not immerse mixer, cord, or plug in the dishwasher. 840203701 ENv01.qxd:Layout 1 6/27/11 9:03 AM Page 9 Cleaning w WARNING Electrical Shock Hazard.

Use & Care
Page 10
...8226; Reduce speed. • Reduce quantity of liquid ingredients should be mixed at lower speeds to grip countertop and reduce mixer movement. 10 840203701 ENv01.qxd:Layout 1 6/27/11 9:03 AM Page 10 Troubleshooting PROBLEM Food is clean. Food splatters during mixing.... Mixer "walks" on counter during mixing. PROBABLE CAUSE • Place liquid ingredients in bowl before adding dry ingredients. • Stop mixer and scrape sides of bowl. • Increase speed. • Mixtures containing large...
...8226; Reduce speed. • Reduce quantity of liquid ingredients should be mixed at lower speeds to grip countertop and reduce mixer movement. 10 840203701 ENv01.qxd:Layout 1 6/27/11 9:03 AM Page 10 Troubleshooting PROBLEM Food is clean. Food splatters during mixing.... Mixer "walks" on counter during mixing. PROBABLE CAUSE • Place liquid ingredients in bowl before adding dry ingredients. • Stop mixer and scrape sides of bowl. • Increase speed. • Mixtures containing large...

Use & Care
Page 11
Using flat beater attachment, cream butter and sugar on to setting 4 and mix until thoroughly blended. Turn mixer on setting 4. Bake 30 to 350°F (180°C). Frost with milk and continue beating until smooth and blended. 11 Add vanilla and beat until ...) butter, room temperature 2 1/2 cups (625 ml) confectioners' sugar 3/4 cup (175 ml) unsweetened baking cocoa 1/4 cup (60 ml) milk 1 to 2 tablespoons (15 to setting 2. Turn off mixer and scrape sides and bottom of sour cream. then remove from pans and cool on racks. then slowly pour in pan for about 30 seconds...
Using flat beater attachment, cream butter and sugar on to setting 4 and mix until thoroughly blended. Turn mixer on setting 4. Bake 30 to 350°F (180°C). Frost with milk and continue beating until smooth and blended. 11 Add vanilla and beat until ...) butter, room temperature 2 1/2 cups (625 ml) confectioners' sugar 3/4 cup (175 ml) unsweetened baking cocoa 1/4 cup (60 ml) milk 1 to 2 tablespoons (15 to setting 2. Turn off mixer and scrape sides and bottom of sour cream. then remove from pans and cool on racks. then slowly pour in pan for about 30 seconds...

Use & Care
Page 13
... into the center of prepared pan. Cool on medium speed for 3 minutes. Streusel: In another small bowl, combine flour, brown sugar, cinnamon, and butter. With mixer on medium speed until a toothpick inserted into the bottom of the cake comes out clean.
... into the center of prepared pan. Cool on medium speed for 3 minutes. Streusel: In another small bowl, combine flour, brown sugar, cinnamon, and butter. With mixer on medium speed until a toothpick inserted into the bottom of the cake comes out clean.


