Use & Care
Page 2
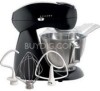
... from yesteryear. In 1904, Louis Hamilton and Chester Beach teamed up to those dependable, all-metal appliances you use your purchase. 840142500 ENv00.qxd 10/25/05 9:11 AM Page 2 Dear Stand Mixer Owner, Congratulations on your all-metal appliance, think about the history that your appliance helps you create! The Hamilton Beach® Eclectrics™ Collection adds a modern...
... from yesteryear. In 1904, Louis Hamilton and Chester Beach teamed up to those dependable, all-metal appliances you use your purchase. 840142500 ENv00.qxd 10/25/05 9:11 AM Page 2 Dear Stand Mixer Owner, Congratulations on your all-metal appliance, think about the history that your appliance helps you create! The Hamilton Beach® Eclectrics™ Collection adds a modern...
Use & Care
Page 3
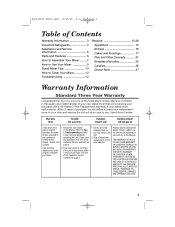
... for Three years from abuse, misuse, neglect, use for stand mixers operated in the quality and craftsmanship of the Customer Service numbers on page 5. 2. Here's how it works: Warranty Term To fulfill the warranty: Hamilton Beach® will Hamilton Beach® will deliver a brand new replacement mixer to your address. This warranty applies only to your door...
... for Three years from abuse, misuse, neglect, use for stand mixers operated in the quality and craftsmanship of the Customer Service numbers on page 5. 2. Here's how it works: Warranty Term To fulfill the warranty: Hamilton Beach® will Hamilton Beach® will deliver a brand new replacement mixer to your address. This warranty applies only to your door...
Use & Care
Page 4
... . Call our toll-free customer service number for household use with a grounded-type 3-wire cord (3-prong plug). To disconnect, turn control to mixer. 6. This appliance is dropped or damaged in , or tripping over a longer cord. This is plugged into the outlet. If the plug should...contacting moving parts. The use outdoors. 11. Do not use of attachments not recommended or sold by Hamilton Beach/Proctor-Silex, Inc. WARNING: To reduce risk of personal injury, always unplug mixer before it can be followed, including the following: 1. Do not attempt to reduce the hazards of ...
... . Call our toll-free customer service number for household use with a grounded-type 3-wire cord (3-prong plug). To disconnect, turn control to mixer. 6. This appliance is dropped or damaged in , or tripping over a longer cord. This is plugged into the outlet. If the plug should...contacting moving parts. The use outdoors. 11. Do not use of attachments not recommended or sold by Hamilton Beach/Proctor-Silex, Inc. WARNING: To reduce risk of personal injury, always unplug mixer before it can be followed, including the following: 1. Do not attempt to reduce the hazards of ...
Use & Care
Page 5
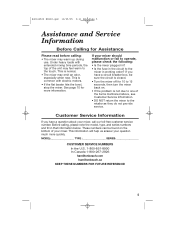
... they do not provide service. If your question much more information. Customer Service Information If you have a question about your mixer. This is not due to one of your mixer, call our toll-free customer service number. If you have a circuit breaker box, be found on . • If... the problem is normal. • The mixer may warm up during use. MODEL TYPE SERIES CUSTOMER SERVICE NUMBERS In the U.S. 1-800-851-8900 In Canada 1-800-267-2826 hamiltonbeach.com hamiltonbeach...
... they do not provide service. If your question much more information. Customer Service Information If you have a question about your mixer. This is not due to one of your mixer, call our toll-free customer service number. If you have a circuit breaker box, be found on . • If... the problem is normal. • The mixer may warm up during use. MODEL TYPE SERIES CUSTOMER SERVICE NUMBERS In the U.S. 1-800-851-8900 In Canada 1-800-267-2826 hamiltonbeach.com hamiltonbeach...
Use & Care
Page 6
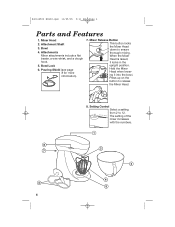
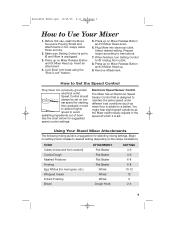
...6 Parts and Features 1. Bowl Lock 6. Mixer Release Button This button locks the Mixer Head down to release the Mixer Head. 8. When the Mixer Head is raised, it into the bowl. The setting of the mixer increases with the numbers. 6 Attachments Mixer attachments include a flat beater, a wire whisk..., and a dough hook. 5. Pouring Shield (see page 8 for more information). 7. Bowl 4. Hold the Mixer Head when lowering it locks in the upright...
...6 Parts and Features 1. Bowl Lock 6. Mixer Release Button This button locks the Mixer Head down to release the Mixer Head. 8. When the Mixer Head is raised, it into the bowl. The setting of the mixer increases with the numbers. 6 Attachments Mixer attachments include a flat beater, a wire whisk..., and a dough hook. 5. Pouring Shield (see page 8 for more information). 7. Bowl 4. Hold the Mixer Head when lowering it locks in the upright...
Use & Care
Page 7
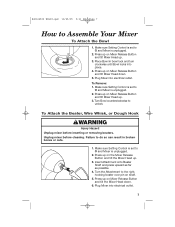
...onto Beater Shaft and press upward as far as possible. 4. Press up on the Mixer Release Button and tilt the Mixer Head up . 3. Plug Mixer into place. 4. Press up on Mixer Release Button and tilt Mixer Head up . 3. Make sure Setting Control is set to do so can result...Page 7 How to O and Mixer is unplugged. 2. Turn Bowl counterclockwise to the right, hooking beater over pin on Mixer Release Button and tilt the Mixer Head down . 5. Turn the Attachment to unlock. Plug Mixer into electrical outlet. 7 Press up on Mixer Release Button and tilt Mixer Head up on shaft. 5. ...
...onto Beater Shaft and press upward as far as possible. 4. Press up on the Mixer Release Button and tilt the Mixer Head up . 3. Plug Mixer into place. 4. Press up on Mixer Release Button and tilt Mixer Head up . 3. Make sure Setting Control is set to do so can result...Page 7 How to O and Mixer is unplugged. 2. Turn Bowl counterclockwise to the right, hooking beater over pin on Mixer Release Button and tilt the Mixer Head down . 5. Turn the Attachment to unlock. Plug Mixer into electrical outlet. 7 Press up on Mixer Release Button and tilt Mixer Head up on shaft. 5. ...
Use & Care
Page 8
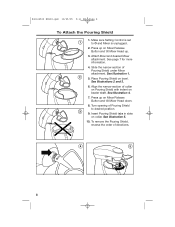
... To remove the Pouring Shield, reverse the order of Pouring Shield to O and Mixer is unplugged. 2. Slide the narrow section of collar on Pouring Shield with indent on Mixer Release Button and tilt Mixer Head down. 8. Place Pouring Shield on collar. See Illustrations 2 and 3. ...6. Make sure Setting Control is set to desired position. 9. Align the narrow section of Pouring Shield under Mixer attachment. See page 7 for more information. 4. Press up . 3. Insert Pouring Shield tabs in slots on bowl. See Illustration 4. 7. 840142500 ...
... To remove the Pouring Shield, reverse the order of Pouring Shield to O and Mixer is unplugged. 2. Slide the narrow section of collar on Pouring Shield with indent on Mixer Release Button and tilt Mixer Head down. 8. Place Pouring Shield on collar. See Illustrations 2 and 3. ...6. Make sure Setting Control is set to desired position. 9. Align the narrow section of Pouring Shield under Mixer attachment. See page 7 for more information. 4. Press up . 3. Insert Pouring Shield tabs in slots on bowl. See Illustration 4. 7. 840142500 ...
Use & Care
Page 9
... gradually moved to desired higher speed to avoid splashing ingredients out of bowl. Remove Attachment. Electronic Speed Sensor Control The Mixer has an Electronic Speed Sensor Control that is designed to maintain the same speed under different load conditions (such as the.... Insert an attachment. 4. Using Your Stand Mixer Attachments The following mixing guide is set . Press up on Mixer Release Button and tilt Mixer Head up . 9. Press up on Mixer Release Button and tilt Mixer Head up . When finished, turn Setting Control to Use Your Mixer 1. 840142500 ENv00.qxd 10/25/05 ...
... gradually moved to desired higher speed to avoid splashing ingredients out of bowl. Remove Attachment. Electronic Speed Sensor Control The Mixer has an Electronic Speed Sensor Control that is designed to maintain the same speed under different load conditions (such as the.... Insert an attachment. 4. Using Your Stand Mixer Attachments The following mixing guide is set . Press up on Mixer Release Button and tilt Mixer Head up . 9. Press up on Mixer Release Button and tilt Mixer Head up . When finished, turn Setting Control to Use Your Mixer 1. 840142500 ENv00.qxd 10/25/05 ...
Use & Care
Page 10
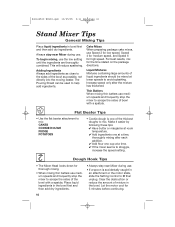
...use . • If a spoon is one cup at lower speeds to mix. 840142500 ENv00.qxd 10/25/05 9:11 AM Page 10 Stand Mixer Tips General Mixing Tips Place liquid ingredients in the bowl. This will reduce spattering. Clear the obstruction or reduce the amount of bowl with ... after each addition. ✔ Add flour one of the bowl with a spatula. To begin mixing, use medium speeds and frequently stop the mixer to scrape the sides of the thickest doughs to avoid splashing. Cake Mixes When preparing package cake mixes, use medium speeds and frequently stop the...
...use . • If a spoon is one cup at lower speeds to mix. 840142500 ENv00.qxd 10/25/05 9:11 AM Page 10 Stand Mixer Tips General Mixing Tips Place liquid ingredients in the bowl. This will reduce spattering. Clear the obstruction or reduce the amount of bowl with ... after each addition. ✔ Add flour one of the bowl with a spatula. To begin mixing, use medium speeds and frequently stop the mixer to scrape the sides of the thickest doughs to avoid splashing. Cake Mixes When preparing package cake mixes, use medium speeds and frequently stop the...
Use & Care
Page 11
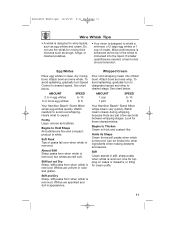
...dull in stiff, sharp peaks when whisk is removed. AMOUNT 1 cup 1 pint SPEED to 10 to 8 Your Hamilton Beach® Stand MIxer whips egg whites quickly. Stiff Cream stands in appearance. Use for topping on cakes or desserts, or filling for mixing thick mixtures such as the tip of...stiff peaks form when whisk is white. Mixer performance is enhanced as dough, fudge, or mashed potatoes • Your mixer is immersed into the liquid. AMOUNT 2 to 4 egg whites 6 or more egg whites SPEED to 10 to 8 Your Hamilton Beach® Stand MIxer whips cream very quickly. product is removed...
...dull in stiff, sharp peaks when whisk is removed. AMOUNT 1 cup 1 pint SPEED to 10 to 8 Your Hamilton Beach® Stand MIxer whips egg whites quickly. Stiff Cream stands in appearance. Use for topping on cakes or desserts, or filling for mixing thick mixtures such as the tip of...stiff peaks form when whisk is white. Mixer performance is enhanced as dough, fudge, or mashed potatoes • Your mixer is immersed into the liquid. AMOUNT 2 to 4 egg whites 6 or more egg whites SPEED to 10 to 8 Your Hamilton Beach® Stand MIxer whips cream very quickly. product is removed...
Use & Care
Page 12
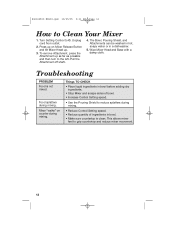
...speed. • Reduce quantity of ingredients in a dishwasher. 5. 840142500 ENv00.qxd 10/25/05 9:11 AM Page 12 How to grip countertop and reduce mixer movement. 12 Unplug cord from outlet. 2. The Bowl, Pouring Shield, and Attachments can be washed in hot, soapy water or in bowl. •... Make sure countertop is not mixed. Mixer "walks" on Mixer Release Button and tilt Mixer Head up. 3. This allows mixer feet to Clean Your Mixer 1. Turn Setting Control to the left. Press up as far as possible and then turn to O. ...
...speed. • Reduce quantity of ingredients in a dishwasher. 5. 840142500 ENv00.qxd 10/25/05 9:11 AM Page 12 How to grip countertop and reduce mixer movement. 12 Unplug cord from outlet. 2. The Bowl, Pouring Shield, and Attachments can be washed in hot, soapy water or in bowl. •... Make sure countertop is not mixed. Mixer "walks" on Mixer Release Button and tilt Mixer Head up. 3. This allows mixer feet to Clean Your Mixer 1. Turn Setting Control to the left. Press up as far as possible and then turn to O. ...
Use & Care
Page 13
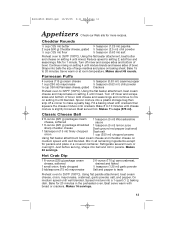
Reduce speed to 325ºF (160ºC). Mix for more recipes. Turn off mixer and scrape sides and bottom of bowl. Classic Cheese Ball 2 8-ounce (225 g) packages cream cheese, softened 1 8-ounce (225 g) package shredded sharp cheddar cheese 1 tablespoon (15 .... Makes 24 servings. Add cheese and seasonings and continue to 10 minutes until mixed. Just before serving, shape into a plastic storage bag then snip off mixer and scrape sides and bottom of bowl. Using the flat beater attachment, beat butter and cheese on baking sheet. Turn off a corner to 350º...
Reduce speed to 325ºF (160ºC). Mix for more recipes. Turn off mixer and scrape sides and bottom of bowl. Classic Cheese Ball 2 8-ounce (225 g) packages cream cheese, softened 1 8-ounce (225 g) package shredded sharp cheddar cheese 1 tablespoon (15 .... Makes 24 servings. Add cheese and seasonings and continue to 10 minutes until mixed. Just before serving, shape into a plastic storage bag then snip off mixer and scrape sides and bottom of bowl. Using the flat beater attachment, beat butter and cheese on baking sheet. Turn off a corner to 350º...
Use & Care
Page 14
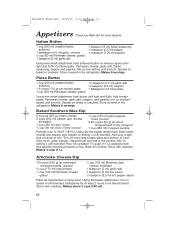
..., grated 11⁄2 teaspoon (7.5 ml) garlic salt 1⁄2 teaspoon (2.5 ml) oregano 1 tablespoon (15 ml) parsley Using wire whisk attachment beat butter until blended. Turn off mixer and scrape sides and bottom of the pecans. Mix on medium speed until blended. Artichoke Cheese Dip 12-ounce (350 g) jar marinated artichoke hearts, drained...
..., grated 11⁄2 teaspoon (7.5 ml) garlic salt 1⁄2 teaspoon (2.5 ml) oregano 1 tablespoon (15 ml) parsley Using wire whisk attachment beat butter until blended. Turn off mixer and scrape sides and bottom of the pecans. Mix on medium speed until blended. Artichoke Cheese Dip 12-ounce (350 g) jar marinated artichoke hearts, drained...
Use & Care
Page 16
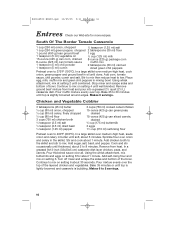
... 16 Entrees Check our Web site for about 5 to 8 minutes. Pour muffin mixture evenly over all. Makes 6 servings. Turn off mixer and scrape the sides and bottom of bowl. Stop mixer and scrape sides and bottom of the bowl. Add chicken broth to the skillet and stir to low. Add sugar, salt...
... 16 Entrees Check our Web site for about 5 to 8 minutes. Pour muffin mixture evenly over all. Makes 6 servings. Turn off mixer and scrape the sides and bottom of bowl. Stop mixer and scrape sides and bottom of the bowl. Add chicken broth to the skillet and stir to low. Add sugar, salt...
Use & Care
Page 17
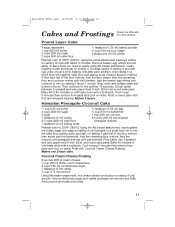
...) coconut Using flat beater attachment, mix cream cheese and butter on setting 4 until tests done with a toothpick. Increase speed to mix another 15 seconds. Stop mixer and scrape sides and bottom of the flour mixture. Then continue to setting 6 and add egg yolks one 2-layer cake. Bake 40 to 45 minutes...
...) coconut Using flat beater attachment, mix cream cheese and butter on setting 4 until tests done with a toothpick. Increase speed to mix another 15 seconds. Stop mixer and scrape sides and bottom of the flour mixture. Then continue to setting 6 and add egg yolks one 2-layer cake. Bake 40 to 45 minutes...
Use & Care
Page 18
..., baking soda, and salt. Set aside. Add half of flour mixture, then all of bowl. Add remaining flour mixture. Turn off mixer and scrape sides and bottom of sour cream. Turn mixer on setting 4 until smooth. Bake 30 to setting 4 and mix until tests done. Makes one 2-layer cake. Bittersweet Chocolate Frosting...
..., baking soda, and salt. Set aside. Add half of flour mixture, then all of bowl. Add remaining flour mixture. Turn off mixer and scrape sides and bottom of sour cream. Turn mixer on setting 4 until smooth. Bake 30 to setting 4 and mix until tests done. Makes one 2-layer cake. Bittersweet Chocolate Frosting...
Use & Care
Page 20
... one 3-layer cake. Frost with Cream Cheese Frosting (see recipe above). Cool in the buttermilk; Add buttermilk mixture, vanilla extract, coconut, and baking powder. Turn mixer on medium speed until well combined. Makes one at a time. Cream Cheese Frosting 2 8-ounce (225 g) packages cream cheese, softened 1⁄2 cup (125 ml) butter, softened...
... one 3-layer cake. Frost with Cream Cheese Frosting (see recipe above). Cool in the buttermilk; Add buttermilk mixture, vanilla extract, coconut, and baking powder. Turn mixer on medium speed until well combined. Makes one at a time. Cream Cheese Frosting 2 8-ounce (225 g) packages cream cheese, softened 1⁄2 cup (125 ml) butter, softened...
Use & Care
Page 21
...ºF (160ºC). Add brown sugar, flour, salt, cinnamon, and nutmeg. Blend until incorporated. Turn off mixer and scrape sides and bottom of bowl. Set aside. Turn off mixer and scrape sides and bottom of bowl. With mixer running on setting 6. Reduce speed to 8 servings. 21 Makes 6 to setting 2 and add milk and...
...ºF (160ºC). Add brown sugar, flour, salt, cinnamon, and nutmeg. Blend until incorporated. Turn off mixer and scrape sides and bottom of bowl. Set aside. Turn off mixer and scrape sides and bottom of bowl. With mixer running on setting 6. Reduce speed to 8 servings. 21 Makes 6 to setting 2 and add milk and...
Use & Care
Page 22
...840142500 ENv00.qxd 10/25/05 9:11 AM Page 22 Pies and Other Desserts Check our Web site for the liqueur and coffee. Turn off mixer and scrape sides and bottom of bowl. Reserve 2 tablespoons (30 ml) chopped chocolate. Spoon on top. Cook and whisk constantly over medium-...high heat until stiff. Turn off mixer and scrape sides and bottom of bowl. Best if made a day before serving. Make a layer of the milk on setting 6 until smooth and incorporated...
...840142500 ENv00.qxd 10/25/05 9:11 AM Page 22 Pies and Other Desserts Check our Web site for the liqueur and coffee. Turn off mixer and scrape sides and bottom of bowl. Reserve 2 tablespoons (30 ml) chopped chocolate. Spoon on top. Cook and whisk constantly over medium-...high heat until stiff. Turn off mixer and scrape sides and bottom of bowl. Best if made a day before serving. Make a layer of the milk on setting 6 until smooth and incorporated...
Use & Care
Page 23
... g) container frozen whipped topping, thawed 1⁄2 of a 13x9x2-inch (33x23x5 cm) dish with remaining whipped topping. Reduce speed to 350ºF (180ºC). Turn off mixer and fold in oven for more recipes. Line the bottom of a 12-ounce (350 g) package vanilla wafers 3 medium ripe bananas, sliced Using wire whisk attachment...
... g) container frozen whipped topping, thawed 1⁄2 of a 13x9x2-inch (33x23x5 cm) dish with remaining whipped topping. Reduce speed to 350ºF (180ºC). Turn off mixer and fold in oven for more recipes. Line the bottom of a 12-ounce (350 g) package vanilla wafers 3 medium ripe bananas, sliced Using wire whisk attachment...


