Use & Care
Page 1
Digitally signed by Anna Creery cn=Anna Creery, c=US Date: 2001.02.27 09:26:05 -05'00' Reason: I am approving this document 840082200 ENv03 2/20/01 2:00 PM Page 1 Hand Mixer 840082200 Mixer Safety 2 Know Your Mixer 3 Using Your Mixer 6 Cleaning Your Mixer 7 Recipes 7-9 Customer Service 10 In USA: 1-800-851-8900 In Canada: 1-800-267-2826
Digitally signed by Anna Creery cn=Anna Creery, c=US Date: 2001.02.27 09:26:05 -05'00' Reason: I am approving this document 840082200 ENv03 2/20/01 2:00 PM Page 1 Hand Mixer 840082200 Mixer Safety 2 Know Your Mixer 3 Using Your Mixer 6 Cleaning Your Mixer 7 Recipes 7-9 Customer Service 10 In USA: 1-800-851-8900 In Canada: 1-800-267-2826
Use & Care
Page 2
...let cord contact hot surfaces, including stove. 11. Do not use of electrical shock. for information on or near children. 4. Unplug from mixer before cleaning. 5. This appliance is off parts, and before washing. 7. Do not attempt to OFF, then remove plug from beaters during operation...with a damaged cord or plug, or after the appliance malfunctions or is used by Hamilton Beach/Proctor-Silex, Inc. Do not let cord hang over edge of personal injury, always unplug mixer before plugging cord into an electrical outlet only one blade wider than intended purpose. ...
...let cord contact hot surfaces, including stove. 11. Do not use of electrical shock. for information on or near children. 4. Unplug from mixer before cleaning. 5. This appliance is off parts, and before washing. 7. Do not attempt to OFF, then remove plug from beaters during operation...with a damaged cord or plug, or after the appliance malfunctions or is used by Hamilton Beach/Proctor-Silex, Inc. Do not let cord hang over edge of personal injury, always unplug mixer before plugging cord into an electrical outlet only one blade wider than intended purpose. ...

Use & Care
Page 3
...in warm, sudsy water; The whisk may be inserted into either opening. 3 rinse and dry. Speed Control (ON/OFF) and Eject 2. Mixer Body 4. Bowl Rest™ Optional Attachments and Features (Available on selected models) Before first use, wash beaters or other attachments in cleaning,...are designed for general mixing purposes. Power Burst Button 3. To ensure safety, unplug mixer from electrical outlet before inserting or removing attachments. 840082200 ENv03 2/20/01 2:00 PM Page 3 Know Your Mixer Parts and Features 1. The single whisk is perfect for mixing thick batters and ...
...in warm, sudsy water; The whisk may be inserted into either opening. 3 rinse and dry. Speed Control (ON/OFF) and Eject 2. Mixer Body 4. Bowl Rest™ Optional Attachments and Features (Available on selected models) Before first use, wash beaters or other attachments in cleaning,...are designed for general mixing purposes. Power Burst Button 3. To ensure safety, unplug mixer from electrical outlet before inserting or removing attachments. 840082200 ENv03 2/20/01 2:00 PM Page 3 Know Your Mixer Parts and Features 1. The single whisk is perfect for mixing thick batters and ...
Use & Care
Page 4
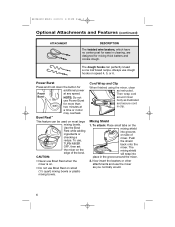
... Place small tabs on side of the bowl. The dough hooks can be used on speed 4, 5, or 6. Then wrap cord around the mixer. 2. The mixing shield will snap into grooves on the mixing shield into place in cleaning, are designed for mixing thick batters and cookie dough...Page 4 Optional Attachments and Features (continued) ATTACHMENT DESCRIPTION The twisted wire beaters, which have no center post for ease in the groove around mixer body as instructed. Use the Bowl Rest while adding ingredients or checking a recipe. Mixing Shield 1. Now insert the beaters or other attachments ...
... Place small tabs on side of the bowl. The dough hooks can be used on speed 4, 5, or 6. Then wrap cord around the mixer. 2. The mixing shield will snap into grooves on the mixing shield into place in cleaning, are designed for mixing thick batters and cookie dough...Page 4 Optional Attachments and Features (continued) ATTACHMENT DESCRIPTION The twisted wire beaters, which have no center post for ease in the groove around mixer body as instructed. Use the Bowl Rest while adding ingredients or checking a recipe. Mixing Shield 1. Now insert the beaters or other attachments ...
Use & Care
Page 5
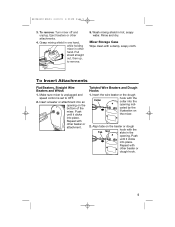
... collar into place. Rinse and dry. Insert the wire beater or the dough Collar hook with the slots in the opening on the mixer. 2. Push until it clicks into the opening indi- Wash mixing shield in other beater or attachment. To Insert Attachments Flat Beaters, ...Straight Wire Beaters and Whisk 1. Insert a beater or attachment into place. cated by the illustration on the bottom of the mixer. Make sure mixer is unplugged and speed control is set to remove. 5. Twisted Wire Beaters and Dough Hooks 1. Eject beaters or other beater or dough hook...
... collar into place. Rinse and dry. Insert the wire beater or the dough Collar hook with the slots in the opening on the mixer. 2. Push until it clicks into the opening indi- Wash mixing shield in other beater or attachment. To Insert Attachments Flat Beaters, ...Straight Wire Beaters and Whisk 1. Insert a beater or attachment into place. cated by the illustration on the bottom of the mixer. Make sure mixer is unplugged and speed control is set to remove. 5. Twisted Wire Beaters and Dough Hooks 1. Eject beaters or other beater or dough hook...

Use & Care
Page 6
... easier by hand at 0 (OFF) push straight down on the recipe consistency. 6 SPEED 0 1 2 3 4 5 6 FUNCTION OFF and/or Eject LOW speed for the 6 speed mixers. When finished mixing, move the speed control to a higher speed as necessary. kneading dough Beating egg whites; Make sure...or nuts to a very thick dough or batter, we recommend stirring them in dry ingredients, muffins, or quick breads To cream butter and sugar; Plug mixer into bowl. 3. Move the speed control to desired speed depending on the speed control. Begin on speed 1 and increase to desired speed, starting at ...
... easier by hand at 0 (OFF) push straight down on the recipe consistency. 6 SPEED 0 1 2 3 4 5 6 FUNCTION OFF and/or Eject LOW speed for the 6 speed mixers. When finished mixing, move the speed control to a higher speed as necessary. kneading dough Beating egg whites; Make sure...or nuts to a very thick dough or batter, we recommend stirring them in dry ingredients, muffins, or quick breads To cream butter and sugar; Plug mixer into bowl. 3. Move the speed control to desired speed depending on the speed control. Begin on speed 1 and increase to desired speed, starting at ...
Use & Care
Page 7
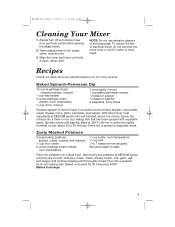
... 1⁄2 teaspoon paprika 2 baguettes, thinly sliced Squeeze spinach to taste Place hot potatoes into a greased 9x13-inch baking dish. With hand mixer, beat ingredients at 350°F until well blended, about 25 to spread on top, about one minute. Pour into a large bowl....rinse and dry. 3. Start mixing the potatoes at 400ºF. NOTE: Do not use abrasive cleaners or scouring pads. Always turn off and unplug mixer from electrical outlet before ejecting the attachments. 2. Zesty Mashed Potatoes 8 large baking potatoes (peeled, cubed, cooked, and drained) 1⁄2 cup sour...
... 1⁄2 teaspoon paprika 2 baguettes, thinly sliced Squeeze spinach to taste Place hot potatoes into a greased 9x13-inch baking dish. With hand mixer, beat ingredients at 350°F until well blended, about 25 to spread on top, about one minute. Pour into a large bowl....rinse and dry. 3. Start mixing the potatoes at 400ºF. NOTE: Do not use abrasive cleaners or scouring pads. Always turn off and unplug mixer from electrical outlet before ejecting the attachments. 2. Zesty Mashed Potatoes 8 large baking potatoes (peeled, cubed, cooked, and drained) 1⁄2 cup sour...
Use & Care
Page 8
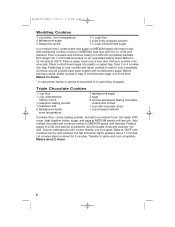
... into plastic or paper bag. Before storing cookies, shake cookies in a medium bowl. Bake at 350ºF until all cookies have been coated with hand mixer. Makes about 11 minutes. Place a paper towel over a wire rack. 840082200 ENv03 2/20/01 2:00 PM Page 8 Wedding Cookies 1 cup butter, room temperature ...Combine flour, cocoa, baking powder, and salt in bag of confectioners sugar one inch apart. Add vanilla and continue mixing on MEDIUM. With mixer, beat together butter, sugar, and eggs at 325ºF. Add chocolate chips and walnuts; Bake for 5 minutes. mix well.
... into plastic or paper bag. Before storing cookies, shake cookies in a medium bowl. Bake at 350ºF until all cookies have been coated with hand mixer. Makes about 11 minutes. Place a paper towel over a wire rack. 840082200 ENv03 2/20/01 2:00 PM Page 8 Wedding Cookies 1 cup butter, room temperature ...Combine flour, cocoa, baking powder, and salt in bag of confectioners sugar one inch apart. Add vanilla and continue mixing on MEDIUM. With mixer, beat together butter, sugar, and eggs at 325ºF. Add chocolate chips and walnuts; Bake for 5 minutes. mix well.

Use & Care
Page 10
... only to you may not apply to the original consumer purchaser and does not cover a defect resulting from abuse, misuse, neglect, use for Hamilton Beach products from state to state, or province to the following, which vary from the date of your question much more quickly. If you have...This product is no cost. During this period, we will help us answer your hand mixer. There is warranted to be free from defects in material and workmanship for a period of two (2) years for Hamilton Beach Portfolio products or one (1) year for commercial purposes, or any use not in that ...
... only to you may not apply to the original consumer purchaser and does not cover a defect resulting from abuse, misuse, neglect, use for Hamilton Beach products from state to state, or province to the following, which vary from the date of your question much more quickly. If you have...This product is no cost. During this period, we will help us answer your hand mixer. There is warranted to be free from defects in material and workmanship for a period of two (2) years for Hamilton Beach Portfolio products or one (1) year for commercial purposes, or any use not in that ...


