
Use & Care
Page 2
...stabilized power consumption of the cord used . Do not let cord contact hot surfaces, including the stove. 9. The use of the maximum wattage a hand mixer may cause fire, electric shock, or injury. 11. Peak power is dropped or damaged in water or other utensils, away from outlet when not in...Do not use , before plugging cord into wall outlet. Do not place on this model may consume during operation to reduce risk of the hand mixer is intended for other than the rating of electric shock. Check that it will not drape over the countertop or tabletop where it still ...
...stabilized power consumption of the cord used . Do not let cord contact hot surfaces, including the stove. 9. The use of the maximum wattage a hand mixer may cause fire, electric shock, or injury. 11. Peak power is dropped or damaged in water or other utensils, away from outlet when not in...Do not use , before plugging cord into wall outlet. Do not place on this model may consume during operation to reduce risk of the hand mixer is intended for other than the rating of electric shock. Check that it will not drape over the countertop or tabletop where it still ...

Use & Care
Page 3
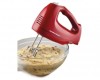
... out for most packaged cake mixes 4 Frosting and mashed potatoes; kneading dough 5 Beating egg whites; SPEED FUNCTION O OFF and/or Eject 1 LOW speed for 6-speed mixers. Begin on speed 1 and increase to desired speed depending on model) Bowl Rest™ OR Speed Control Eject Eject Button General Mixing Guide The following... ingredients, muffins, or quick breads 2 To cream butter and sugar; 840171612 ENv01.qxd:Layout 1 2/6/12 9:39 AM Page 3 Parts and Features Speed Control (varies by hand. 3
... out for most packaged cake mixes 4 Frosting and mashed potatoes; kneading dough 5 Beating egg whites; SPEED FUNCTION O OFF and/or Eject 1 LOW speed for 6-speed mixers. Begin on speed 1 and increase to desired speed depending on model) Bowl Rest™ OR Speed Control Eject Eject Button General Mixing Guide The following... ingredients, muffins, or quick breads 2 To cream butter and sugar; 840171612 ENv01.qxd:Layout 1 2/6/12 9:39 AM Page 3 Parts and Features Speed Control (varies by hand. 3

Use & Care
Page 4
... 4 Drink Mixes) (Mixing/Kneading) Suitcase Style Snap-On Case 840171612 ENv01.qxd:Layout 1 2/6/12 9:39 AM Page 4 Features Chart Model number can be found on hand mixer or hand mixer carton. Please visit www.hamiltonbeach.com for a list of parts, accessories, and replacement parts that are available for your model.
... 4 Drink Mixes) (Mixing/Kneading) Suitcase Style Snap-On Case 840171612 ENv01.qxd:Layout 1 2/6/12 9:39 AM Page 4 Features Chart Model number can be found on hand mixer or hand mixer carton. Please visit www.hamiltonbeach.com for a list of parts, accessories, and replacement parts that are available for your model.

Use & Care
Page 5
attachments. Eject Button Models Push eject button to O (OFF) and unplug mixer. Start at 1 and increase speed as needed. 6 Speed Control Models When finished, turn speed control Push speed control to eject to eject attachments. 5 840171612 ENv01.qxd:Layout 1 2/6/12 9:39 AM Page 5 How to Use Your Hand Mixer 1 Make sure mixer is unplugged and turned to O (OFF). 2 3 Following diagrams on bottom of mixer, insert desired attachment(s) into place. 4 OR 5 Move speed control to desired speed. Push and click into proper openings on bottom of mixer.
attachments. Eject Button Models Push eject button to O (OFF) and unplug mixer. Start at 1 and increase speed as needed. 6 Speed Control Models When finished, turn speed control Push speed control to eject to eject attachments. 5 840171612 ENv01.qxd:Layout 1 2/6/12 9:39 AM Page 5 How to Use Your Hand Mixer 1 Make sure mixer is unplugged and turned to O (OFF). 2 3 Following diagrams on bottom of mixer, insert desired attachment(s) into place. 4 OR 5 Move speed control to desired speed. Push and click into proper openings on bottom of mixer.


