Use & Care
Page 2
..., repair, or electrical or mechanical adjustment. 10. To reduce the risk of the hand mixer at high speed. 2 Do not use only. WATTAGE/PEAK POWER INFORMATION The marked rating of the hand mixer is intended for household use appliance for information on by using electrical appliances, basic safety... or electric burner, or in or tripping over edge of the appliance. The electrical rating of the extension cord must be used on this model may be taken to persons, including the following: 1. CAUTION! Avoid contacting moving parts. Do not let cord hang over a longer cord....
..., repair, or electrical or mechanical adjustment. 10. To reduce the risk of the hand mixer at high speed. 2 Do not use only. WATTAGE/PEAK POWER INFORMATION The marked rating of the hand mixer is intended for household use appliance for information on by using electrical appliances, basic safety... or electric burner, or in or tripping over edge of the appliance. The electrical rating of the extension cord must be used on this model may be taken to persons, including the following: 1. CAUTION! Avoid contacting moving parts. Do not let cord hang over a longer cord....
Use & Care
Page 3
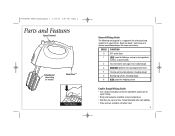
...Beating egg whites; Begin on speed 1 and increase to desired speed depending on model) Bowl Rest™ Eject Button General Mixing Guide The following mixing guide is...flour one cup at a time, mixing thoroughly after each addition. • Chips and nuts should be stirred by hand. 3 kneading dough 6 HIGH speed for whipping cream Cookie Dough Mixing Guide • Use a large mixing bowl ... potatoes; SPEED FUNCTION O OFF and/or Eject 1 LOW speed for 6-speed mixers. 840189902 ENv02.qxd:Layout 1 11/9/10 1:47 PM Page 3 Parts and Features Speed Control Attachment (depending on the ...
...Beating egg whites; Begin on speed 1 and increase to desired speed depending on model) Bowl Rest™ Eject Button General Mixing Guide The following mixing guide is...flour one cup at a time, mixing thoroughly after each addition. • Chips and nuts should be stirred by hand. 3 kneading dough 6 HIGH speed for whipping cream Cookie Dough Mixing Guide • Use a large mixing bowl ... potatoes; SPEED FUNCTION O OFF and/or Eject 1 LOW speed for 6-speed mixers. 840189902 ENv02.qxd:Layout 1 11/9/10 1:47 PM Page 3 Parts and Features Speed Control Attachment (depending on the ...
Use & Care
Page 4
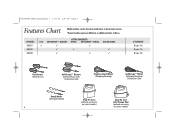
840189902 ENv02.qxd:Layout 1 11/9/10 1:47 PM Page 4 Features Chart Model number can be found on select models) MODEL 62637 62640 62645 FLAT SOFTSCRAPE™ BEATERS 3 3 3 3 ATTACHMENTS WHISK SOFTSCRAPE™ WHISK 3 3 3 DOUGH HOOKS 3 3 STORAGE Snap-On Snap-On Snap-On Flat Beaters (General Use)... Whisk (Whipping/Aerating) Dishwasher-Safe Dough Hooks (Mixing/Kneading) Snap-On Case Snap-On Case (optional accessory with Storage Door on select models) (optional accessory 4 on hand mixer or hand mixer carton. *Select models may have different or additional letter suffixes.
840189902 ENv02.qxd:Layout 1 11/9/10 1:47 PM Page 4 Features Chart Model number can be found on select models) MODEL 62637 62640 62645 FLAT SOFTSCRAPE™ BEATERS 3 3 3 3 ATTACHMENTS WHISK SOFTSCRAPE™ WHISK 3 3 3 DOUGH HOOKS 3 3 STORAGE Snap-On Snap-On Snap-On Flat Beaters (General Use)... Whisk (Whipping/Aerating) Dishwasher-Safe Dough Hooks (Mixing/Kneading) Snap-On Case Snap-On Case (optional accessory with Storage Door on select models) (optional accessory 4 on hand mixer or hand mixer carton. *Select models may have different or additional letter suffixes.
Use & Care
Page 5
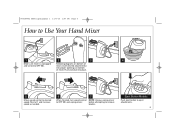
840189902 ENv02.qxd:Layout 1 11/9/10 1:47 PM Page 5 How to Use Your Hand Mixer 1 2 3 4 Make sure mixer is unplugged and turned to desired speed. Push and click into proper openings on bottom of mixer. before attempting to eject attachments. 5 Eject Button Models Push eject button to remove beaters. Start at 1 and increase speed as needed. 6 7 When finished, turn speed control NOTE: Always unplug mixer to OFF (O) and unplug mixer. Following diagrams on bottom of mixer, insert desired attachment(s) into place. 5 Move speed control to OFF (O).
840189902 ENv02.qxd:Layout 1 11/9/10 1:47 PM Page 5 How to Use Your Hand Mixer 1 2 3 4 Make sure mixer is unplugged and turned to desired speed. Push and click into proper openings on bottom of mixer. before attempting to eject attachments. 5 Eject Button Models Push eject button to remove beaters. Start at 1 and increase speed as needed. 6 7 When finished, turn speed control NOTE: Always unplug mixer to OFF (O) and unplug mixer. Following diagrams on bottom of mixer, insert desired attachment(s) into place. 5 Move speed control to OFF (O).

