Use And Care
Page 2
...children. 4. OTHER CONSUMER SAFETY INFORMATION This appliance is dropped or damaged in water or other liquid. 3. Care must be pulled on this model may cause fire, electric shock, or injury. 11. Moving Parts Hazard. To protect against risk of electrical shock, do not put cord, ... let cord contact hot surfaces, including the stove. 9. To disconnect, turn control to or greater than intended purpose. The length of the hand mixer at high speed. 2 To reduce the risk of becoming tangled in any appliance is off parts, and before inserting or removing beaters. Remove...
...children. 4. OTHER CONSUMER SAFETY INFORMATION This appliance is dropped or damaged in water or other liquid. 3. Care must be pulled on this model may cause fire, electric shock, or injury. 11. Moving Parts Hazard. To protect against risk of electrical shock, do not put cord, ... let cord contact hot surfaces, including the stove. 9. To disconnect, turn control to or greater than intended purpose. The length of the hand mixer at high speed. 2 To reduce the risk of becoming tangled in any appliance is off parts, and before inserting or removing beaters. Remove...
Use And Care
Page 3
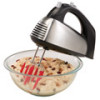
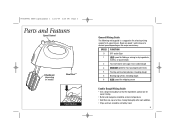
Begin on speed 1 and increase to desired speed depending on model) Bowl Rest™ Eject Button General Mixing Guide The following mixing guide is a suggestion for selecting mixing speeds for folding or mixing in dry ingredients, .... • Add flour one cup at a time, mixing thoroughly after each addition. • Chips and nuts should be stirred by hand. 3 SPEED FUNCTION O OFF and/or Eject 1 LOW speed for 6-speed mixers. kneading dough 5 Beating egg whites; 840189901 ENv01.qxd:Layout 1 12/2/09 3:36 PM Page 3 Parts and Features Speed Control Attachment...
Begin on speed 1 and increase to desired speed depending on model) Bowl Rest™ Eject Button General Mixing Guide The following mixing guide is a suggestion for selecting mixing speeds for folding or mixing in dry ingredients, .... • Add flour one cup at a time, mixing thoroughly after each addition. • Chips and nuts should be stirred by hand. 3 SPEED FUNCTION O OFF and/or Eject 1 LOW speed for 6-speed mixers. kneading dough 5 Beating egg whites; 840189901 ENv01.qxd:Layout 1 12/2/09 3:36 PM Page 3 Parts and Features Speed Control Attachment...
Use And Care
Page 4
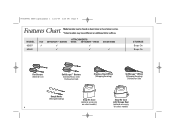
840189901 ENv01.qxd:Layout 1 12/2/09 3:36 PM Page 4 Features Chart Model number can be found on select models) MODEL 62637 62640 FLAT SOFTSCRAPE™ BEATERS 3 3 3 ATTACHMENTS WHISK SOFTSCRAPE™ WHISK 3 3 DOUGH HOOKS 3 STORAGE Snap-On Snap-On Flat Beaters (General Use) SoftScrape™...; Whisk (Whipping/Aerating) Dishwasher-Safe Dough Hooks (Mixing/Kneading) Snap-On Case Snap-On Case (optional accessory with Storage Door on select models) (optional accessory 4 on hand mixer or hand mixer carton. *Select models may have different or additional letter suffixes.
840189901 ENv01.qxd:Layout 1 12/2/09 3:36 PM Page 4 Features Chart Model number can be found on select models) MODEL 62637 62640 FLAT SOFTSCRAPE™ BEATERS 3 3 3 ATTACHMENTS WHISK SOFTSCRAPE™ WHISK 3 3 DOUGH HOOKS 3 STORAGE Snap-On Snap-On Flat Beaters (General Use) SoftScrape™...; Whisk (Whipping/Aerating) Dishwasher-Safe Dough Hooks (Mixing/Kneading) Snap-On Case Snap-On Case (optional accessory with Storage Door on select models) (optional accessory 4 on hand mixer or hand mixer carton. *Select models may have different or additional letter suffixes.
Use And Care
Page 5
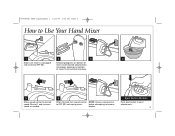
Push and click into proper openings on bottom of mixer, insert desired attachment(s) into place. 5 Move speed control to desired speed. Eject Button Models Push eject button to remove beaters. before attempting to eject attachments. 5 840189901 ENv01.qxd:Layout 1 12/2/09 3:36 PM Page 5 How to Use Your Hand Mixer 1 2 3 4 Make sure mixer is unplugged and turned to OFF (O) and unplug mixer. Start at 1 and increase speed as needed. 6 When finished, turn speed control NOTE: Always unplug mixer to OFF (O). Following diagrams on bottom of mixer.
Push and click into proper openings on bottom of mixer, insert desired attachment(s) into place. 5 Move speed control to desired speed. Eject Button Models Push eject button to remove beaters. before attempting to eject attachments. 5 840189901 ENv01.qxd:Layout 1 12/2/09 3:36 PM Page 5 How to Use Your Hand Mixer 1 2 3 4 Make sure mixer is unplugged and turned to OFF (O) and unplug mixer. Start at 1 and increase speed as needed. 6 When finished, turn speed control NOTE: Always unplug mixer to OFF (O). Following diagrams on bottom of mixer.

