
Use & Care
Page 2
... malfunctions, or is dropped or damaged in place. 15. A rubber spatula may push lid off parts, and before plugging cord into wall outlet. Do not use a broken, chipped, or cracked blender jar. 13. With the protection of an oven mitt or thick towel, place one hand on ...Read all instructions. 2. Unplug cord from outlet when not in water or other than intended purpose. handle carefully - Always operate blender with moving parts. 6. To prevent possible burns: Do not fill blender jar beyond the 3-cup (750-ml) level. Do not use , before putting on top of two-piece lid. When...
... malfunctions, or is dropped or damaged in place. 15. A rubber spatula may push lid off parts, and before plugging cord into wall outlet. Do not use a broken, chipped, or cracked blender jar. 13. With the protection of an oven mitt or thick towel, place one hand on ...Read all instructions. 2. Unplug cord from outlet when not in water or other than intended purpose. handle carefully - Always operate blender with moving parts. 6. To prevent possible burns: Do not fill blender jar beyond the 3-cup (750-ml) level. Do not use , before putting on top of two-piece lid. When...

Use & Care
Page 3
...the plug. This is needed most power to crush ice, frozen fruit, etc. Wattage/Peak Power Information The wattage/ampere rating of the blender is determined by an Underwriters Laboratory test and is necessary, an approved extension cord may draw significantly less power. Use for household use ... to reduce the hazards of becoming tangled in the freezer filled with your unit, but are available as replacement parts. WARNING! This is intended for food or liquids only. Wipe blender base with a damp cloth or sponge. 840208401 ENv01.qxd:Layout 1 12/21/11 4:25 PM Page 3...
...the plug. This is needed most power to crush ice, frozen fruit, etc. Wattage/Peak Power Information The wattage/ampere rating of the blender is determined by an Underwriters Laboratory test and is necessary, an approved extension cord may draw significantly less power. Use for household use ... to reduce the hazards of becoming tangled in the freezer filled with your unit, but are available as replacement parts. WARNING! This is intended for food or liquids only. Wipe blender base with a damp cloth or sponge. 840208401 ENv01.qxd:Layout 1 12/21/11 4:25 PM Page 3...

Use & Care
Page 4
840208401 ENv01.qxd:Layout 1 12/21/11 4:25 PM Page 4 Parts and Features Filler-Cap Lid Dispenser Assembly Cord Stuff and Spout Cap Storage (located at bottom of blender) 4 Spout Cap Base Jar With Cutting Assembly Control Panel
840208401 ENv01.qxd:Layout 1 12/21/11 4:25 PM Page 4 Parts and Features Filler-Cap Lid Dispenser Assembly Cord Stuff and Spout Cap Storage (located at bottom of blender) 4 Spout Cap Base Jar With Cutting Assembly Control Panel

Use & Care
Page 5
.../21/11 4:25 PM Page 5 Using Your Blender BEFORE FIRST USE: After unpacking the blender, follow the instructions in "Cleaning Your Blender." Call our toll-free customer service number to wear during normal use . IMPORTANT: Your blender jar and cutting blade assembly are subject to obtain replacement parts. 1 2 3 4 BLENDING HOT LIQUIDS WARNING! With the protection...
.../21/11 4:25 PM Page 5 Using Your Blender BEFORE FIRST USE: After unpacking the blender, follow the instructions in "Cleaning Your Blender." Call our toll-free customer service number to wear during normal use . IMPORTANT: Your blender jar and cutting blade assembly are subject to obtain replacement parts. 1 2 3 4 BLENDING HOT LIQUIDS WARNING! With the protection...

Use & Care
Page 9
...in water or other dairy products, meats, or seafood. To remove stubborn spots, use the "SANI" setting when washing in "Cleaning Your Blender." 9 Discard soapy water. DO NOT use a mild, nonabrasive cleanser. Rinse and dry thoroughly. This function should be taken when handling the..., pour 2 cups (500 ml) warm water in "Cleaning Your Blender." Parts may also be used to rinse the blender between batches of food is not a substitute for 10 seconds. This function is finished, the blender should only be disassembled and thoroughly cleaned as instructed in jar and ...
...in water or other dairy products, meats, or seafood. To remove stubborn spots, use the "SANI" setting when washing in "Cleaning Your Blender." 9 Discard soapy water. DO NOT use a mild, nonabrasive cleanser. Rinse and dry thoroughly. This function should be taken when handling the..., pour 2 cups (500 ml) warm water in "Cleaning Your Blender." Parts may also be used to rinse the blender between batches of food is not a substitute for 10 seconds. This function is finished, the blender should only be disassembled and thoroughly cleaned as instructed in jar and ...
Use & Care
Page 10
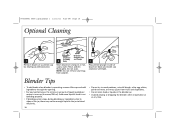
... and vegetables. • Do not store food or liquids in the blender jar. • Avoid bumping or dropping the blender when in operation or at any time. Do not soak. Blender Tips • To add foods when blender is operating, remove filler-cap and add ingredients through the opening. &#...8226; For best performance, the minimum amount of dispenser body and rotate cap clockwise until tight. Dispenser Dispenser Assembly Cap Assembly and Plunger 2 Body Wash dispenser and parts in the jar to ...
... and vegetables. • Do not store food or liquids in the blender jar. • Avoid bumping or dropping the blender when in operation or at any time. Do not soak. Blender Tips • To add foods when blender is operating, remove filler-cap and add ingredients through the opening. &#...8226; For best performance, the minimum amount of dispenser body and rotate cap clockwise until tight. Dispenser Dispenser Assembly Cap Assembly and Plunger 2 Body Wash dispenser and parts in the jar to ...


