
Use & Care
Page 2
... any manner. Do not use broken, cracked, or loose cutting blade assembly. 14. Always operate blender with lid in any appliance with moving parts. 6. To prevent possible burns: Do not fill blender jar beyond the 3-cup (750-ml) level. Check that the control is OFF before.... 10. Read all instructions. 2. Do not use appliance for information on or taking off jar during blending. A rubber spatula may push lid off parts, and before cleaning. 5. To protect against risk of attachments, including canning jars, not recommended or sold by or near children. 4. Unplug cord from...
... any manner. Do not use broken, cracked, or loose cutting blade assembly. 14. Always operate blender with lid in any appliance with moving parts. 6. To prevent possible burns: Do not fill blender jar beyond the 3-cup (750-ml) level. Check that the control is OFF before.... 10. Read all instructions. 2. Do not use appliance for information on or taking off jar during blending. A rubber spatula may push lid off parts, and before cleaning. 5. To protect against risk of attachments, including canning jars, not recommended or sold by or near children. 4. Unplug cord from...

Use & Care
Page 3
... assembly as provided may draw significantly less power. The contents may freeze and may not be provided with your unit, but are available as replacement parts. The blender as it still does not fit, have an electrician replace the outlet. DO NOT IMMERSE BASE IN WATER. Care should be used on...
... assembly as provided may draw significantly less power. The contents may freeze and may not be provided with your unit, but are available as replacement parts. The blender as it still does not fit, have an electrician replace the outlet. DO NOT IMMERSE BASE IN WATER. Care should be used on...

Use & Care
Page 4
840208401 ENv01.qxd:Layout 1 12/21/11 4:25 PM Page 4 Parts and Features Filler-Cap Lid Dispenser Assembly Cord Stuff and Spout Cap Storage (located at bottom of blender) 4 Spout Cap Base Jar With Cutting Assembly Control Panel
840208401 ENv01.qxd:Layout 1 12/21/11 4:25 PM Page 4 Parts and Features Filler-Cap Lid Dispenser Assembly Cord Stuff and Spout Cap Storage (located at bottom of blender) 4 Spout Cap Base Jar With Cutting Assembly Control Panel

Use & Care
Page 5
... lid. Keep exposed skin away from lid. Start blending at lowest speed. 5 6 7 5 IMPORTANT: Your blender jar and cutting blade assembly are subject to obtain replacement parts. 1 2 3 4 BLENDING HOT LIQUIDS WARNING! Always inspect jar for broken, cracked, or loose blades. Burn Hazard: When blending hot liquids, do not use . Always inspect cutting...
... lid. Keep exposed skin away from lid. Start blending at lowest speed. 5 6 7 5 IMPORTANT: Your blender jar and cutting blade assembly are subject to obtain replacement parts. 1 2 3 4 BLENDING HOT LIQUIDS WARNING! Always inspect jar for broken, cracked, or loose blades. Burn Hazard: When blending hot liquids, do not use . Always inspect cutting...

Use & Care
Page 9
Parts may also be used to rinse the blender between batches of food is very sharp. This function should never be washed with a damp cloth or ...
Parts may also be used to rinse the blender between batches of food is very sharp. This function should never be washed with a damp cloth or ...
Use & Care
Page 10
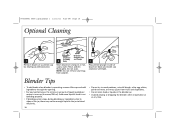
.../11 4:25 PM Page 10 Optional Cleaning 1 Remove dispenser assembly cap by rotating counterclockwise. Dispenser Dispenser Assembly Cap Assembly and Plunger 2 Body Wash dispenser and parts in the jar to blend efficiently. 10 • Do not try to mash potatoes, mix stiff dough, whip egg whites, grind raw meat, or extract...
.../11 4:25 PM Page 10 Optional Cleaning 1 Remove dispenser assembly cap by rotating counterclockwise. Dispenser Dispenser Assembly Cap Assembly and Plunger 2 Body Wash dispenser and parts in the jar to blend efficiently. 10 • Do not try to mash potatoes, mix stiff dough, whip egg whites, grind raw meat, or extract...


