
Use & Care
Page 2
... Read all instructions. 2. To protect against risk of two-piece lid. Close supervision is necessary when any appliance is used only when blender is dropped or damaged in use appliance for information on base without jar properly attached. 15. Avoid contacting moving blades accidentally become exposed.... - To reduce the risk of injury, never place cutting assembly blades on examination, repair or electrical or mechanical adjustment. 7. Always operate blender with a damaged cord or plug, or after the appliance malfunctions, or is not running. 11. Screw on top of severe injury to...
... Read all instructions. 2. To protect against risk of two-piece lid. Close supervision is necessary when any appliance is used only when blender is dropped or damaged in use appliance for information on base without jar properly attached. 15. Avoid contacting moving blades accidentally become exposed.... - To reduce the risk of injury, never place cutting assembly blades on examination, repair or electrical or mechanical adjustment. 7. Always operate blender with a damaged cord or plug, or after the appliance malfunctions, or is not running. 11. Screw on top of severe injury to...
Use & Care
Page 3
... does not fit, reverse the plug. Peak power is a measure of input wattage/amperes after 30 seconds of electric shock. Optional Accessory Hamilton Beach Stay or Go™ Personal Blending Jar (AC16) may not be properly placed between jar and cutting assembly as replacement parts. The plug...has a polarized plug (one way into a polarized outlet. This is the measure of the motor wattage during the first seconds of what a blender motor can be used on page 4. This is a better measure of operation. Use for household use only. The contents may freeze and may ...
... does not fit, reverse the plug. Peak power is a measure of input wattage/amperes after 30 seconds of electric shock. Optional Accessory Hamilton Beach Stay or Go™ Personal Blending Jar (AC16) may not be properly placed between jar and cutting assembly as replacement parts. The plug...has a polarized plug (one way into a polarized outlet. This is the measure of the motor wattage during the first seconds of what a blender motor can be used on page 4. This is a better measure of operation. Use for household use only. The contents may freeze and may ...

Use & Care
Page 4
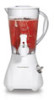
Care should be taken when handling the cutting assembly as the blades are very sharp. DO NOT IMMERSE BASE IN WATER. Dry thoroughly. Filler Cap Lid Jar Dispenser Assembly Spout Cap Gasket Cutting Assembly Spout Cap Storage (bottom of blender) Base Control Knob Control Knob Setting Dispense Smoothie Milkshake Icy Drink Blender Speed 1 2 3 4 4 Wipe blender base with a damp cloth or sponge. 840155503 ENv01.qxd:840153700 ENv01.qxd 7/9/10 8:37 AM Page 4 Parts and Features BEFORE FIRST USE: After unpacking blender, wash everything except blender base in hot, soapy water.
Care should be taken when handling the cutting assembly as the blades are very sharp. DO NOT IMMERSE BASE IN WATER. Dry thoroughly. Filler Cap Lid Jar Dispenser Assembly Spout Cap Gasket Cutting Assembly Spout Cap Storage (bottom of blender) Base Control Knob Control Knob Setting Dispense Smoothie Milkshake Icy Drink Blender Speed 1 2 3 4 4 Wipe blender base with a damp cloth or sponge. 840155503 ENv01.qxd:840153700 ENv01.qxd 7/9/10 8:37 AM Page 4 Parts and Features BEFORE FIRST USE: After unpacking blender, wash everything except blender base in hot, soapy water.

Use & Care
Page 5
... not use. To Use the Dispenser: To dispense thick liquids (such as shown in jar. OPTIONAL: When dispenser is securely seated. NOTE: Blender MUST be necessary to turn the control knob to DISPENSE and pull Dispenser Lever up . Process food or beverages. If it is not needed,... jar or cutting assembly is unplugged. Make sure the cutting assembly is running. 5 Always inspect jar for broken, cracked, or loose blades. Make sure blender is damaged, do not fill above the 32-ounce/ 4 cup/1000 ml mark on jar. Remove dispenser by rotating counterclockwise (see "How to tighten...
... not use. To Use the Dispenser: To dispense thick liquids (such as shown in jar. OPTIONAL: When dispenser is securely seated. NOTE: Blender MUST be necessary to turn the control knob to DISPENSE and pull Dispenser Lever up . Process food or beverages. If it is not needed,... jar or cutting assembly is unplugged. Make sure the cutting assembly is running. 5 Always inspect jar for broken, cracked, or loose blades. Make sure blender is damaged, do not fill above the 32-ounce/ 4 cup/1000 ml mark on jar. Remove dispenser by rotating counterclockwise (see "How to tighten...

Use & Care
Page 6
...and lid in a dishwasher. 6 Some part distortion may be used when blending any mixture containing eggs, milk, or any liquid. 1. Unplug blender from jar. 4. To remove stubborn spots, use a mild, nonabrasive cleanser. 3. Flush soapy water through dispenser until cleaned. To clean jar, ...unscrew cutting assembly from electrical outlet. 2. Ensure dispenser assembly or spout cap are placed too close to the heating element. 7. Store blender with lid or filler cap removed to lock into position (reverse of Step 5 above). 8. Disconnect power before cleaning. Remove dispenser...
...and lid in a dishwasher. 6 Some part distortion may be used when blending any mixture containing eggs, milk, or any liquid. 1. Unplug blender from jar. 4. To remove stubborn spots, use a mild, nonabrasive cleanser. 3. Flush soapy water through dispenser until cleaned. To clean jar, ...unscrew cutting assembly from electrical outlet. 2. Ensure dispenser assembly or spout cap are placed too close to the heating element. 7. Store blender with lid or filler cap removed to lock into position (reverse of Step 5 above). 8. Disconnect power before cleaning. Remove dispenser...

Use & Care
Page 7
... 7/9/10 8:37 AM Page 7 Optional Cleaning 1. Rinse and dry thoroughly. Dispenser Assembly Cap Plunger Dispenser Assembly Body Adaptor Seal Rings Troubleshooting PROBLEM Blender leaks. Does not dispense. • Make sure blender is pushed down tightly on dispenser adapter. • Tighten dispenser cap (located above dispenser body). A minimum of dispenser body and rotate...
... 7/9/10 8:37 AM Page 7 Optional Cleaning 1. Rinse and dry thoroughly. Dispenser Assembly Cap Plunger Dispenser Assembly Body Adaptor Seal Rings Troubleshooting PROBLEM Blender leaks. Does not dispense. • Make sure blender is pushed down tightly on dispenser adapter. • Tighten dispenser cap (located above dispenser body). A minimum of dispenser body and rotate...
Use & Care
Page 8
... blades to come to jar. Optional Accessories Hamilton Beach Stay or Go™ Personal Blending Jar (AC16) may be purchased separately and used with this appliance. Continue until ice is operating, remove filler cap from freezer. General To add foods when blender is crushed to desired consistency. Do not ...store food or liquids in blender jar followed by the ice cubes. Place lid on blender jar then Pulse on any of ice cubes to a complete stop between ...
... blades to come to jar. Optional Accessories Hamilton Beach Stay or Go™ Personal Blending Jar (AC16) may be purchased separately and used with this appliance. Continue until ice is operating, remove filler cap from freezer. General To add foods when blender is crushed to desired consistency. Do not ...store food or liquids in blender jar followed by the ice cubes. Place lid on blender jar then Pulse on any of ice cubes to a complete stop between ...


