Use & Care
Page 3
...motor wattage during the first seconds of electric shock. The electrical rating of the extension cord must be provided with your blender jar, the round rubber gasket must be taken to arrange the extension cord so that reduces the risk of operation. Peak power is needed most ...and cutting assembly as provided may be purchased separately and used on page 4. Optional Accessory Hamilton Beach Stay or Go™ Personal Blending Jar (AC16) may result in damage to the cutting blades, jar, blender and possibly result in any way or by children or accidentally tripped over , a longer...
...motor wattage during the first seconds of electric shock. The electrical rating of the extension cord must be provided with your blender jar, the round rubber gasket must be taken to arrange the extension cord so that reduces the risk of operation. Peak power is needed most ...and cutting assembly as provided may be purchased separately and used on page 4. Optional Accessory Hamilton Beach Stay or Go™ Personal Blending Jar (AC16) may result in damage to the cutting blades, jar, blender and possibly result in any way or by children or accidentally tripped over , a longer...

Use & Care
Page 4
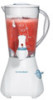
Dry thoroughly. Filler Cap Lid Jar Dispenser Assembly Spout Cap Gasket Cutting Assembly Spout Cap Storage (bottom of blender) Base Control Knob Control Knob Setting Dispense Smoothie Milkshake Icy Drink Blender Speed 1 2 3 4 4 Care should be taken when handling the cutting assembly as the blades are very sharp. DO NOT IMMERSE BASE IN WATER. Wipe blender base with a damp cloth or sponge. 840155503 ENv01.qxd:840153700 ENv01.qxd 7/9/10 8:37 AM Page 4 Parts and Features BEFORE FIRST USE: After unpacking blender, wash everything except blender base in hot, soapy water.
Dry thoroughly. Filler Cap Lid Jar Dispenser Assembly Spout Cap Gasket Cutting Assembly Spout Cap Storage (bottom of blender) Base Control Knob Control Knob Setting Dispense Smoothie Milkshake Icy Drink Blender Speed 1 2 3 4 4 Care should be taken when handling the cutting assembly as the blades are very sharp. DO NOT IMMERSE BASE IN WATER. Wipe blender base with a damp cloth or sponge. 840155503 ENv01.qxd:840153700 ENv01.qxd 7/9/10 8:37 AM Page 4 Parts and Features BEFORE FIRST USE: After unpacking blender, wash everything except blender base in hot, soapy water.

Use & Care
Page 5
Always inspect jar for broken, cracked, or loose blades. Fit gasket over blades as milkshakes, smoothies, frozen drinks, etc.), turn the blender ON to dispense the liquid. How to Clean" section). Place lid with spout cap. Do not twist. NOTE: NEVER replace jar onto .... 5 840155503 ENv01.qxd:840153700 ENv01.qxd 7/9/10 8:37 AM Page 5 How to Assemble IMPORTANT: Your blender jar and cutting assembly are subject to wear during normal use , snap onto bottom of gasket and screw on jar. Remove dispenser by rotating counterclockwise (see "How to Operate 1. If jar or cutting...
Always inspect jar for broken, cracked, or loose blades. Fit gasket over blades as milkshakes, smoothies, frozen drinks, etc.), turn the blender ON to dispense the liquid. How to Clean" section). Place lid with spout cap. Do not twist. NOTE: NEVER replace jar onto .... 5 840155503 ENv01.qxd:840153700 ENv01.qxd 7/9/10 8:37 AM Page 5 How to Assemble IMPORTANT: Your blender jar and cutting assembly are subject to wear during normal use , snap onto bottom of gasket and screw on jar. Remove dispenser by rotating counterclockwise (see "How to Operate 1. If jar or cutting...

Use & Care
Page 6
...parts except the cutting assembly and gasket may occur if your household dishwasher temperature is finished, the blender should never be washed in jar and add 1 drop liquid dishwashing detergent. Store blender with lid or filler cap removed to rinse the blender between batches of food is ...unscrew cutting assembly from jar. 4. Some part distortion may be used to prevent container odor. Reassemble cutting assembly and gasket onto jar, and replace jar onto blender base. Ensure dispenser assembly or spout cap are placed too close to lock into position (reverse of Step 5 above)....
...parts except the cutting assembly and gasket may occur if your household dishwasher temperature is finished, the blender should never be washed in jar and add 1 drop liquid dishwashing detergent. Store blender with lid or filler cap removed to rinse the blender between batches of food is ...unscrew cutting assembly from jar. 4. Some part distortion may be used to prevent container odor. Reassemble cutting assembly and gasket onto jar, and replace jar onto blender base. Ensure dispenser assembly or spout cap are placed too close to lock into position (reverse of Step 5 above)....

Use & Care
Page 7
... NOTE: Do not remove seal rings from adaptor. 3. PROBABLE CAUSE • Tighten cutting assembly on jar. • Make sure gasket is in place on jar. A minimum of dispenser body and rotate cap clockwise until tight. Ice not crushed. • See ice...Cap Plunger Dispenser Assembly Body Adaptor Seal Rings Troubleshooting PROBLEM Blender leaks. Does not dispense. • Make sure blender is recommended. Dispenser leaks. • Make sure seal rings are in place on cutting assembly. • Make sure gasket is pushed down tightly on dispenser adapter. • Tighten...
... NOTE: Do not remove seal rings from adaptor. 3. PROBABLE CAUSE • Tighten cutting assembly on jar. • Make sure gasket is in place on jar. A minimum of dispenser body and rotate cap clockwise until tight. Ice not crushed. • See ice...Cap Plunger Dispenser Assembly Body Adaptor Seal Rings Troubleshooting PROBLEM Blender leaks. Does not dispense. • Make sure blender is recommended. Dispenser leaks. • Make sure seal rings are in place on cutting assembly. • Make sure gasket is pushed down tightly on dispenser adapter. • Tighten...


