

Use & Care
Page 1
Digitally signed by Anna Creery cn=Anna Creery, c=US Date: 2001.05.02 09:50:12 -05'00' Reason: I am approving this instruction manual before using your appliance. We invite you to carefully read this document Use & Care for Blenders 2 USA: 1-800-851-8900 - Uso y cuidado de las licuadoras 9 México: 01-800-71-16-100 - Le invitamos a leer cuidadosamente este instructivo antes de usar su aparato. 840086000
Digitally signed by Anna Creery cn=Anna Creery, c=US Date: 2001.05.02 09:50:12 -05'00' Reason: I am approving this instruction manual before using your appliance. We invite you to carefully read this document Use & Care for Blenders 2 USA: 1-800-851-8900 - Uso y cuidado de las licuadoras 9 México: 01-800-71-16-100 - Le invitamos a leer cuidadosamente este instructivo antes de usar su aparato. 840086000
Use & Care
Page 2
...an approved extension cord may be used but must be equal to replace the obsolete outlet. Use for future reference. 2. Do not attempt to blender. The length of becoming tangled in use, before cleaning. 6. Care must be followed, including the following: 1. Unplug cord from outlet when not...not leave blender unattended while it can result if moving parts. 7. If the plug should turn the control to OFF, then remove plug from the cover opening to arrange the extension cord so that of your home corresponds to reduce the hazards of the cord used by Hamilton Beach/Proctor-...
...an approved extension cord may be used but must be equal to replace the obsolete outlet. Use for future reference. 2. Do not attempt to blender. The length of becoming tangled in use, before cleaning. 6. Care must be followed, including the following: 1. Unplug cord from outlet when not...not leave blender unattended while it can result if moving parts. 7. If the plug should turn the control to OFF, then remove plug from the cover opening to arrange the extension cord so that of your home corresponds to reduce the hazards of the cord used by Hamilton Beach/Proctor-...
Use & Care
Page 3
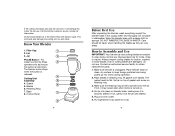
...-Cap 2. Gasket 5. Care should be taken when handling the blades as the button is securely seated. Always inspect jar for information. Place blender base on retaining ring. 3. Fit gasket over blades. If not, gently rock the jar until seated. 5. Call the toll-free customer service number... stops when the button is firmly screwed onto the jar. Base 8. Control Panel 4 Before First Use After unpacking the blender, wash everything except the blender base in dishwasher. Dry thoroughly. If jar or cutting blades are damaged, do not move, it may loosen later when motor is ...
...-Cap 2. Gasket 5. Care should be taken when handling the blades as the button is securely seated. Always inspect jar for information. Place blender base on retaining ring. 3. Fit gasket over blades. If not, gently rock the jar until seated. 5. Call the toll-free customer service number... stops when the button is firmly screwed onto the jar. Base 8. Control Panel 4 Before First Use After unpacking the blender, wash everything except the blender base in dishwasher. Dry thoroughly. If jar or cutting blades are damaged, do not move, it may loosen later when motor is ...
Use & Care
Page 4
...cover in hot, soapy water. Customer Service If you have stopped rotating before blending hot foods or liquids. • To add foods when blender is not made to sides of retaining ring. 5. These numbers can be found on lid when blending liquids. This information will help us ... and wait until blades have a question about your question much more quickly. 7. Push button on control panel to Clean the Blender 1. ALWAYS turn blender OFF. How to start blender. 8. To remove stubborn spots, use a rubber spatula to push mixture toward blades. • Do not try to spurt out ...
...cover in hot, soapy water. Customer Service If you have stopped rotating before blending hot foods or liquids. • To add foods when blender is not made to sides of retaining ring. 5. These numbers can be found on lid when blending liquids. This information will help us ... and wait until blades have a question about your question much more quickly. 7. Push button on control panel to Clean the Blender 1. ALWAYS turn blender OFF. How to start blender. 8. To remove stubborn spots, use a rubber spatula to push mixture toward blades. • Do not try to spurt out ...


