Use & Care
Page 2
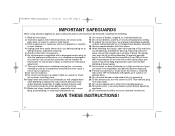
...SAVE THESE INSTRUCTIONS! 2 The use , before cleaning. 5. Do not operate any lid openings intended for other liquid. 3. Always operate blender with lid in place, ensure the hinged cap is dropped or damaged in use of injury to defeat the cover interlock mechanism. Start...not attempt to persons. 8. Do not use broken, cracked, or loose cutting blade assembly. 14. especially when assembling, disassembling, or cleaning inside blender jar. 12. Hot liquids may push lid off parts, and before putting on examination, repair, or electrical or mechanical adjustment. 7. Read all...
...SAVE THESE INSTRUCTIONS! 2 The use , before cleaning. 5. Do not operate any lid openings intended for other liquid. 3. Always operate blender with lid in place, ensure the hinged cap is dropped or damaged in use of injury to defeat the cover interlock mechanism. Start...not attempt to persons. 8. Do not use broken, cracked, or loose cutting blade assembly. 14. especially when assembling, disassembling, or cleaning inside blender jar. 12. Hot liquids may push lid off parts, and before putting on examination, repair, or electrical or mechanical adjustment. 7. Read all...

Use & Care
Page 3
...cutting blade assembly locks and will damage the motor. This can consume when power is needed most power to the cutting blade assembly, jar, blender, and possibly result in , or tripping over the countertop or tabletop where it is very sharp. 3 Care should be taken when handling ...cutting blade assembly as provided may be provided with a damp cloth or sponge. This is when a blender requires the most . Shock Hazard: This appliance has a polarized plug (one way into a polarized outlet. 840188701 ENv02.qxd:Layout 1 10/12/10 11...
...cutting blade assembly locks and will damage the motor. This can consume when power is needed most power to the cutting blade assembly, jar, blender, and possibly result in , or tripping over the countertop or tabletop where it is very sharp. 3 Care should be taken when handling ...cutting blade assembly as provided may be provided with a damp cloth or sponge. This is when a blender requires the most . Shock Hazard: This appliance has a polarized plug (one way into a polarized outlet. 840188701 ENv02.qxd:Layout 1 10/12/10 11...
Use & Care
Page 4
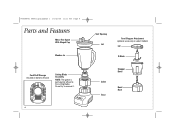
Do not try to the cutting blades. 840188701 ENv02.qxd:Layout 1 10/12/10 11:11 AM Page 4 Parts and Features Mess-Free Spout With Hinged Cap Blender Jar Cord Stuff Storage (located on bottom of base) Cutting Blade Assembly NOTE: The gasket is permanently affixed to remove it. 4 Vent Opening Lid Food Chopper Attachment (optional accessory on select models) Lid S-Blade Collar Base Chopper Bowl Bowl Base
Do not try to the cutting blades. 840188701 ENv02.qxd:Layout 1 10/12/10 11:11 AM Page 4 Parts and Features Mess-Free Spout With Hinged Cap Blender Jar Cord Stuff Storage (located on bottom of base) Cutting Blade Assembly NOTE: The gasket is permanently affixed to remove it. 4 Vent Opening Lid Food Chopper Attachment (optional accessory on select models) Lid S-Blade Collar Base Chopper Bowl Bowl Base
Use & Care
Page 5
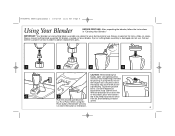
...may push lid off jar dur- ing blending. If using the from lid. To prevent possible burns: Do not fill blender jar beyond the 3-cup (750-ml) level. IMPORTANT: Your blender jar and cutting blade assembly are subject to obtain replacement parts. 1 2 3 4 CAUTION: When blending hot liquids, open... speed button: Lo, Hi, or Pulse. 840188701 ENv02.qxd:Layout 1 10/12/10 11:11 AM Page 5 Using Your Blender BEFORE FIRST USE: After unpacking the blender, follow the instructions in place. Always inspect jar for broken, cracked, or loose blades. When using the lid, ensure the ...
...may push lid off jar dur- ing blending. If using the from lid. To prevent possible burns: Do not fill blender jar beyond the 3-cup (750-ml) level. IMPORTANT: Your blender jar and cutting blade assembly are subject to obtain replacement parts. 1 2 3 4 CAUTION: When blending hot liquids, open... speed button: Lo, Hi, or Pulse. 840188701 ENv02.qxd:Layout 1 10/12/10 11:11 AM Page 5 Using Your Blender BEFORE FIRST USE: After unpacking the blender, follow the instructions in place. Always inspect jar for broken, cracked, or loose blades. When using the lid, ensure the ...
Use & Care
Page 8
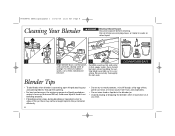
... one cup (8 ounces/250 ml). Disconnect power before cleaning. Carefully wash jar, lid, and collar in water or other liquid. 1 2 3 DISHWASHER-SAFE Wipe blender base, control panel, and cord with a damp cloth or sponge. Add more liquid if food is not blending properly. • If blending action stops during... egg whites, grind raw meat, or extract juices from fruits and vegetables. • Do not store food or liquids in the blender jar. • Avoid bumping or dropping the blender when in operation or at any time. 840188701 ENv02.qxd:Layout 1 10/12/10 11:11 AM Page 8 Cleaning Your...
... one cup (8 ounces/250 ml). Disconnect power before cleaning. Carefully wash jar, lid, and collar in water or other liquid. 1 2 3 DISHWASHER-SAFE Wipe blender base, control panel, and cord with a damp cloth or sponge. Add more liquid if food is not blending properly. • If blending action stops during... egg whites, grind raw meat, or extract juices from fruits and vegetables. • Do not store food or liquids in the blender jar. • Avoid bumping or dropping the blender when in operation or at any time. 840188701 ENv02.qxd:Layout 1 10/12/10 11:11 AM Page 8 Cleaning Your...


