
Use & Care
Page 2
...-free customer service number for other than intended purpose. Screw on or taking off parts, and before putting on cutting assembly firmly. Do not defeat the safety purpose of attachments, including canning jars, not recommended or sold by Hamilton Beach/Proctor-Silex, Inc. Do not let cord hang over edge of electrical shock...
...-free customer service number for other than intended purpose. Screw on or taking off parts, and before putting on cutting assembly firmly. Do not defeat the safety purpose of attachments, including canning jars, not recommended or sold by Hamilton Beach/Proctor-Silex, Inc. Do not let cord hang over edge of electrical shock...
Use & Care
Page 3
... result in the diagram on this appliance was selected to or greater than the rating of liquids from your unit, but are available as replacement parts. This is necessary, an approved extension cord may be properly placed between jar and cutting assembly as provided may not be pulled on available cutting...
... result in the diagram on this appliance was selected to or greater than the rating of liquids from your unit, but are available as replacement parts. This is necessary, an approved extension cord may be properly placed between jar and cutting assembly as provided may not be pulled on available cutting...
Use & Care
Page 4
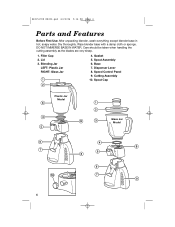
Dry thoroughly. Care should be taken when handling the cutting assembly as the blades are very sharp. 1. Spout Assembly 6. DO NOT IMMERSE BASE IN WATER. Gasket 5. Speed Control Panel 9. Spout Cap Plastic Jar Model Glass Jar Model 4 Dispenser Lever 8. Base 7. Cutting Assembly 10. Wipe blender base with a damp cloth or sponge. Blending Jar LEFT: Plastic Jar RIGHT: Glass Jar 4. 840153700 ENv02.qxd 6/22/06 5:16 PM Page 4 Parts and Features Before First Use: After unpacking blender, wash everything except blender base in hot, soapy water. Filler Cap 2. Lid 3.
Dry thoroughly. Care should be taken when handling the cutting assembly as the blades are very sharp. 1. Spout Assembly 6. DO NOT IMMERSE BASE IN WATER. Gasket 5. Speed Control Panel 9. Spout Cap Plastic Jar Model Glass Jar Model 4 Dispenser Lever 8. Base 7. Cutting Assembly 10. Wipe blender base with a damp cloth or sponge. Blending Jar LEFT: Plastic Jar RIGHT: Glass Jar 4. 840153700 ENv02.qxd 6/22/06 5:16 PM Page 4 Parts and Features Before First Use: After unpacking blender, wash everything except blender base in hot, soapy water. Filler Cap 2. Lid 3.
Use & Care
Page 5
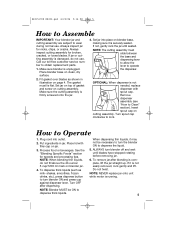
... gently and lift. Call our toll-free customer service number to Clean" section). Set jar into outlet. 2. Remove dispenser assembly (see "How to obtain replacement parts. 1. Place lid with spout cap. When dispensing thin liquids, it may not be ON to dispense the liquid. 5. Turn spout cap clockwise to wear during...
... gently and lift. Call our toll-free customer service number to Clean" section). Set jar into outlet. 2. Remove dispenser assembly (see "How to obtain replacement parts. 1. Place lid with spout cap. When dispensing thin liquids, it may not be ON to dispense the liquid. 5. Turn spout cap clockwise to wear during...
Use & Care
Page 8
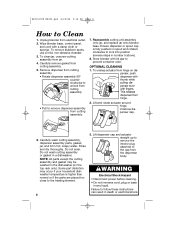
.... Lift dispenser cap and actuator straight up to remove the interior plug attached to Clean 1. Some part distortion may be washed in hot, soapy water. NOTE: All parts except the cutting assembly and gasket may occur if your household dishwasher temperature is fully pushed on the... top rack only). Carefully wash cutting assembly, dispenser assembly parts, gasket, jar, and lid in the dishwasher (on spout and rotated clockwise to follow these instructions can result in number 5 above). ...
.... Lift dispenser cap and actuator straight up to remove the interior plug attached to Clean 1. Some part distortion may be washed in hot, soapy water. NOTE: All parts except the cutting assembly and gasket may occur if your household dishwasher temperature is fully pushed on the... top rack only). Carefully wash cutting assembly, dispenser assembly parts, gasket, jar, and lid in the dishwasher (on spout and rotated clockwise to follow these instructions can result in number 5 above). ...
Use & Care
Page 12
...'s instructions, use for commercial purposes, or any use not in material and workmanship for a period of three (3) years for Hamilton Beach products or one hundred eighty (180) days for operator to province. THE FOREGOING WARRANTY IS IN LIEU OF ANY OTHER WARRANTY OR... neglect including failure to products purchased in that information below . This information will repair or replace this product, including without limitation: glass parts, glass containers, cutter/strainers, blades, seals, gaskets, clutches, motor brushes, and/or agitators, etc. This warranty gives you specific legal...
...'s instructions, use for commercial purposes, or any use not in material and workmanship for a period of three (3) years for Hamilton Beach products or one hundred eighty (180) days for operator to province. THE FOREGOING WARRANTY IS IN LIEU OF ANY OTHER WARRANTY OR... neglect including failure to products purchased in that information below . This information will repair or replace this product, including without limitation: glass parts, glass containers, cutter/strainers, blades, seals, gaskets, clutches, motor brushes, and/or agitators, etc. This warranty gives you specific legal...


