
Use & Care
Page 4
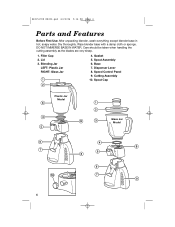
Care should be taken when handling the cutting assembly as the blades are very sharp. 1. Filler Cap 2. Gasket 5. Speed Control Panel 9. Dry thoroughly. Dispenser Lever 8. Spout Cap Plastic Jar Model Glass Jar Model 4 Base 7. Lid 3. Blending Jar LEFT: Plastic Jar RIGHT: Glass Jar 4. Cutting Assembly 10. Wipe blender base with a damp cloth or sponge. 840153700 ENv02.qxd 6/22/06 5:16 PM Page 4 Parts and Features Before First Use: After unpacking blender, wash everything except blender base in hot, soapy water. DO NOT IMMERSE BASE IN WATER. Spout Assembly 6.
Care should be taken when handling the cutting assembly as the blades are very sharp. 1. Filler Cap 2. Gasket 5. Speed Control Panel 9. Dry thoroughly. Dispenser Lever 8. Spout Cap Plastic Jar Model Glass Jar Model 4 Base 7. Lid 3. Blending Jar LEFT: Plastic Jar RIGHT: Glass Jar 4. Cutting Assembly 10. Wipe blender base with a damp cloth or sponge. 840153700 ENv02.qxd 6/22/06 5:16 PM Page 4 Parts and Features Before First Use: After unpacking blender, wash everything except blender base in hot, soapy water. DO NOT IMMERSE BASE IN WATER. Spout Assembly 6.
Use & Care
Page 9
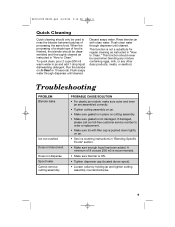
...Specific Foods" section. • Make sure enough liquid has been added. Does not blend well. PROBABLE CAUSE/SOLUTION • For plastic jar models, make sure outer and inner jar are assembled correctly. • Tighten cutting assembly on jar. • Make sure gasket is pushed down ...dairy products, meats, or seafood. When the processing of a single type of 8 ounces (250 ml) is recommended. • Make sure blender is finished, the blender should be disassembled and thoroughly cleaned as instructed in jar and add 1 drop liquid dishwashing detergent. To quick clean, pour 2 cups (500...
...Specific Foods" section. • Make sure enough liquid has been added. Does not blend well. PROBABLE CAUSE/SOLUTION • For plastic jar models, make sure outer and inner jar are assembled correctly. • Tighten cutting assembly on jar. • Make sure gasket is pushed down ...dairy products, meats, or seafood. When the processing of a single type of 8 ounces (250 ml) is recommended. • Make sure blender is finished, the blender should be disassembled and thoroughly cleaned as instructed in jar and add 1 drop liquid dishwashing detergent. To quick clean, pour 2 cups (500...
Use & Care
Page 12
MODEL TYPE SERIES This warranty applies to you. This warranty gives you specific legal rights, and you may also have other legal rights which may not apply to products purchased in material and workmanship for a period of three (3) years for Hamilton Beach products or one hundred eighty (180)...proctorsilex.com KEEP THESE NUMBERS FOR FUTURE REFERENCE! 12 During this period, we will help us answer your blender, call our CUSTOMER SERVICE NUMBER. (For faster service please have model, series, and type numbers ready for commercial purposes, or any use not in that information below ....
MODEL TYPE SERIES This warranty applies to you. This warranty gives you specific legal rights, and you may also have other legal rights which may not apply to products purchased in material and workmanship for a period of three (3) years for Hamilton Beach products or one hundred eighty (180)...proctorsilex.com KEEP THESE NUMBERS FOR FUTURE REFERENCE! 12 During this period, we will help us answer your blender, call our CUSTOMER SERVICE NUMBER. (For faster service please have model, series, and type numbers ready for commercial purposes, or any use not in that information below ....

