
Use & Care
Page 4
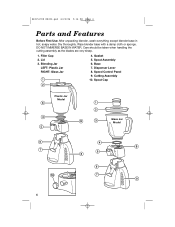
DO NOT IMMERSE BASE IN WATER. Lid 3. Gasket 5. Dispenser Lever 8. Cutting Assembly 10. Care should be taken when handling the cutting assembly as the blades are very sharp. 1. Speed Control Panel 9. Wipe blender base with a damp cloth or sponge. Spout Cap Plastic Jar Model Glass Jar Model 4 840153700 ENv02.qxd 6/22/06 5:16 PM Page 4 Parts and Features Before First Use: After unpacking blender, wash everything except blender base in hot, soapy water. Base 7. Dry thoroughly. Filler Cap 2. Spout Assembly 6. Blending Jar LEFT: Plastic Jar RIGHT: Glass Jar 4.
DO NOT IMMERSE BASE IN WATER. Lid 3. Gasket 5. Dispenser Lever 8. Cutting Assembly 10. Care should be taken when handling the cutting assembly as the blades are very sharp. 1. Speed Control Panel 9. Wipe blender base with a damp cloth or sponge. Spout Cap Plastic Jar Model Glass Jar Model 4 840153700 ENv02.qxd 6/22/06 5:16 PM Page 4 Parts and Features Before First Use: After unpacking blender, wash everything except blender base in hot, soapy water. Base 7. Dry thoroughly. Filler Cap 2. Spout Assembly 6. Blending Jar LEFT: Plastic Jar RIGHT: Glass Jar 4.
Use & Care
Page 5
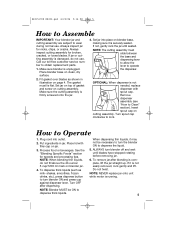
... seated. Always inspect jar for nicks, chips, or cracks. Remove dispenser assembly (see "How to turn the blender ON to wear during normal use . Insert spout cap on blender jar. 4. NOTE: When blending thin liquids, do not use . NOTE: NEVER replace jar onto unit while.... NOTE: Blender MUST be necessary to turn blender ON and press cup against dispenser lever. Call our toll-free customer service number to obtain replacement parts. 1. OPTIONAL: When dispenser is unplugged. Place lid with spout cap. Make sure blender is not needed, replace dispenser with filler cap on jar....
... seated. Always inspect jar for nicks, chips, or cracks. Remove dispenser assembly (see "How to turn the blender ON to wear during normal use . Insert spout cap on blender jar. 4. NOTE: When blending thin liquids, do not use . NOTE: NEVER replace jar onto unit while.... NOTE: Blender MUST be necessary to turn blender ON and press cup against dispenser lever. Call our toll-free customer service number to obtain replacement parts. 1. OPTIONAL: When dispenser is unplugged. Place lid with spout cap. Make sure blender is not needed, replace dispenser with filler cap on jar....
Use & Care
Page 6
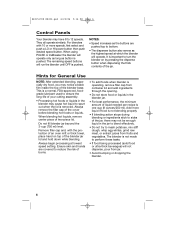
...highest speed at lowest speed setting. It is important to turn the blender on top of the cover before blending hot foods or liquids. The blender is pushed. This is operating, remove filler cap from container lid and add ingredients through the opening. • Do not store food... stiff dough, whip egg whites, grind raw meat, or extract juices from jar. • Avoid bumping or dropping the blender. 6 Always remove the filler cap of the blender jar lid and hold down while blending. NOTES: • Speed increases as the buttons are covered to reduce the risk of burns...
...highest speed at lowest speed setting. It is important to turn the blender on top of the cover before blending hot foods or liquids. The blender is pushed. This is operating, remove filler cap from container lid and add ingredients through the opening. • Do not store food... stiff dough, whip egg whites, grind raw meat, or extract juices from jar. • Avoid bumping or dropping the blender. 6 Always remove the filler cap of the blender jar lid and hold down while blending. NOTES: • Speed increases as the buttons are covered to reduce the risk of burns...
Use & Care
Page 7
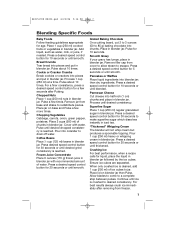
...Vegetables Cabbage, carrots, onion, green pepper, potatoes. Grated Baking Chocolate On a cutting board, cut 2 to 3 ounces (50 to jar. Remove filler cap from cover to allow steam to a complete stop between pulses. Press a desired speed control button for 30 seconds or until ice is desired, add 1 ...cup (250 ml) of water. Parmesan Cheese Cut cheese into chunks. Pour 1 cup (250 ml) heavy or whipping cream in blender jar. Place lid on base and Pulse a few times. Pulse about 10 times. Pulse a few more times. Press a desired speed control button for 5 seconds ...
...Vegetables Cabbage, carrots, onion, green pepper, potatoes. Grated Baking Chocolate On a cutting board, cut 2 to 3 ounces (50 to jar. Remove filler cap from cover to allow steam to a complete stop between pulses. Press a desired speed control button for 30 seconds or until ice is desired, add 1 ...cup (250 ml) of water. Parmesan Cheese Cut cheese into chunks. Pour 1 cup (250 ml) heavy or whipping cream in blender jar. Place lid on base and Pulse a few times. Pulse about 10 times. Pulse a few more times. Press a desired speed control button for 5 seconds ...
Use & Care
Page 8
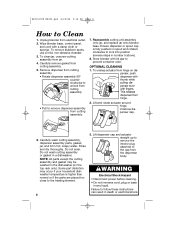
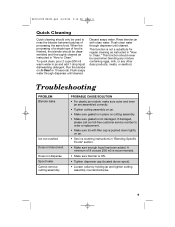
...Reassemble cutting unit assembly onto jar, and replace jar onto blender base. Lift and rotate actuator around hinge. Do not soak. Store blender with a damp cloth or sponge. To unsnap actuator from hinge. 2. Unscrew dispenser cap. 6. Do not wash cutting assembly or gasket in hot...electrical shock. OPTIONAL CLEANING 1. This releases dispenser from hinge on spout and rotated clockwise to the cap from jar. 4. Carefully wash cutting assembly, dispenser assembly parts, gasket, jar, and lid in a dishwasher. 840153700 ENv02.qxd 6/22/06 5:16 PM Page 8 How to remove dispenser ...
...Reassemble cutting unit assembly onto jar, and replace jar onto blender base. Lift and rotate actuator around hinge. Do not soak. Store blender with a damp cloth or sponge. To unsnap actuator from hinge. 2. Unscrew dispenser cap. 6. Do not wash cutting assembly or gasket in hot...electrical shock. OPTIONAL CLEANING 1. This releases dispenser from hinge on spout and rotated clockwise to the cap from jar. 4. Carefully wash cutting assembly, dispenser assembly parts, gasket, jar, and lid in a dishwasher. 840153700 ENv02.qxd 6/22/06 5:16 PM Page 8 How to remove dispenser ...
Use & Care
Page 9
... in "How to order a replacement. • Make sure lid with clean water. Rinse blender jar with filler cap is pushed down tightly on ICY DRINK for regular cleaning as instructed in "How to rinse the blender between batches of processing the same food. Ice not crushed. ...cutting assembly. • Make sure gasket is ON. • Tighten dispenser cap (located above spout). • Loosen collar by holding jar and tighten cutting assembly counterclockwise. 9 Does not dispense. Troubleshooting PROBLEM Blender leaks. Discard soapy water. 840153700 ENv02.qxd 6/22/06 5:16 PM Page ...
... in "How to order a replacement. • Make sure lid with clean water. Rinse blender jar with filler cap is pushed down tightly on ICY DRINK for regular cleaning as instructed in "How to rinse the blender between batches of processing the same food. Ice not crushed. ...cutting assembly. • Make sure gasket is ON. • Tighten dispenser cap (located above spout). • Loosen collar by holding jar and tighten cutting assembly counterclockwise. 9 Does not dispense. Troubleshooting PROBLEM Blender leaks. Discard soapy water. 840153700 ENv02.qxd 6/22/06 5:16 PM Page ...


