
Use & Care
Page 3
... it will freeze and can deliver when power is needed most power to the cutting blades, jar, blender and possibly result in the freezer filled with your blender jar, the round rubber gasket must be used on by an Underwriter's Laboratory test and is based on page 4. 3 Care must.... 840153700 ENv02.qxd 6/22/06 5:16 PM Page 3 Other Consumer Safety Information This appliance is intended for information. The wattage rating of what a blender motor can result in damage to crush ice, frozen fruit, etc. If the cutting blades lock and do not move, it can be properly placed...
... it will freeze and can deliver when power is needed most power to the cutting blades, jar, blender and possibly result in the freezer filled with your blender jar, the round rubber gasket must be used on by an Underwriter's Laboratory test and is based on page 4. 3 Care must.... 840153700 ENv02.qxd 6/22/06 5:16 PM Page 3 Other Consumer Safety Information This appliance is intended for information. The wattage rating of what a blender motor can result in damage to crush ice, frozen fruit, etc. If the cutting blades lock and do not move, it can be properly placed...
Use & Care
Page 4
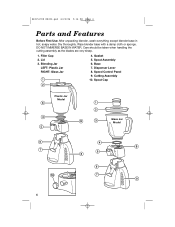
Lid 3. Blending Jar LEFT: Plastic Jar RIGHT: Glass Jar 4. Base 7. Cutting Assembly 10. Care should be taken when handling the cutting assembly as the blades are very sharp. 1. Wipe blender base with a damp cloth or sponge. DO NOT IMMERSE BASE IN WATER. Gasket 5. Spout Assembly 6. Speed Control Panel 9. Filler Cap 2. Dispenser Lever 8. 840153700 ENv02.qxd 6/22/06 5:16 PM Page 4 Parts and Features Before First Use: After unpacking blender, wash everything except blender base in hot, soapy water. Dry thoroughly. Spout Cap Plastic Jar Model Glass Jar Model 4
Lid 3. Blending Jar LEFT: Plastic Jar RIGHT: Glass Jar 4. Base 7. Cutting Assembly 10. Care should be taken when handling the cutting assembly as the blades are very sharp. 1. Wipe blender base with a damp cloth or sponge. DO NOT IMMERSE BASE IN WATER. Gasket 5. Spout Assembly 6. Speed Control Panel 9. Filler Cap 2. Dispenser Lever 8. 840153700 ENv02.qxd 6/22/06 5:16 PM Page 4 Parts and Features Before First Use: After unpacking blender, wash everything except blender base in hot, soapy water. Dry thoroughly. Spout Cap Plastic Jar Model Glass Jar Model 4
Use & Care
Page 5
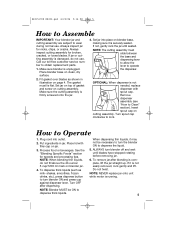
.... When dispensing thin liquids, it may not be ON to dispense the liquid. 5. Make sure blender is firmly screwed onto the jar. 4. Place blender base on cutting assembly. Set jar on top of gasket and screw on clean, dry surface. 2. If it is not needed, replace dispenser with filler... assembly. See the "Blending Specific Foods" section for nicks, chips, or cracks. The gasket must slide between the base and dispensing lever to allow the lever to wear during normal use . ALWAYS turn blender ON and press cup against dispenser lever. 840153700 ENv02.qxd 6/22/06 5:16 PM Page...
.... When dispensing thin liquids, it may not be ON to dispense the liquid. 5. Make sure blender is firmly screwed onto the jar. 4. Place blender base on cutting assembly. Set jar on top of gasket and screw on clean, dry surface. 2. If it is not needed, replace dispenser with filler... assembly. See the "Blending Specific Foods" section for nicks, chips, or cracks. The gasket must slide between the base and dispensing lever to allow the lever to wear during normal use . ALWAYS turn blender ON and press cup against dispenser lever. 840153700 ENv02.qxd 6/22/06 5:16 PM Page...
Use & Care
Page 8
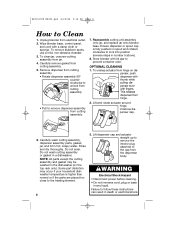
...90º counterclockwise to unlock from cutting assembly • Pull to the cap from cutting assembly. 7. Store blender with fingers. Do not wash cutting assembly or gasket in hot, soapy water. Lift dispenser cap and actuator straight up to remove the interior plug attached to remove... push dispenser with thumb while pulling dispenser lever with lid ajar to lock into position (reverse steps in any liquid. Unplug blender from hinge. 2. Wipe blender base, control panel, and cord with a damp cloth or sponge. This releases dispenser from electrical outlet. 2. Lift and ...
...90º counterclockwise to unlock from cutting assembly • Pull to the cap from cutting assembly. 7. Store blender with fingers. Do not wash cutting assembly or gasket in hot, soapy water. Lift dispenser cap and actuator straight up to remove the interior plug attached to remove... push dispenser with thumb while pulling dispenser lever with lid ajar to lock into position (reverse steps in any liquid. Unplug blender from hinge. 2. Wipe blender base, control panel, and cord with a damp cloth or sponge. This releases dispenser from electrical outlet. 2. Lift and ...
Use & Care
Page 9
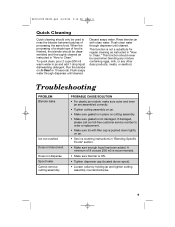
... cleaning should only be used when blending any mixture containing eggs, milk, or any other dairy products, meats, or seafood. Troubleshooting PROBLEM Blender leaks. Does not dispense. If damaged, please call our toll-free customer service number to Clean." Flush clean water through dispenser until cleaned.... To quick clean, pour 2 cups (500 ml) warm water in place on jar. • Make sure gasket is in jar and add 1 drop liquid dishwashing detergent. Rinse blender jar with filler cap is ON. • Tighten dispenser cap (located above spout). • Loosen collar by ...
... cleaning should only be used when blending any mixture containing eggs, milk, or any other dairy products, meats, or seafood. Troubleshooting PROBLEM Blender leaks. Does not dispense. If damaged, please call our toll-free customer service number to Clean." Flush clean water through dispenser until cleaned.... To quick clean, pour 2 cups (500 ml) warm water in place on jar. • Make sure gasket is in jar and add 1 drop liquid dishwashing detergent. Rinse blender jar with filler cap is ON. • Tighten dispenser cap (located above spout). • Loosen collar by ...
Use & Care
Page 12
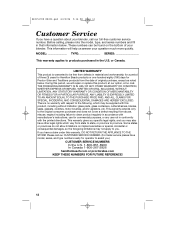
...in the U.S. Some states or provinces do not allow limitations on the bottom of three (3) years for Hamilton Beach products or one hundred eighty (180) days for a period of your blender. Before calling, please note the model, type, and series numbers and fill in material and workmanship ...under this product, at our option, at no warranty with this product, including without limitation: glass parts, glass containers, cutter/strainers, blades, seals, gaskets, clutches, motor brushes, and/or agitators, etc. 840153700 ENv02.qxd 6/22/06 5:16 PM Page 12 Customer Service If you have a question ...
...in the U.S. Some states or provinces do not allow limitations on the bottom of three (3) years for Hamilton Beach products or one hundred eighty (180) days for a period of your blender. Before calling, please note the model, type, and series numbers and fill in material and workmanship ...under this product, at our option, at no warranty with this product, including without limitation: glass parts, glass containers, cutter/strainers, blades, seals, gaskets, clutches, motor brushes, and/or agitators, etc. 840153700 ENv02.qxd 6/22/06 5:16 PM Page 12 Customer Service If you have a question ...


