
Use & Care
Page 2
...jar while blending to blender. especially when assembling, disassembling or cleaning inside blender jar. 12. Always operate blender with a damaged cord or plug, or after the appliance malfunctions, or is switched ON, switch OFF immediately and tighten jar in place. 16. Keep hands and other . If the jar should turn the control to replace...or taking off parts, and before putting on by Hamilton Beach/Proctor-Silex, Inc. Care must be used. The use only. may cause a risk of electrical shock. handle carefully- Do not fill blender jar beyond the 3-cup (750 ml) level. Always ...
...jar while blending to blender. especially when assembling, disassembling or cleaning inside blender jar. 12. Always operate blender with a damaged cord or plug, or after the appliance malfunctions, or is switched ON, switch OFF immediately and tighten jar in place. 16. Keep hands and other . If the jar should turn the control to replace...or taking off parts, and before putting on by Hamilton Beach/Proctor-Silex, Inc. Care must be used. The use only. may cause a risk of electrical shock. handle carefully- Do not fill blender jar beyond the 3-cup (750 ml) level. Always ...
Use & Care
Page 3
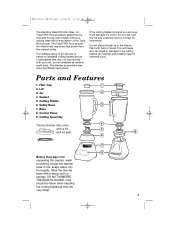
... Type B33 blender. The blender as replacement parts. Do not place blender jar in the freezer filled with a lid and lid seal. Filler Cap 2. Cutting Blades 6. Cutting Assembly *Some blender lids come with food or liquid. Before First Use: After unpacking the blender, wash everything except the blender base in personal... cutting blades lock and do not move, it will freeze and can result in damage to the cutting blades, jar, blender and possibly result in hot, soapy water. This will damage the motor. 840133000 ENv02.qxd 2/24/05 10:50 AM Page 3 The Hamilton Beach/Proctor-Silex, Inc.
... Type B33 blender. The blender as replacement parts. Do not place blender jar in the freezer filled with a lid and lid seal. Filler Cap 2. Cutting Blades 6. Cutting Assembly *Some blender lids come with food or liquid. Before First Use: After unpacking the blender, wash everything except the blender base in personal... cutting blades lock and do not move, it will freeze and can result in damage to the cutting blades, jar, blender and possibly result in hot, soapy water. This will damage the motor. 840133000 ENv02.qxd 2/24/05 10:50 AM Page 3 The Hamilton Beach/Proctor-Silex, Inc.
Use & Care
Page 4
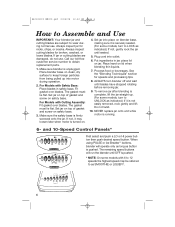
..., dry surface to keep foreign particles from being pulled up . (For some models, turn blender off and wait until blades have stopped rotating before removing jar. 9. Plug cord into motor during normal use . NEVER replace jar onto unit while motor is pushed. The gasket must lie flat. If not, it may... be referred to obtain replacement parts. 1. The gasket must lie flat. Set jar into place on blender base, making sure it is turned on safety base. To remove jar after blending is securely seated. (For some models with 6 to 12 speeds the...
..., dry surface to keep foreign particles from being pulled up . (For some models, turn blender off and wait until blades have stopped rotating before removing jar. 9. Plug cord into motor during normal use . NEVER replace jar onto unit while motor is pushed. The gasket must lie flat. If not, it may... be referred to obtain replacement parts. 1. The gasket must lie flat. Set jar into place on blender base, making sure it is turned on safety base. To remove jar after blending is securely seated. (For some models with 6 to 12 speeds the...
Use & Care
Page 8
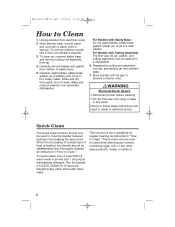
... use a mild, non-abrasive cleanser. 3. Rinse and dry thoroughly. Glass jars may be disassembled and thoroughly cleaned as instructed in "How to Clean 1. Reassemble cutting unit assembly onto jar, and replace jar onto blender base. 7. Quick Clean The Quick Clean function should only be used when blending... with Safety Base: Do not wash blades, safety base, gasket, plastic jar, or lid in death or electrical shock. To clean jar, unscrew safety base and remove cutting unit assembly from jar. 4. Store blender with lid ajar to follow these instructions can result in a dishwasher. For...
... use a mild, non-abrasive cleanser. 3. Rinse and dry thoroughly. Glass jars may be disassembled and thoroughly cleaned as instructed in "How to Clean 1. Reassemble cutting unit assembly onto jar, and replace jar onto blender base. 7. Quick Clean The Quick Clean function should only be used when blending... with Safety Base: Do not wash blades, safety base, gasket, plastic jar, or lid in death or electrical shock. To clean jar, unscrew safety base and remove cutting unit assembly from jar. 4. Store blender with lid ajar to follow these instructions can result in a dishwasher. For...


