Use & Care
Page 2
...SAFEGUARDS When using electrical appliances, basic safety precautions should turn the control to OFF. handle carefully-especially when assembling, disassembling or cleaning inside blender jar. 12. Start blending at lowest speed. 17. To disconnect cord, turn when the motor is not running. 11. Avoid ... or after appliance malfunctions, or is operating. 21. Hot liquids may cause a risk of fire, electric shock, and/or injury to the blender. Injury can result if moving parts. 6. Then remove plug from wall outlet. 22. SAVE THESE INSTRUCTIONS! 2 To protect against risk of...
...SAFEGUARDS When using electrical appliances, basic safety precautions should turn the control to OFF. handle carefully-especially when assembling, disassembling or cleaning inside blender jar. 12. Start blending at lowest speed. 17. To disconnect cord, turn when the motor is not running. 11. Avoid ... or after appliance malfunctions, or is operating. 21. Hot liquids may cause a risk of fire, electric shock, and/or injury to the blender. Injury can result if moving parts. 6. Then remove plug from wall outlet. 22. SAVE THESE INSTRUCTIONS! 2 To protect against risk of...
Use & Care
Page 3
... appliance is intended for food or liquids only. Use for household use . Call the toll-free customer service number for information. This is when a blender requires the most . This is based on by an Underwriter's Laboratory test. WARNING! Shock Hazard: This appliance has a polarized plug (one way into... a polarized outlet. If the plug does not fit, reverse the plug. Do not place blender jar in , or tripping over the countertop or tabletop where it will damage the motor. If cutting blades lock and do not move, it still...
... appliance is intended for food or liquids only. Use for household use . Call the toll-free customer service number for information. This is when a blender requires the most . This is based on by an Underwriter's Laboratory test. WARNING! Shock Hazard: This appliance has a polarized plug (one way into... a polarized outlet. If the plug does not fit, reverse the plug. Do not place blender jar in , or tripping over the countertop or tabletop where it will damage the motor. If cutting blades lock and do not move, it still...
Use & Care
Page 4
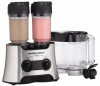
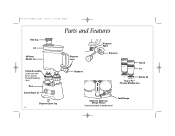
840171704 ENnv01.qxd 7/8/08 2:14 PM Page 4 Filler Cap Lid 80-Ounce Blender Jar Cutting Assemblies (to be used with 80-oz Jar and Personal Blending Jars) Base Control Knobs (2) Dispenser Spout Cap 4 Parts and Features Dispenser Lever Dispenser Dispenser Spout Dispenser Top Lid Jar Bottom Lid Stay or Go™ Personal Blending Jars Dispenser Spout Cap Storage Feature (stored on bottom of blender base) Cord Storage
840171704 ENnv01.qxd 7/8/08 2:14 PM Page 4 Filler Cap Lid 80-Ounce Blender Jar Cutting Assemblies (to be used with 80-oz Jar and Personal Blending Jars) Base Control Knobs (2) Dispenser Spout Cap 4 Parts and Features Dispenser Lever Dispenser Dispenser Spout Dispenser Top Lid Jar Bottom Lid Stay or Go™ Personal Blending Jars Dispenser Spout Cap Storage Feature (stored on bottom of blender base) Cord Storage
Use & Care
Page 5
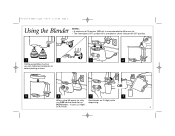
840171704 ENnv01.qxd 7/8/08 2:14 PM Page 5 Using the Blender NOTES: • A minimum of 16 ounces (500 ml) is recommended for 80-ounce jar. • The international OFF symbol (O) is provided to clearly indicate the OFF position. 1 2 3 4 Cutting assemblies must be securely tightened to run dispensing. BOTH blades: 1 (Low), 2 (High), or P (Pulse). 5 OR 5 6 7 7 When using 80-ounce jar, only Run blender on 2 (High) while use ONE control knob to blender jar before placing on base.
840171704 ENnv01.qxd 7/8/08 2:14 PM Page 5 Using the Blender NOTES: • A minimum of 16 ounces (500 ml) is recommended for 80-ounce jar. • The international OFF symbol (O) is provided to clearly indicate the OFF position. 1 2 3 4 Cutting assemblies must be securely tightened to run dispensing. BOTH blades: 1 (Low), 2 (High), or P (Pulse). 5 OR 5 6 7 7 When using 80-ounce jar, only Run blender on 2 (High) while use ONE control knob to blender jar before placing on base.
Use & Care
Page 8
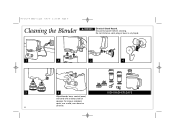
Disconnect power before cleaning. To remove stubborn spots, use a mild, non-abrasive cleanser. 8 Do not immerse cord, plug or base in any liquid. 1 2 3 4 5 6 DISHWASHER SAFE Wipe blender base, control panel, and cord with a damp cloth or sponge. 840171704 ENnv01.qxd 7/8/08 2:14 PM Page 8 Cleaning the Blender w WARNING Electrical Shock Hazard.
Disconnect power before cleaning. To remove stubborn spots, use a mild, non-abrasive cleanser. 8 Do not immerse cord, plug or base in any liquid. 1 2 3 4 5 6 DISHWASHER SAFE Wipe blender base, control panel, and cord with a damp cloth or sponge. 840171704 ENnv01.qxd 7/8/08 2:14 PM Page 8 Cleaning the Blender w WARNING Electrical Shock Hazard.
Use & Care
Page 9
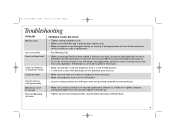
...Jar leaks. • Make sure cutting assemblies are in the UP position. • Loosen cutting assembly by holding jar and turning cutting assembly counterclockwise. Blender jar won't fit on jar. • Make sure gasket is blended to order a replacement. • See Blending Tips. • Make sure... stiff dough, whip egg whites, grind raw meat, or extract juices from jar. • Make sure seal rings are securely tightened to blender jar. • Tighten top lid and cutting assembly securely before placing on dispenser lever and spout. • Make sure dispenser lever is pushed...
...Jar leaks. • Make sure cutting assemblies are in the UP position. • Loosen cutting assembly by holding jar and turning cutting assembly counterclockwise. Blender jar won't fit on jar. • Make sure gasket is blended to order a replacement. • See Blending Tips. • Make sure... stiff dough, whip egg whites, grind raw meat, or extract juices from jar. • Make sure seal rings are securely tightened to blender jar. • Tighten top lid and cutting assembly securely before placing on dispenser lever and spout. • Make sure dispenser lever is pushed...
Use & Care
Page 10
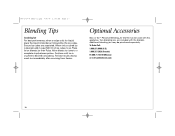
... ENnv01.qxd 7/8/08 2:14 PM Page 10 Blending Tips Crushing Ice For best performance, when a recipe calls for liquid, place the liquid in blender jar followed by the ice cubes. Allow blades to come to a complete stop between pulses. Optional Accessories Stay or Go™ Personal Blending Jar... (AC16) may be used with the blender. Two blending jars are separated. For best results always crush ice immediately after removing from freezer. Ensure ice cubes are included with this appliance....
... ENnv01.qxd 7/8/08 2:14 PM Page 10 Blending Tips Crushing Ice For best performance, when a recipe calls for liquid, place the liquid in blender jar followed by the ice cubes. Allow blades to come to a complete stop between pulses. Optional Accessories Stay or Go™ Personal Blending Jar... (AC16) may be used with the blender. Two blending jars are separated. For best results always crush ice immediately after removing from freezer. Ensure ice cubes are included with this appliance....


